I ran across this recipe in Castsugar's blog -- my mom is a fan of gingerbread so I had originally planned on making it for her birthday. I wound up doing a "test batch" for the bake sale, and WOW. This is possibly one of the better things that has come out of my kitchen.
It literally warms your throat when you eat it, but isn't sharp or spicy like so many recipes that call for chili powder. You can taste each ingredient when you take a bite, which is rare for recipes that call for so many complex flavors in one dish. I was skeptical of Castsugar's raves about this cake but I'm a true believer now. If you bake nothing else from this blog, try this recipe. It will blow you away. This one is going in the green box -- the old tin box where all of my great grandmother's favorite recipes are kept. This is where I turn when I need something utterly original and delicious that no one was expecting but everyone loves. You simply gotta try it!
1 1/2 sticks unsalted butter
1 c. plus 2 Tbsp. dark brown sugar
2 Tbsp. white sugar
3/4 c. light syrup
3/4 c. molasses
1 1/2 tsp apple pie spice
2 1/2 tsp. ground ginger
1 1/2 tsp. chili powder
1 1/4 tsp. baking soda
2 tbsp warm water
2 eggs
1 c. milk
2 c. all-purpose flour
1/3 c. unsweetened cocoa
6 oz. semisweet chocolate chunks
Preheat the oven to 325 and line 3 loaf pans with tin foil.
Meld the sugars, syrups, and butter together over medium-low heat in a large saucepan. Add your spices and allow to cool very slightly.
Combine the milk and eggs together. Mix the water with the baking soda and add to the egg mixture. Add the syrup mixture and stir well. Finish by adding the flour and cocoa. Finish by adding the chocolate chunks.
Pour into loaf pans and bake for 45 minutes. This will still appear liquidy on top; allow it to cool completely, as this creates a very moist cake. I find that this is just as good, if not better after a day or two of maturation time. You could add a glaze or frosting, but I find it to be perfect plain.
Tuesday, June 24, 2008
Cherry Cheesecake Brownies
I had been looking forward to making these ever since I found the recipe -- cheesecake, cherry, AND brownie?! All of my favorite things! While these did turn out well and I'm sure would be a hit at any bake sale or party, it seemed that it was almost too much of a good thing. There were so many flavors going on that none of them could really sing; I would have preferred the cheesecake and cherries over a plain ol' chocolate crumb crust. But these are worth a try!
Cheesecake:
16 oz cream cheese
1/2c sugar
1 egg
1 tsp vanilla
Brownie:
1c unsalted butter
6 oz baking chocolate
2c sugar
1 tsp vanilla
3/4tsp salt
4 eggs
1 1/4c AP flour
21 oz. cherry pie filling + 1 tsp lemon juice
Preheat the oven to 350, and grease a 9 x 13 baking pan.
Melt the baking chocolate in a double broiler. Cream together the butter and sugar for the brownie layer, then add the eggs. Add the vanilla and melted chocolate and mix well. Stir in flour and salt and pour into the baking pan.
For the cheesecake layer, beat all ingredients together until smooth. Drop it by the tablespoon over the brownie layer, and follow by dropping tablespoons of the cherry mixture over it. Use a butter knife to swirl the layers, but do not mix them together. Bake for 45-50 minutes or until the edges of the brownie begin to pull away and the edges of the cheesecake begin to turn slightly brown. Keep in mind that this brownie will still seem gooey when you first take it out of the oven, let it cool completely and chill for at least 4 hours (I let mine go overnight and am glad I did). Try serving these in cupcake liners, they're super gooey!
No-Bake White Chocolate Key Lime Cheesecake
How's THAT for a title? These bars are surprisingly simple to make and require zero oven time. Since I had all burners blazing at the time, this was a relief. This is another gem from Castsugar, although she calls them bars I consider this a cheesecake. They're perfect for summer and I would imagine they'd be the first thing to go had the bake sale not been rained out. You must try these for your next barbeque or summer celebration!
Crust:
30 Oreo cookies
2 oz white chocolate
Filling:
6 oz white chocolate
1 pint whipping cream
8 oz cream cheese
3 tbsp sugar
3 tbsp lime juice
2 tbsp key lime zest
1/3c confectioners sugar
I recommend using an aluminum cake pan instead of a traditional one for this recipe. If you don't have access to this, line a 8x8 pan with foil.
Melt all the white chocolate in a double broiler. Crush your oreos by hand or in a food processor, and combine them with 2-4 tbsp of the melted chocolate. Press into the bottom of the pan to form a crust.
Beat 1/2c whipping cream until peaks begin to form. Add cream cheese, lime, zest and sugar to a separate bowl, and beat well. Beat in remaining white chocolate. Fold in gently with the whipped cream and spread mixture over the crust. In a clean bowl, pour the remaining whipping cream and confectioners sugar and beat with an electric mixer until fluffy. Make sure to not overbeat or you'll wind up with sweetened butter! Spread the whipping cream over the lime layer, and voila! No bake cheesecake! Allow it to chill for at least 2 hours before serving.
Peanut Butter and Jelly Bars
For the last week I've been working on a major bake sale, so I'd been keeping my eyes out for anything unique to contribute. I found that I need not go any further than Castsugar. True to form, these peanut butter and jelly bars are different from anything I could have found in my current collection of cookbooks. It's a very rich shortbread crust with a smear of jelly in the center; imagine a PB&J sandwich cookie, only as a brownie.
I made a few changes to the recipe, but these are still very rich and very sweet. I couldn't eat a whole bar by myself, which speaks a lot after all the spicy chocolate gingerbread I've scarfed! But more on that later. I used more peanut butter and less real butter, I also used the chunky variety. Instead of full octane jam I used a reduced sugar version. I would not recommend using anything containing a sugar substitute though; aside from messing up the perfect taste, the lack of real sugars would prevent the jelly from setting. Anyways, here's my recipe, with pics soon to come:
1 1/2 sticks unsalted butter
1 1/2c sugar
1 1/2 tsp vanilla extract
2 large eggs
2 1/4c chunky peanut butter
3c AP flour
1 tsp baking powder
1 1/2 tsp kosher salt
18 oz jam (I used blackberry)
Preheat the oven to 350, and grease a 9 x 13 pan.
Cream together the sugar, butter and PB. Add eggs one at a time, then add vanilla. Add the flour, baking powder and salt in small additions, mixing well in between. You should be left with a crumbly but malleable dough. Spread 2/3 of it on the bottom of the pan.
Spread the jam on top of the first layer. Sprinkle the rest of the crumbles on top, taking care to not mix them with the jam too much. Bake for 45 minutes. Allow it to cool completely before cutting into chunks, otherwise you'll get a gooey mess instead of a bar. Enjoy!
Monday, June 2, 2008
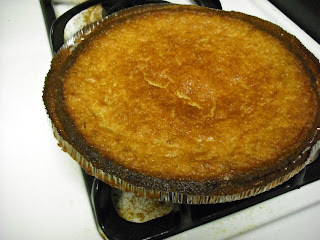
Buttermilk Pie

This is a classic Southern recipe for buttermilk pie. Most people who haven't tasted it before will give you strange looks when you combine the words "buttermilk" and "pie". It's actually quite delicious and goes over well especially on holidays.
This recipe comes from Natalie Moore at NPR. Growing up, one of my neighborhood friends' mothers made this and Natalie's recipe comes the closest to hers (although that South Carolina touch can't be replicated). There are many variations of this recipe; it's similar to chess pie, creme brulee and a South African dish called "melktert".
I used a chocolate graham cracker crust since I couldn't find regular pie crust. After my adventure with the apple pie, I wasn't quite ready to dive back into those waters. While the graham crust made it really interesting, it was a bit sweet. I'm posting the reduced-sugar version of the filling for that reason. Also remember to let this pie cool for at least twenty or thirty minutes before serving, it gets VERY HOT!
Buttermilk Pie:
1 graham pie crust
4 eggs
1c sugar
2 tbsp flour
1/2c melted butter
1 1/2c buttermilk
1tsp vanilla extract (I tend to go heavy on this, so you can use up to 1 tbsp)
Beat the eggs with sugar. Add flour and beat well. Add buttermilk and vanilla. The filling will be liquidy, so carefully pour it into the crust and load it into the oven. Bake at 400 for the first 10 minutes and reduce to 325 for 50 more minutes.
Allow to cool, serve either slightly warm or at room temperature.
Ugly Apple Pie

No pain, no gain, right? This pie was definitely one of the worst aesthetic disasters to come out of my kitchen in a long time ;] However, I think you have to know just as much about what doesn't work as you know what does to be a successful cook. Besides, the thing TASTED great! I present, for your viewing pleasure, how to make a very ugly but very tasty apple pie.
Crust:
2c flour (I used cake flour)
1tsp salt
1tbsp sugar
6tbsp butter
6tbsp shortening
6-8tbsp very cold water
Filling:
5 tart apples, peeled and chopped
1c sugar
2tbsp flour
1tbsp cinnamon
1/2tsp clove powder
1/4tsp salt
2tbsp vinegar
1tbsp lemon juice
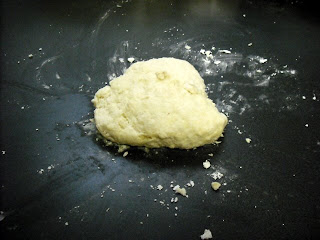
Combine the dry ingredients for the crust in a large bowl. You're supposed to use a pastry cutter to combine the butter and shortening, which I didn't do. I used the whisk on my countertop mixer -- instead of the crumbly, dry mixture you want for a pie crust, I wound up with a creamy schmaltzy yellow mixture. Either way, let it chill in the fridge for 10-45 minutes.
As you're working on the crust, if your apples are pre-sliced and peeled, let them rest in water combined with the lemon juice so they don't discolor. Drain them when the time comes to make filling. Most people don't cook theirs beforehand; I didn't think it was necessary, and I was right. Anywho. Mix the filling ingredients and set aside.
I brought my crust mixture out of the fridge and it was nowhere near wanting to roll out. So I scooped some in my hand and smeared it all around the bottom of the pan and up the sides, about an inch thick. Put the apple filling into the crust. I still had some left over for the top though, so I decided to attempt a streusel. To do a streusel, you pinch sugar and flour into butter until it turns into crumbs. Instead, after about 1/2c of sugar and 1c flour, I wound up with a mixture that was roll-able. I flattened it and draped it over the apple mixture. Bake at 400 degrees for 50-60 minutes.
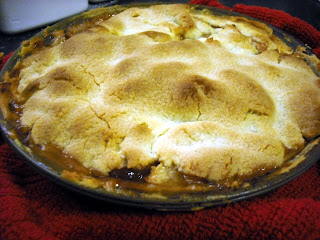
My primary issue was the crust -- while it tasted heavenly and turned out quite nicely when cooked, the bottom layer was way too soft to work with. Definitely combine your crust using a pastry cutter, you want something crumbly that will stick together when rolled out.
The top was a bit too sweet. Since it was basically a sheet of streusel, this is to be expected. Again, this problem can be avoided by making the crust right ;]
Although this pie was delicious, it's incredibly rich. When I come by a recipe that works and has that magic to it I'll make sure to post it. Otherwise, I'll need to find someone who doesn't mind ugly pies to eat the test batch!
Southern Buttermilk Biscuits

These were more of a challenge than you'd think -- mash the dough together, roll it out and bake, right? It turns out there's a big difference between a biscuit (a hard piece of salty bread) and a true Southern buttermilk biscuit. I'd had some buttermilk left over from the pie so I decided to give these a whirl. While they didn't turn out terribly, they definitely could have come out better. For that reason I'm leaving an "improved" recipe and method, along with some helpful information about ingredients.
White Lily flour is touted as the best for making biscuits; it's made from soft winter wheat and has a low protein content. Thanks to Pinch My Salt, I have some good info on different flours and what they do:
The less protein a flour has, the better it is for "quick" breads like biscuits and pizza crusts. A higher protein flour, which also tends to produce more gluten, is better for risen and yeast breads. Hence, bread flour has the most protein while cake flour has the least. I tend to keep cake flour, all purpose flour, self-rising and bread flour in my kitchen along with a little wheat gluten. You can add some of this to all purpose flour to create bread flour, check the box for exact measurements. Long story short, low protein flour creates a light and fluffy bread while high protein flour assists in rising. Here are exact protein percentages:
Cake flours (Swans Down, Softasilk):7.5 to 8.5% proteinBleached southern all-purpose (White Lily, Martha White, Gladiola, Red Band):7.5 to 9.5% protein
National brand self-rising (Gold Medal, Pillsbury):9 to 10% protein
National brand bleached all-purpose (Gold Medal, Pillsbury): 10 to 12% protein
Northern all-purpose (Robin Hood, Hecker’s):11 to 12% protein
Northern unbleached all-purpose (King Arthur):11.7% protein
Bread Flour:11.5 to 12.5% protein
Pinch My Salt suggests using a combination of cake and all purpose flour if you don't have White Lily; this is what I did and it seemed to work.
Pinch My Salt's Buttermilk Biscuits
1-1/4c cake flour
3/4c all-purpose flour
1 1/2tsp baking powder
1/2tsp baking soda
1/2tsp salt
1/4c butter
3/4c buttermilk
Grease a baking sheet and preheat the oven to 450. Combine dry ingredients in a large bowl. Using a dough cutter (a handle with several U-shaped wires), cut the butter into the dry ingredients. It should look like crumbs. Add your buttermilk and shape into a ball.
Knead the dough a few times on a floured surface and roll out. I rolled mine too thin, about 1/2 an inch, I suggest making them about an inch thick. Make sure to coat the surface and rolling pin with flour so there's no sticking. Once your dough is flat, use either a cookie cutter or the top of a drinking glass to cut the biscuits out. Shape the remaining dough into biscuit shapes and place on the cookie sheet. Bake for 10-12 minutes.
Here are a few tips from Salt on how to make the best biscuits:
Make sure your baking powder, baking soda, and/or self-rising flour are fresh!
Start preheating the oven as soon as you start thinking about making the biscuits! You want the oven to be completely preheated before the biscuits go in.
Prepare your ingredients and tools in advance so that once you get started, you can work quickly and efficiently: cut your butter in small pieces and put it back in the fridge, measure out the buttermilk, flour the counter, get out the biscuit cutter and baking sheet.
Use very cold butter, keep it in the fridge until you’re ready for it. Work the butter quickly into the flour so that it doesn’t have a chance to even think about melting!
When you add the buttermilk, stir lightly! This can be done simply with a fork. You just want to get the dough to a point where the flour is all clumped together, not a smooth dough!
Knead lightly and minimally. You aren’t kneading this like bread dough, you are simply finishing the mixing process with your hands. You only want to knead a couple of times to finish dispersing the liquid through the dough. The more you knead, the denser your biscuits will be!
Even if you use self-rising flour in the dough, dust the counter and dough with all-purpose flour. Self-rising flour can give the outside of the biscuits a bitter taste, due to the leavening it contains.
Don’t pat the dough out too thin. If you want high biscuits, don’t roll the dough any thinner than 3/4 - 1 inch.
When cutting biscuits, use a sharp cutter and press straight down and up. Don’t twist! This was the hardest tip for me to adapt. I have always twisted the biscuit cutter. But guess what, it makes a difference!
Place cut biscuits together on the baking sheet so that they are touching. Again, this is something I have never done. But I found that the biscuits do rise well and I really enjoy the texture of the soft-sided biscuits!
Don’t re-roll the scraps. Since it is best to work the dough as little as possible, instead of gathering the scraps, re-rolling and cutting into biscuits, just form the scraps into biscuit shapes by hand. I usually end up with scraps to form two extra biscuits. They might look a little funny, but they rise as well as the others and they taste just as good!
Sunday, June 1, 2008
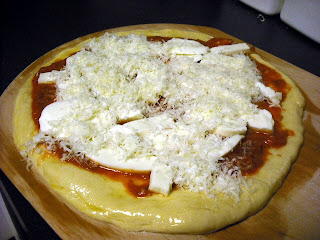
Home Baked Pizza

I made this when I was having a pizza craving but didn't want to order delivery -- it's heavenly with homemade marinara!
3.5c bread flour
1c warm water
2tbsp yeast
1/4c olive oil
1tsp salt
4 oz fresh mozarella
1/2c marinara sauce
1/3c shredded asiago cheese
Combine the warm water and yeast. Add half the olive oil, salt, and flour; let rise for 30 minutes. Preheat oven to 400. Once dough has risen, roll out either by hand or with a pin. Drizzle the rest of the olive oil over the crust and brush thoroughly.
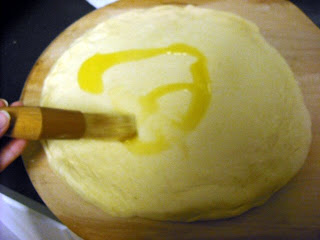
Spoon the marinara onto the crust and top with cheeses (plus other toppings if you want them).
Bake until the crust is browned and the pizza bubbles; this should take around 20 minutes. Allow to cool for a few minutes and slice. 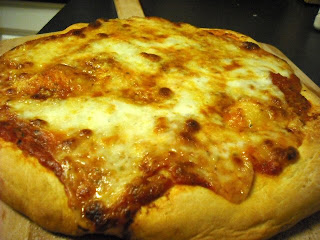
Subscribe to:
Posts (Atom)