Pirozhki are a staple of Russian street food -- whether you're in a cafe, literally walking home from the metro station or at one of the many historic sights, there will be someone selling pirozhki. If I were preparing these for my friends I would use Boca Burger crumbles; if you want to make them authentic style, as my stepdad prefers, use lamb. Don't use beef or you won't get the real flavor.
If you do choose to use Boca crumbles, add 3-4 tbsp of oil to the pan before cooking the crumbles and 1/3 cup of mock chicken or beef broth to the mixture after the onions cook and before the cabbage goes in.
Ingredients for filling:
3/4 lb thawed Boca Burger crumbles or ground lamb
1 onion, finely chopped
2 small cabbages (size of softballs) or 1 large one, finely shredded
3 tbsp salt, or to taste
pepper to taste
1-2 tbsp dried dill
Dough and cooking:
1 packet yeast
1/4 cup warm water
1 cup milk
1 tbsp sugar
2 tsp salt
1/2 cup vegetable oil
4-5 cups all purpose flour
3 eggs
1 quart of oil
To begin, start with the dough. Dissolve the yeast into the water and set aside until frothy, about ten minutes. In this time, take a large skillet or pot and begin to cook the meat aspect. Once cooked, throw in the onions and seasonings. Get back to the dough and whisk in the liquid ingredients. Add the sugar and salt then the dry ingredients. Knead until smooth and elastic and set aside in an oiled bowl in a warm place until doubled in size, about an hour.
Once the dough is kneaded the onions should be thoroughly cooked. Add the cabbage and broth if necessary. Cover and allow to simmer for around half an hour, coming back frequently to stir so one side doesn't get burnt. Once the cabbage is tender, set aside to cool.
Once the filling is cooled the dough should be ready. Set the oil to heat to 375 degrees in a large pot. Flattening small handfuls at a time, wrap the dough around about 2 tablespoons of filling per roll and pinch the ends back together. They will want to pull apart once they hit the hot oil, so make sure you pinch thoroughly and reinforce any weak spots. Set aside on an oiled cookie sheet and repeat until all are done, or the first batch has been resting for approximately ten minutes. Slide them into the oil and cook until light golden brown, remove onto paper towels or another device to drain any excess grease. Repeat until they're all done. As with the pierogies, these can be frozen before frying for later cooking.
These are best served hot and on their own. Enjoy!
Showing posts with label Breads. Show all posts
Showing posts with label Breads. Show all posts
Wednesday, December 30, 2009

Saturday, August 16, 2008
Cheese Bread
Do I even have to say it anymore? Castsugar rescued me in the throes of bake sale-dom yet again. This time with cheese bread -- it's a molten cheddar center encased in sweet fluffy yeast bread. It's also relatively fast. When selling it I suggested that the buyer throw it into a 350 degree oven for 10 or 15 minutes before serving -- this stuff is best hot and fresh! I also omitted the jalapenos from the original recipe, but if you want spicy bread add 2 tbsp of them chopped to the dough.
Cheese Bread:
2c warm water
1/4c sugar
1 packet yeast
1.5 tsp salt
1/4c vegetable oil
6c bread flour
2-3c cubed cheddar cheese
Combine the yeast, water and sugar and allow to proof for 10 minutes. Add the oil and salt, add the flour one cup at a time until dough is elastic. Grease a large bowl and let the dough rise for 60-90 minutes, covered.
Grease 2 LARGE loaf pans. Splice the risen dough into 2 pieces and flatten each one. Place 1/2 of the cubed cheese over each dough disc and roll up, tucking the ends under. Allow to rise in the pans for 30 more minutes. Make absolutely sure the dough doesn't rise over the loaf pans, otherwise you'll get cheddar overflow in the oven! Bake at 350 for 30 minutes and allow to cool in pans for 10 minutes before serving.
Cheese Bread:
2c warm water
1/4c sugar
1 packet yeast
1.5 tsp salt
1/4c vegetable oil
6c bread flour
2-3c cubed cheddar cheese
Combine the yeast, water and sugar and allow to proof for 10 minutes. Add the oil and salt, add the flour one cup at a time until dough is elastic. Grease a large bowl and let the dough rise for 60-90 minutes, covered.
Grease 2 LARGE loaf pans. Splice the risen dough into 2 pieces and flatten each one. Place 1/2 of the cubed cheese over each dough disc and roll up, tucking the ends under. Allow to rise in the pans for 30 more minutes. Make absolutely sure the dough doesn't rise over the loaf pans, otherwise you'll get cheddar overflow in the oven! Bake at 350 for 30 minutes and allow to cool in pans for 10 minutes before serving.
Tuesday, June 24, 2008
Spicy Chocolate Gingerbread
I ran across this recipe in Castsugar's blog -- my mom is a fan of gingerbread so I had originally planned on making it for her birthday. I wound up doing a "test batch" for the bake sale, and WOW. This is possibly one of the better things that has come out of my kitchen.
It literally warms your throat when you eat it, but isn't sharp or spicy like so many recipes that call for chili powder. You can taste each ingredient when you take a bite, which is rare for recipes that call for so many complex flavors in one dish. I was skeptical of Castsugar's raves about this cake but I'm a true believer now. If you bake nothing else from this blog, try this recipe. It will blow you away. This one is going in the green box -- the old tin box where all of my great grandmother's favorite recipes are kept. This is where I turn when I need something utterly original and delicious that no one was expecting but everyone loves. You simply gotta try it!
1 1/2 sticks unsalted butter
1 c. plus 2 Tbsp. dark brown sugar
2 Tbsp. white sugar
3/4 c. light syrup
3/4 c. molasses
1 1/2 tsp apple pie spice
2 1/2 tsp. ground ginger
1 1/2 tsp. chili powder
1 1/4 tsp. baking soda
2 tbsp warm water
2 eggs
1 c. milk
2 c. all-purpose flour
1/3 c. unsweetened cocoa
6 oz. semisweet chocolate chunks
Preheat the oven to 325 and line 3 loaf pans with tin foil.
Meld the sugars, syrups, and butter together over medium-low heat in a large saucepan. Add your spices and allow to cool very slightly.
Combine the milk and eggs together. Mix the water with the baking soda and add to the egg mixture. Add the syrup mixture and stir well. Finish by adding the flour and cocoa. Finish by adding the chocolate chunks.
Pour into loaf pans and bake for 45 minutes. This will still appear liquidy on top; allow it to cool completely, as this creates a very moist cake. I find that this is just as good, if not better after a day or two of maturation time. You could add a glaze or frosting, but I find it to be perfect plain.
It literally warms your throat when you eat it, but isn't sharp or spicy like so many recipes that call for chili powder. You can taste each ingredient when you take a bite, which is rare for recipes that call for so many complex flavors in one dish. I was skeptical of Castsugar's raves about this cake but I'm a true believer now. If you bake nothing else from this blog, try this recipe. It will blow you away. This one is going in the green box -- the old tin box where all of my great grandmother's favorite recipes are kept. This is where I turn when I need something utterly original and delicious that no one was expecting but everyone loves. You simply gotta try it!
1 1/2 sticks unsalted butter
1 c. plus 2 Tbsp. dark brown sugar
2 Tbsp. white sugar
3/4 c. light syrup
3/4 c. molasses
1 1/2 tsp apple pie spice
2 1/2 tsp. ground ginger
1 1/2 tsp. chili powder
1 1/4 tsp. baking soda
2 tbsp warm water
2 eggs
1 c. milk
2 c. all-purpose flour
1/3 c. unsweetened cocoa
6 oz. semisweet chocolate chunks
Preheat the oven to 325 and line 3 loaf pans with tin foil.
Meld the sugars, syrups, and butter together over medium-low heat in a large saucepan. Add your spices and allow to cool very slightly.
Combine the milk and eggs together. Mix the water with the baking soda and add to the egg mixture. Add the syrup mixture and stir well. Finish by adding the flour and cocoa. Finish by adding the chocolate chunks.
Pour into loaf pans and bake for 45 minutes. This will still appear liquidy on top; allow it to cool completely, as this creates a very moist cake. I find that this is just as good, if not better after a day or two of maturation time. You could add a glaze or frosting, but I find it to be perfect plain.
Friday, May 23, 2008
Six Strand Bread
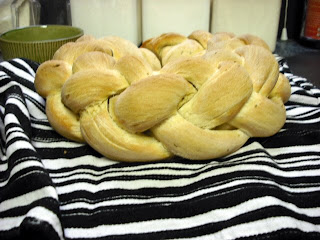
I love braided breads; being able to put artistry back in the kitchen is a passion of mine. I've done three strand loaves for awhile, but chose to tackle something decidedly more challenging this week. I made mine with the regular sourdough, but any type of dough will work. Another fun thing to do is brush filling with cinnamon or cheese between the strands, but that's for another time.
The best resource on this bread is a video I found on YouTube, so thank you MayaSophia! She gives a great visual as to how to braid these loaves, otherwise my explanations would just be confusing.
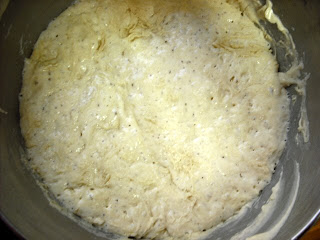
The first step for me was to sponge the bread. I took a photo to show what sourdough sponge should look like:
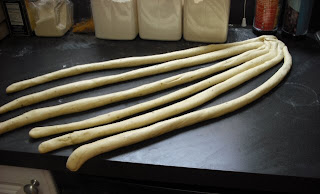
The next step was to mix the dough and let it rise. I then divided it into six parts and rolled each into a snake, pinching them together at the top:
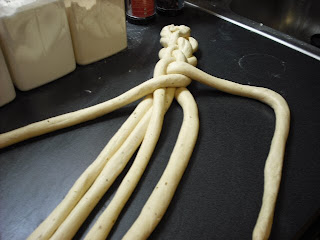
Then comes the braiding, which is demonstrated in the video:
Continue to braid until the entire loaf is finished, then pinch and tuck each end over. Set it on your floured peel and allow to rise for 1 hour.
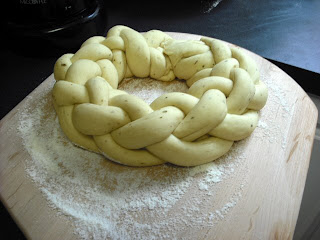
Brush the loaf either with egg or olive oil (used here) and allow to bake at 400 for 30-45 minutes, or until golden brown. These loaves typically take longer since they're more dense. What I love about braided breads is that you can break them apart and dip the little sections in oil or sauce, so this is pictured next to spinach dip (see Spinach Artichoke Dip Rediscovered for recipe).

The best resource on this bread is a video I found on YouTube, so thank you MayaSophia! She gives a great visual as to how to braid these loaves, otherwise my explanations would just be confusing.
The first step for me was to sponge the bread. I took a photo to show what sourdough sponge should look like:

The next step was to mix the dough and let it rise. I then divided it into six parts and rolled each into a snake, pinching them together at the top:
Then comes the braiding, which is demonstrated in the video:
Continue to braid until the entire loaf is finished, then pinch and tuck each end over. Set it on your floured peel and allow to rise for 1 hour.
Brush the loaf either with egg or olive oil (used here) and allow to bake at 400 for 30-45 minutes, or until golden brown. These loaves typically take longer since they're more dense. What I love about braided breads is that you can break them apart and dip the little sections in oil or sauce, so this is pictured next to spinach dip (see Spinach Artichoke Dip Rediscovered for recipe).
Tuesday, May 20, 2008
Honey Braided Challah
This is a great holiday bread and doubles as a nice breakfast loaf. It's sweet without being demanding and is perfect with cream cheese or honey butter. Many traditions include seeds or certain herbs sprinkled over the top; sesame seeds work well for this particular loaf.
Honey Cinnamon Challah:
7c bread flour
1 tbsp kosher salt
1/2c agave nectar (low glycemic sweetener, check health food stores or well stocked grocers)
2 packets of yeast dissolved in 1/3c warm water
1/2c veg oil
2 tbsp apple pie spice
4 eggs
1c boiling water
1/2c cold water
1 egg + 2 tbsp honey + 1 tbsp water (set aside)
Beat eggs in a bowl. In separate large bowl mix oil, nectar, spices, salt and add boiling water. Stir until completely dissolved. Add cold water, stir, and add yeast water -- keep in mind that the mixture should be warm, not hot, before the addition of yeast. Add eggs to the large bowl. Combine flour 1/2-1c at a time, as certain climates require more or less of it. If you're kneading by hand, knead for about 15 minutes or until smooth and elastic; if you're using a bread hook it takes around five to ten minutes. Place loaf into a greased bowl and let rise, covered, in a warm place for an hour or until doubled in size.
Before punching the dough down, remove from the bowl and slice into thirds with a sharp knife. Knead each round for 2-5 minutes and use the sharp knife to divide each into thirds again. Roll each section into a "snake" about 1-2 inches in diameter. Pinch the top ends together and braid down the loaf, then pinch the bottom ends and tuck under. Repeat this with the 2 remaining rounds and let each rise on a greased baking sheet for 30-45 minutes. Right before the loaves are ready to go in the oven, take a pastry brush and coat each with the egg and honey mixture. Make sure to cover all exposed areas of the loaf except for the bottom. Sprinkle seeds if desired.
Preheat the oven to 450 with your baking stone, and reduce to 350 for the actual baking time. If you're operating with a baking sheet only, flour with cornmeal or semolina and allow it to preheat. Place the loaf on a greased large plate or a floured peel and slide it onto the baking stone or sheet. Allow to bake for 20-30 minutes or until loaf is a deep golden brown.
Honey Cinnamon Challah:
7c bread flour
1 tbsp kosher salt
1/2c agave nectar (low glycemic sweetener, check health food stores or well stocked grocers)
2 packets of yeast dissolved in 1/3c warm water
1/2c veg oil
2 tbsp apple pie spice
4 eggs
1c boiling water
1/2c cold water
1 egg + 2 tbsp honey + 1 tbsp water (set aside)
Beat eggs in a bowl. In separate large bowl mix oil, nectar, spices, salt and add boiling water. Stir until completely dissolved. Add cold water, stir, and add yeast water -- keep in mind that the mixture should be warm, not hot, before the addition of yeast. Add eggs to the large bowl. Combine flour 1/2-1c at a time, as certain climates require more or less of it. If you're kneading by hand, knead for about 15 minutes or until smooth and elastic; if you're using a bread hook it takes around five to ten minutes. Place loaf into a greased bowl and let rise, covered, in a warm place for an hour or until doubled in size.
Before punching the dough down, remove from the bowl and slice into thirds with a sharp knife. Knead each round for 2-5 minutes and use the sharp knife to divide each into thirds again. Roll each section into a "snake" about 1-2 inches in diameter. Pinch the top ends together and braid down the loaf, then pinch the bottom ends and tuck under. Repeat this with the 2 remaining rounds and let each rise on a greased baking sheet for 30-45 minutes. Right before the loaves are ready to go in the oven, take a pastry brush and coat each with the egg and honey mixture. Make sure to cover all exposed areas of the loaf except for the bottom. Sprinkle seeds if desired.
Preheat the oven to 450 with your baking stone, and reduce to 350 for the actual baking time. If you're operating with a baking sheet only, flour with cornmeal or semolina and allow it to preheat. Place the loaf on a greased large plate or a floured peel and slide it onto the baking stone or sheet. Allow to bake for 20-30 minutes or until loaf is a deep golden brown.
Friday, May 2, 2008
Fun with Sourdough
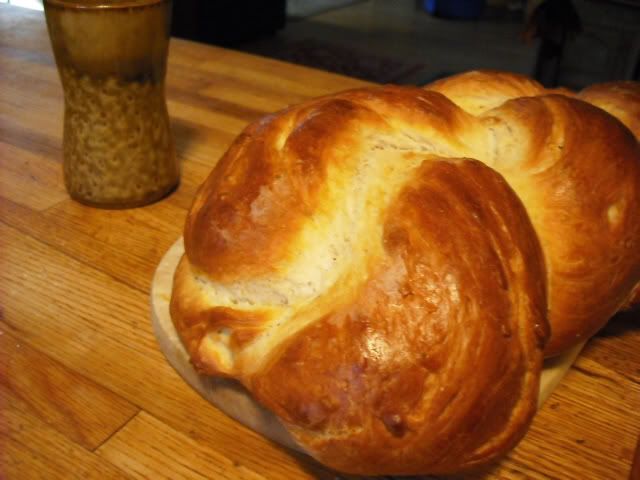
There are few things more delectable than steaming fresh sourdough. While yeast breads are fine and have their place in many dishes, there's something special about sourdough. Maybe it's the labor of love or the savory scent of wild yeast as it bakes; either way, once you get the hang of it, no other bread can compare (except maybe a braid of cinnamon challah).
Every great loaf of bread begins with a starter. Many people choose to make their own, but seeing as even I have time limits in my kitchen, I decided to order a fresh starter. King Arthur Flour, who publishes an awesome catalog and makes great bread flour, sells a fresh starter that's been kept alive for nearly 300 years! This guarantees a distinctive, fully developed taste -- I highly recommend giving theirs a try. They also include some great recipes and detailed instructions on how to care for your starter.
This is a recipe I happened upon while experimenting with breads to go with pasta and Italian dishes, but it's delicious enough to eat on its own. Never underestimate what you can do to a basic recipe with a well stocked spice cabinet!
There are a few pointers I can give for turning out your best, most stress-free loaf. The first is to get a baking stone; you can either purchase one at a cooking store or make do with some unfinished quarry tiles. Especially if you're like me and operating with a gas stove, this is an investment that can last a lifetime if you care for it. Remember to preheat the oven to 450-500 degrees at least an hour before baking, that way the stone can get fully heated. In addition to this is a pizza or bread peel, which you can find at restaurant supply stores. You powder it with cornstarch, stick the loaf to it and slide the bread onto the stone -- easy as pie!
Another piece of equipment that is vital to my kitchen is my countertop Kitchen-Aid mixer. I'm not sure where my culinary skills would be without this! They tend to be a bit pricey, but are worth every penny. They can handle most doughs with ease where a regular mixer would combust. They're also great for multitasking, as you can let things knead or mix while working on another aspect of the recipe. I keep three different attachments for mine -- a whisk for general mixing, a bread hook, and a flat attachment that works wonders for meringue and whipped cream.
Every great loaf of bread begins with a starter. Many people choose to make their own, but seeing as even I have time limits in my kitchen, I decided to order a fresh starter. King Arthur Flour, who publishes an awesome catalog and makes great bread flour, sells a fresh starter that's been kept alive for nearly 300 years! This guarantees a distinctive, fully developed taste -- I highly recommend giving theirs a try. They also include some great recipes and detailed instructions on how to care for your starter.
This is a recipe I happened upon while experimenting with breads to go with pasta and Italian dishes, but it's delicious enough to eat on its own. Never underestimate what you can do to a basic recipe with a well stocked spice cabinet!
There are a few pointers I can give for turning out your best, most stress-free loaf. The first is to get a baking stone; you can either purchase one at a cooking store or make do with some unfinished quarry tiles. Especially if you're like me and operating with a gas stove, this is an investment that can last a lifetime if you care for it. Remember to preheat the oven to 450-500 degrees at least an hour before baking, that way the stone can get fully heated. In addition to this is a pizza or bread peel, which you can find at restaurant supply stores. You powder it with cornstarch, stick the loaf to it and slide the bread onto the stone -- easy as pie!
Another piece of equipment that is vital to my kitchen is my countertop Kitchen-Aid mixer. I'm not sure where my culinary skills would be without this! They tend to be a bit pricey, but are worth every penny. They can handle most doughs with ease where a regular mixer would combust. They're also great for multitasking, as you can let things knead or mix while working on another aspect of the recipe. I keep three different attachments for mine -- a whisk for general mixing, a bread hook, and a flat attachment that works wonders for meringue and whipped cream.
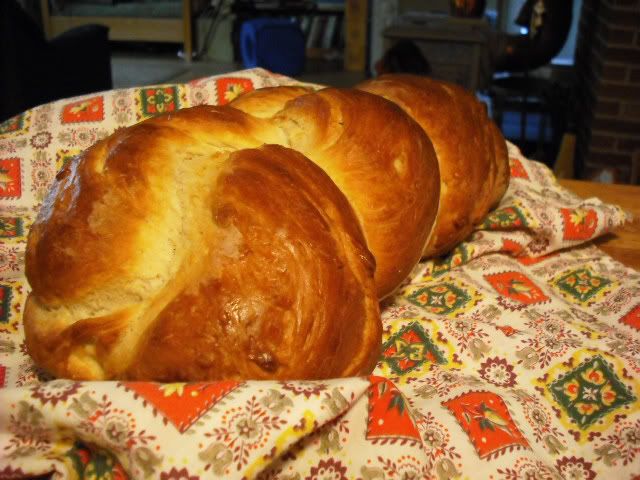
Rustic Italian Sourdough
Sponge:
1c fresh "fed" starter
3c bread flour
1 1/2c warm water
Combine these ingredients in a large, non-reactive bowl. Cover with plastic wrap and allow to "sponge" for 6-12 hours. I tend to let mine sponge overnight, so begin this recipe the day before you plan to serve it.
Bread:
Sponge
2-3c flour
1 tbsp kosher salt
1/2 c finely grated hard cheese (Asiago works well)
2 tbsp oregano
Garlic olive oil
cornstarch
Knead or mix your sponge with the remaining flour. Add the salt, herbs, and cheese, and knead until smooth and elastic. Grease a large bowl with garlic oil, place and turn the dough into it. Cover and allow to rise for around an hour.
Splice the dough into two loaves. Knead each into a round and allow to rise for 1-2 more hours, until doubled in size. Slice the tops of each loaf and place on cornstarched peel. Slide onto baking stone, and bake for 20-25 minutes at 450. Serve hot.
I like to hand shape my loaves to maximize the "crustiness" of each piece. If you want an even thicker crust, mist the loaf with water midway through baking. I like to serve this particular loaf with cream cheese. Enjoy!
Subscribe to:
Posts (Atom)