Castsugar included this recipe in her blog, and having epically (EPICALLY) failed my previous attempt at whoopie pies I was leery. I had gotten a recipe for something similar, chocolate whoopie pies with pumpkin filling. But I digress, I should probably explain what a whoopie pie is before I say how to make one.
I'd seen these things in the little bakeries and general stores in the town where my mom loves, I'd always wanted to get one but they seemed sort of intimidating. What I was seeing were these huge pies with a dubious looking white filling -- probably something shortening based, which I am staunchly against. Whoopie pies are an Amish dish, especially popular in that Western VA/Pennsylvania area. The original dish are two crumbly chocolate cookies with marshmallow fluff on the inside. So how could someone mess that up?
Apparently I can! My first attempt resulted in misshappen, almost bitter cakey cookies and runny, chunky filling. It was a nightmare. Then I found this recipe, which calls for pumpkin cookies and a regular icing filling. Sure enough, it worked out fine and these babies were a hit among each final exam study group.
Cookies:
3c flour
1 tsp baking soda
1 tsp baking powder
2 tbsp cinnamon
1 tsp ginger
1c sugar
1c dark brown sugar (I took 3/4c white sugar and combined with 1/4c molasses, shhh)
1c oil
1 can pumpkin (15 oz)
2 eggs
1 tsp vanilla
Preheat the oven to 350. Whisk together the oil, sugar and eggs. Follow with your spices and dry ingredients. Carefully spoon 1 tbsp gobs onto a greased baking sheet, you want them to be around "2-"3 in diameter and not too flat or too tall. Bake for 10-12 minutes, the cookies will be very soft and cakey so just let them cool completely.
Filling:
3c confectioner's sugar
1 stick butter
8 oz cream cheese
1 tbsp cinnamon
1 tsp vanilla
1 tbsp maple syrup
Using an electric mixer, cream all of the ingredients together until light and fluffy. I just used a rubber spatula to spread it onto one side of the cookie, but a lot of people like to use a piping bag because it looks a little more sophisticated. Just sandwich them up, and you've got whoopies! I kept mine in freezer bags in the fridge because of their moist consistency, I would definitely recommend storing them this way.
Friday, December 12, 2008
Beet Salad
As a part of a dinner party at my parents' house one of their friends brought this dish and I was heartily impressed. I'm not too familiar with beets but after trying this at home I'm definitely going to have to use them more often. It's a bit labor intensive with the boiling, peeling and pickling but it's worth it -- just trust me on this one. This is a great pre-workout meal because it gives a nice burst of energy without being heavy or greasy.
The key to this dish are the preserved lemons, without which it might taste pretty boring. They take from 3 to 7 days to make and last up to a year in your fridge; I will be including more recipes containing them since I have a jar waiting for me!
Lastly, this recipe can easily be made vegan by substituting soy cheese or nuts for the feta. The primary effect is textural so feel free to experiment.
To preserve lemons:
6-10 medium lemons
kosher salt (just buy a can of it, you won't need the whole thing but you need a lot)
a quart mason jar or tupperware
Slice the ends off the lemons and juice them into the jar, there's no need to pickle them. Slice the lemons thinly and create a layer then a layer of salt (a few tablespoons). Do this until you've used up all the lemons. Some people might add vinegar but I think they're fine without it, fill the jar with just enough water to cover the lemons. Let them chill in the fridge for three to seven days, shaking every few days to dissolve the salt.
Salad:
3 medium sized beets
2 bartlett pears
around 1/2-3/4c crumbled feta or cubed ricotta salata
Chop the the tops off the beets and boil for twenty to thirty minutes. Remove from the water and allow to cool. Peel them over a sink, this can get messy so I suggest using gloves. Follow up by julienning the beets, or slicing into long, thin strips. Chop the pears in a similar fashion, I don't peel mine. Add the cheese and then bring out your preserved lemons. The membrane and rind aren't needed so free up the pulp, similar to a relish. Add to the pears and beets and toss -- everything will turn red, but it will taste delicious :)
Saturday, November 29, 2008
Rolled Sugar Cookies
Everyone can recognize a sugar cookie -- paler than a snickerdoodle and usually sparkling with some colored sugar or decorated with frosting. Most of us have been eating the storebought kind since we were kids; I was having a craving but given my aversion to shortening and lord knows what else they put in those things I decided to give rolled sugar cookies a try for myself.
I was out of waxed paper, so I just used plastic wrap and I don't think it made too much of a difference. The waxed paper is surely easier to handle though, so I recommend that. Not paying attention to the proportions, this recipe made a LOT of cookies. I wound up having to take the majority of them to my classes to share; the plus side is that I got a lot of feedback, and all of it was great. People really like these cute little cookies.
You can decorate these any way you want, I just used colored sugar. For something like sugar or sprinkles you brush a bit of water over the cookie and sprinkle it before you put them in the oven. For frosting, wait until they've cooked and cooled to decorate.
Ingredients:
3 sticks salted butter (1.5c)
2c vanilla sugar
5c bread flour
2 tsp baking powder
4 eggs
1 tsp vanilla
colored sugar for decorating
Whip the butter and sugar together, once it's creamy add the vanilla and eggs. This recipe is so large that you'll want to add the dry ingredients gradually, otherwise it will be impossible to mix (and a total mess if you're using a countertop mixer!) Once the dough is blended, spoon it onto a piece of waxed paper and roll to about "3-"4 in diameter. Freeze for around an hour.
Preheat the oven to 400 degrees and cut the cookies into 1/2 inch rounds with a sharp knife. Bake for 6-10 minutes. My oven is notoriously slow, but for these the time on the original recipe was correct so don't overbake! If the bottoms of the cookies are getting brown, they're done. The bottoms will remain pale after they're fully cooked...just trust me on this one :)
Monday, November 17, 2008
Rasta's Famous Cookies
After some unexpected praise for my "magic cookies" from my sisters at Allure, I figured posting the recipe would be the ONLY fair way to compensate :) Truthfully, most cookie recipes do follow a certain formula so the differences tend to lie in how the batter is prepared. If you like chewier cookies, try using bread flour and refridgerating the dough for about an hour before you spoon it out and bake it. If you like thinner, crispier cookies, you can use cake flour and melted butter. I really could go on and on about the mechanical differences between cookie recipes...point is, every batch can be a little bit different even with the exact same ingredients. This is a great basic recipe with a can't-go-wrong twist (chocolate toffee) so feel free to experiment. I've added dried cherries to this recipe, macadamia nuts, even cocoa powder. The toffee ones seem to be the favorites of all these.
One last note -- I've started using salted butter in my baking mainly because of its versatility and the fact that it tends to last a bit longer. It's an economic decision but if you prefer to use unsalted butter, about a teaspoon of kosher salt will do the trick for this recipe. Whatever you do, don't add salt AND salted butter! It only took me one try for that lesson to hit home ;)
Ingredients:
2 1/4c flour
2 sticks (one cup) salted butter
3/4c granulated white sugar
3/4c light brown sugar
1 tsp baking soda
1 tsp vanilla extract
2 eggs
12 oz milk chocolate chips
1c toffee bits
Preheat the oven to 375. Combine your butter and sugars until uniform and creamy. Add the eggs and vanilla, mix well. Add your dry ingredients and once those are mixed in, add the chocolate chips and toffee. Spoon onto a greased cookie sheet and bake for 10-15 minutes, depending on your oven.
Pomegranate Flan
I've already extolled on my love of pomegranates; now it's time to wax about the wonders of flan. It's a traditional custard dish like creme brulee, except in the Spanish version there's a layer of liquid caramel instead of a caramel crust. It's one of those dishes that seems like it should be difficult to prepare, but I actually only spent around 20 minutes assembling the ingredients. The only special thing you would want to buy would be pomegranate juice, aside from that all ingredients should be found in any basically stocked kitchen.
There's a little trick I like to use with my sugar, and this seems the appropriate time to share it. I got the idea from Alton Brown, bless him. I had some sealed madagascar vanilla beans chillin' around my kitchen for several months; I wasn't quite sure what I could do with them, but I do appreciate the smell. If you keep your sugar in an airtight container (which I think everyone should do) you can add the beans and voila -- within 48 hours, you will have vanilla sugar. It doesn't make a huge difference in the taste of any dish I've made but it smells lovely and can't hurt :)
Back to the flan. The original recipe, from the POM website, lists several unitaskers in its instructions and seems to make the process more complicated than it actually is. So I'm going ahead and posting my method with a few notes from the original recipe.
Pomegranate syrup:
1c pomegranate juice
3/4c sugar
Put these in a saucepan over medium heat and simmer for around 20 minutes, or until you're left with about 2/3c of syrup. Set aside for later.
Flan:
4 eggs
2 1/4c whole milk
1/2c sugar
2 tsp vanilla
pinch of salt
Preheat the oven to 325, and place a large cake pan with about an inch of water in to preheat as well. I used a cupcake pan for my flans, so make sure that the pan can fit into the water-holding one. You want the water to be very hot when the flans go in the oven.
Whisk the eggs together and add your additional ingredients. Scoop the flan liquid into the cups, about 2/3 full. Very carefully place the cupcake pan in the water-holding pan; this lets a more gentle, even heat cook the bottom of the flans similar to a double boiler method.
The original recipe dictates 30-35 minutes of cooking time; mine took well over an hour. They're done when you insert a knife near the center and it emerges clean. Fortunately this isn't a dish you have to worry about "falling", so check frequently if your oven is as slow as mine!
Once the flans are done, remove them and let them cool for at least half an hour before putting them in the fridge. Refridgerate for 3 hours. I cheated, and I only chilled mine for an hour because I had to see how they tasted. Spoon about 1tbsp of the pomegranate syrup over the tops of the flans and put them back in the fridge for up to 24 hours. You can garnish with pomegranate seeds or orange slices; I used raspberries. Once the flans are fully chilled, loosen them from the cups with a butter knife and gently scoop them out.
Sunday, November 16, 2008
Pomegranate-Ginger Muffins
One of my favorite, favorite FAVORITE items of the season is the pomegranate. Some people snack on popcorn or trail mix, I prefer to nom on pomegranate seeds. Not only does it taste delicious but it packs a huge antioxidant punch. I remember the first time I tried one...I was on a hike with my parents, around age 7, and they brought out this weird fruit with pretty little red berries. After my first try I knew this was a fruit I could truly love. Sadly, I didn't taste pomegranates again until the antioxidant craze kicked in during my first years of college. I suppose I got a bad apple (or pom, if you will) because it was tart, pale pink and nothing like the food I remembered loving so much that day. For the next few years I forgot about them.
While at my health food store a few weeks ago I noticed poms had just come into season. I was running low on fruit with the season's harvest ebbing away, so I decided to give them one more chance. Cracking open the fist-sized red fruit was a mess but worthwhile. The arils (seeds) were bright red, juicy and sweet. I was reunited and my passion for pommies was reawakened.
I'm normally an all-natural kinda gal and would never snub organic produce, but I've found that the giant poms from the POM company at my local Kroger are actually better than the ones for over twice the price at the health food store. They're bigger, redder and sweeter -- never bad things! So for this recipe I used those. Anywho. Enough about my love of pommies...here's how to make them so everyone in the family will enjoy. I got the idea for this recipe from the POM website, but I made several alterations given what I had on hand. I'm sure they're just as good either way -- I especially love these muffins with honey.
Ingredients:
1/2c arils from 1 large pomegranate, approximately
2c flour
2/3c sugar
1 tbsp baking powder
~2 tbsp finely grated fresh ginger
1 tbsp orange zest
1c milk
1 egg
1/3 c melted salted butter
Score the pomegranate with one cut, just breaking through the skin. Run a sink of cold water and submerge the pomegranate. Using both hands break it open and free the seeds -- they will sink while the extra stuff will float to the top of the water. Refridgerate any leftovers.
Preheat the oven to 400 and prepare 12 muffin cups.
Mix your dry ingredients and add the arils, orange zest and ginger. Make a well in the center of the bowl.
Whisk together the wet ingredients and pour them into the bowl. Whisk until batter is moist and there are no flourey lumps left. Spoon the batter into the muffin cups, top with sugar if you like. Bake for 15-20 minutes (my oven always takes longer), let them cool for about 10 before serving.
Roasted Veggies in Asiago Pepper Sauce
Although I'm working hard at obtaining my degree in Russian and International Relations, it doesn't mean I don't have time for some down home classics. I was going through my pantry trying to find a mix of ingredients that went well together when inspiration struck.
For my birthday a few weeks ago a friend and I visited a tapas bar downtown, Europa. Of the many delicious (!) things we ordered, the roasted asparagus in manchego sauce was one of the favorites (don't worry spicy eggplant Parmesan, you're next!) I found a block of asiago in the fridge along with several seasonal vegetables and got to work.
Any veggies will work, I used dutch fingerling potatoes, sweet corn, edamame and broccoli. If you don't have a cast iron skillet on hand, roast these babies in a large cake pan.
Ingredients:
for the veggies:
3-4 fingerling potatoes
1 bunch (~ 1c) fresh broccoli
1c frozen corn
3/4c frozen edamame
1 tbsp dried onion
1/2 tsp chili powder
1 tsp dried basil
2 tsp oregano
salt
pinch of garlic powder
2 tbsp olive or vegetable oil
dash of tamari sauce
For the sauce:
1c milk
1 tbsp all purpose flour
1 tbsp butter
1 1/2c finely shredded asiago cheese
dash of black pepper
salt to taste
Preheat the oven to 400. Toss the vegetables, oil and spices together in a large cast iron skillet. When all pieces are thoroughly coated, put in the oven for around 30 minutes, tossing the veggies once midway through. Take them out of the oven but do not turn it off!
While the roasting is going on, put the milk and butter over medium heat. When it gets hot whisk in the flour until all the lumps are gone. Proceed with 1/2c of cheese, pepper, and salt, and turn down the heat. Whisk until the sauce cools and thickens.
Pour the sauce over the veggies and top with the rest of the cheese. Put it back into the oven and bake until it begins to bubble and brown slightly. Allow to cool for about 10 minutes and serve.
Saturday, October 4, 2008
Tiramisu Cupcakes
I came up with these from the chiffon cake recipe posted earlier this month. They're delish! I include the recipe for whipped cream, but canned is just as good in this particular dish. Enjoy :)
3/4c cake flour
1 1/2 tsp baking powder
1/2tsp kosher salt
5 large eggs, separated
1/2 c sugar with 3 tbsp separated
1/4c water
1/4c instant cappucino powder
1/4c vegetable oil
1 tsp vanilla extract
5/8 tsp cream of tartar
1/2c heavy whipping cream
3 tbsp confectioners sugar
2 tbsp kahlua
Preheat the oven to 325 degrees. Mix your egg yolks, oil, sugar, cappucino powder and vanilla. Using an electric mixer, beat until they're at the ribbon stage. Add your dry ingredients and beat well.
Whip your egg yolks with an electric mixer and add the remaining sugar. Beat until stiff peaks form and gently fold into your batter. Scoop into cupcake pans with liners, about 3/4 full. Bake for 30 minutes *remember, DO NOT OPEN THE OVEN!*
Whip your cream and confectioners sugar until creamy -- don't overbeat unless you want butter. When you take the cupcakes out of the oven drizzle with the kahlua. When they cool completely frost the top with whipped cream. Chill for an hour before serving.
Friday, September 26, 2008
Seasonal Lentil Stew
Good news -- I recently found the farmer's market in my new city. Even better, it's a block from my house! Last Thursday I decided to check it out to get some ingredients for a veggie stew; I had a few pounds of lentils chillin' around my kitchen and figured that was a good use for them. This stew was a product of things I had lying around and what I thought might taste nice, so ingredients are estimated. For the broth I used diluted some very smooth marinara sauce but it's very close to tomato broth with garlic added, so that would be the easiest method. One of the great things about lentils is that they get better the more they're reheated so this is ideal for leftovers!
You will need:
1 large onion, diced
2 1/2 quarts tomato broth
2-3 cloves garlic, chopped
2c green beans chopped into 1-inch sections
~2c dried green lentils
2c fresh cut sweet corn
1c diced carrot
1/2c diced celery
1/2tsp chili powder
Bring the broth to a boil and add the lentils. Cook for 20-30 minutes over medium heat, then add your veggies and spices. Cook for at least another half hour. Serve hot or keep refridgerated for up to a week.
Saturday, September 20, 2008
Vanilla Chiffon Cake
Aside from my love-hate relationship with Anthony Bourdain, Alton Brown is the TV cook of my heart. I make it a point to take breaks in my homework to catch his show, Good Eats, every weeknight -- it gives me ideas of how to better my already existing recipes, even if he's making something I'd never eat like pork BBQ. But I digress. As soon as I saw it was the cupcake episode, I was completely fascinated.
The recipe he uses for cupcakes is a chiffon cake batter, which is exquisitely light and very different from a traditional cake. It uses oil instead of butter and lots of eggs. You could compare this cake to angel food but it just wouldn't do it justice. The only problem I had was that mine tasted a *wee* bit salty, so I've cut the salt in half for this recipe. Try this next time you feel like making a cake, I guarantee it will be a pleasant surprise!
You will need:
3/4c cake flour
1 1/2 tsp baking powder
1/2tsp kosher salt
5 large eggs, separated
3/4 c sugar with 3 tbsp separated
1/4c water
1/4c vegetable oil
1 tsp vanilla extract
5/8 tsp cream of tartar
1/2c heavy whipping cream
3 tbsp confectioners sugar
Preheat the oven to 325. Grease a 9 x 11 pan and set aside. Using an electric mixer, whip the egg yolks, sugar, and oil until it is smooth and forms "ribbons". Add the vanilla and water. Add your dry ingredients and set aside.
Combine the egg whites and cream of tartar in a separate bowl. Whisk with an electric mixer until it becomes foamy, then add the 3 tbsp of sugar gradually. Whip until stiff peaks form.
Very gently fold the egg white mixture into the yellow batter 1/3 at a time. Pour into the pan and bake for 30 minutes or until a toothpick comes out clean when inserted. Remember not to take this cake out early or open the oven door for the first 30 minutes or it will fall -- a chiffon cake is characterized by a very light, fluffy texture. Once removed, allow to cool completely.
While this cools whip your cream and confectioners sugar together. Be sure not to overwhip so you don't wind up with sweet butter! Coat the top of the cake with this as if it were icing and serve. Keep any leftovers refridgerated so the cream doesn't go funky :)
Real Fruit Smoothie
Fruit smoothies have gotten a bad rap with all of the syrupy, chunky gunky drinks being churned out by chain restaurants and smoothie stands. Or they've been labeled as tasteless and bland by those who have been browbeaten into drinking the watery slush handed to them. I was looking at a load of seasonal fruits my mom sent me home with and decided to do something different and this creation was born. It is positively delicious and takes about 15 minutes to throw together.
You will need:
3 small or 2 medium apples, cored and chopped but not peeled
2 medium pears, chopped into chunks but again, not peeled
1 asian pear, chopped and not peeled
1/3c grape juice
1/4c agave nectar
The first step is to refridgerate your fruit and juice, this way you don't have to use ice and don't wind up with a watery smoothie. Put everything in a blender and pulse until the chunks of fruit have been broken up, then puree until smooth. It's important to keep the skins on the fruit so you get all that nutrition and fiber, make sure you blend well. Pour into a glass and enjoy :)
The Complete Salad
I've had one heck of a time figuring out some healthy lunch options since the new semester started. I must admit -- my brain and body function much better when I've filled up on a nutritious meal than when I'm gulping down frappucinos for 8 hours :) One night last week I made the decision to create something organic, healthy and that could fill almost every one of my food groups for half the day. A daunting task indeed! But I have succeeded and am here to share my creation with all of you. This salad packs everything -- taste, nutrition, portability and ease. Stock up on a few of these quality ingredients at your local health food store and break out the tupperware, because this just might ease its way into your lunchtime rotation.
You will need:
2-3c fresh baby spinach greens
1/4c dried cranberries
3 tbsp roasted pumpkin seeds
apx 1/4c crumbled feta cheese
1/3 c steamed edamame beans (no shells)
1/4c sweet peas
greek vinagrette dressing of your choice (recipes to come soon)
1/2c cooked whole wheat pasta shells
Assembling a salad doesn't require too much of an instruction manual but I like to use the dressing with the pasta, cheese, seeds, cranberries and peas and use that to top the spinach and edamame.
Sunday, September 7, 2008
Swedish Caramelized Pears
This is a recipe I used in a fall banquet last year. We won, heehee! Pears are beginning to come into season, so for the more fortunate farmers out there we have to find new and interesting ways to use them. This is a really versatile dish; it can go as a side dish or dessert depending on what you serve it with. It can be made savory or sweet. Keep in mind that these are slightly spicy, but the flavor works perfectly! Look for juniper berries in the bulk section of your local healthfood store..or on the bushes in your backyard.
4-6 pears, sliced lengthwise and cored
1/2c honey
1/4tsp chili powder
6-10 juniper berries
1 tbsp cinnamon
dash of clove powder
sour cream or whipped cream
1/2 c water
Heat the honey and spices over medium heat in a large skillet. Once the honey begins to bubble, place the pears face-down and cover. Allow to brown for around 7 minutes. Flip them over and add the water, then cover. If the honey starts to burn add a bit more water or just shift the pears around in the pan; a little bit of burning is critical to the flavor. Remove pears and separate the sauce, add the sour cream or whipped cream and drizzle the remaining sauce over the dish.
Wednesday, August 20, 2008
10-Minute Marinara
My post of Classic Marinara is indeed a winner, but most women don't have hours to spare marinating and firing tomatoes. I decided to include this recipe because it requires minimal effort and is cheap, cheap CHEAP to make. It also tastes great! Prep time is about 10 minutes, cooking time is 45 but doesn't require much of a watchful eye.
10 Minute Marinara:
28 oz can of diced tomatoes
5-6 large basil leaves (or 1tbsp dried)
1.5tbsp oregano
3 cloves garlic, finely chopped
1 tsp salt
dash of chili powder
2 tbsp olive oil
Squish the tomatoes well with your fingers, throwing out stems. Add the spices and oil and simmer for 45 minutes or until most of the moisture has evaporated. I prefer to keep mine a bit runny so the grease doesn't take over. Serve and enjoy!
Fake Chicken Salad
This is an oldie but a goody. My mom came up with this when I went through my hardcore vegan phase in high school -- that only lasted a few months, but I still make this years later. I dare you to serve this to your meat loving, vegetarian hating friends..I haven't had any complaints yet! I'm including the tofu but this recipe is fine without it, I think it adds a more interesting texture to have a mix of tofu and tempeh.
Fake Chicken Salad:
1.5c cubed tempeh (I use 5-grain)
1c cubed extra firm tofu
3/4c veganaise
1/3c diced celery
1 tbsp mustard
1/4tsp black pepper
1 avocado, cubed (optional)
Combine the veganaise, mustard and pepper. Add the tempeh then the tofu. Drop the avocado bits on top, roll into a tortilla or sandwich and enjoy!
Saturday, August 16, 2008
Cheese Bread
Do I even have to say it anymore? Castsugar rescued me in the throes of bake sale-dom yet again. This time with cheese bread -- it's a molten cheddar center encased in sweet fluffy yeast bread. It's also relatively fast. When selling it I suggested that the buyer throw it into a 350 degree oven for 10 or 15 minutes before serving -- this stuff is best hot and fresh! I also omitted the jalapenos from the original recipe, but if you want spicy bread add 2 tbsp of them chopped to the dough.
Cheese Bread:
2c warm water
1/4c sugar
1 packet yeast
1.5 tsp salt
1/4c vegetable oil
6c bread flour
2-3c cubed cheddar cheese
Combine the yeast, water and sugar and allow to proof for 10 minutes. Add the oil and salt, add the flour one cup at a time until dough is elastic. Grease a large bowl and let the dough rise for 60-90 minutes, covered.
Grease 2 LARGE loaf pans. Splice the risen dough into 2 pieces and flatten each one. Place 1/2 of the cubed cheese over each dough disc and roll up, tucking the ends under. Allow to rise in the pans for 30 more minutes. Make absolutely sure the dough doesn't rise over the loaf pans, otherwise you'll get cheddar overflow in the oven! Bake at 350 for 30 minutes and allow to cool in pans for 10 minutes before serving.
Monday, August 4, 2008
At-Home Pesto Sauce with Fettucine
I'm finally moved into my new house and back in the kitchen! As I've written about, I'm experimenting with new recipes that I can incorporate into a healthy diet. Pesto sauce is delicious and contains healthy fats from olive oil and pine nuts. It adds flavor to plain pasta and bruschetta without taking over. I'm posting my blender-free method because hand chopping allows the separate flavors to sing rather than being, well, blended into each other. The pieces aren't uniform and the sauce is a bit "chunkier". The hand chopping is totally worth the extra effort and saves lots on cleanup. So let's get started!
Pesto:
2-3 c loose fresh basil leaves (I buy the live basil, it tastes much better this way)
1/4c pine nuts
3 cloves garlic
2 tbsp olive oil
pinch of sea salt
Fettucine:
2 tbsp salt
1 box fettucine
1/2 c finely shredded asiago cheese
1 tbsp olive oil
Using a mezzeluna, pizza cutter or sharp knife cut 1/3 of the basil until very fine and almost paste-y. Place into a mixing bowl and move onto the next 1/3. You want to do this in batches to avoid bruising and pulverizing the leaves.
Once your basil is chopped, do the same with the pine nuts and garlic. Slice until very fine and incorporate into the basil. Add the salt and olive oil, set aside.
Boil a pot of water and add the olive oil and salt. Add your fettucine and cook until al dente. Immediately after straining add the pesto and toss until all the pasta is evenly coated. Top with asiago and serve!
Tuesday, June 24, 2008
Spicy Chocolate Gingerbread
I ran across this recipe in Castsugar's blog -- my mom is a fan of gingerbread so I had originally planned on making it for her birthday. I wound up doing a "test batch" for the bake sale, and WOW. This is possibly one of the better things that has come out of my kitchen.
It literally warms your throat when you eat it, but isn't sharp or spicy like so many recipes that call for chili powder. You can taste each ingredient when you take a bite, which is rare for recipes that call for so many complex flavors in one dish. I was skeptical of Castsugar's raves about this cake but I'm a true believer now. If you bake nothing else from this blog, try this recipe. It will blow you away. This one is going in the green box -- the old tin box where all of my great grandmother's favorite recipes are kept. This is where I turn when I need something utterly original and delicious that no one was expecting but everyone loves. You simply gotta try it!
1 1/2 sticks unsalted butter
1 c. plus 2 Tbsp. dark brown sugar
2 Tbsp. white sugar
3/4 c. light syrup
3/4 c. molasses
1 1/2 tsp apple pie spice
2 1/2 tsp. ground ginger
1 1/2 tsp. chili powder
1 1/4 tsp. baking soda
2 tbsp warm water
2 eggs
1 c. milk
2 c. all-purpose flour
1/3 c. unsweetened cocoa
6 oz. semisweet chocolate chunks
Preheat the oven to 325 and line 3 loaf pans with tin foil.
Meld the sugars, syrups, and butter together over medium-low heat in a large saucepan. Add your spices and allow to cool very slightly.
Combine the milk and eggs together. Mix the water with the baking soda and add to the egg mixture. Add the syrup mixture and stir well. Finish by adding the flour and cocoa. Finish by adding the chocolate chunks.
Pour into loaf pans and bake for 45 minutes. This will still appear liquidy on top; allow it to cool completely, as this creates a very moist cake. I find that this is just as good, if not better after a day or two of maturation time. You could add a glaze or frosting, but I find it to be perfect plain.
Cherry Cheesecake Brownies
I had been looking forward to making these ever since I found the recipe -- cheesecake, cherry, AND brownie?! All of my favorite things! While these did turn out well and I'm sure would be a hit at any bake sale or party, it seemed that it was almost too much of a good thing. There were so many flavors going on that none of them could really sing; I would have preferred the cheesecake and cherries over a plain ol' chocolate crumb crust. But these are worth a try!
Cheesecake:
16 oz cream cheese
1/2c sugar
1 egg
1 tsp vanilla
Brownie:
1c unsalted butter
6 oz baking chocolate
2c sugar
1 tsp vanilla
3/4tsp salt
4 eggs
1 1/4c AP flour
21 oz. cherry pie filling + 1 tsp lemon juice
Preheat the oven to 350, and grease a 9 x 13 baking pan.
Melt the baking chocolate in a double broiler. Cream together the butter and sugar for the brownie layer, then add the eggs. Add the vanilla and melted chocolate and mix well. Stir in flour and salt and pour into the baking pan.
For the cheesecake layer, beat all ingredients together until smooth. Drop it by the tablespoon over the brownie layer, and follow by dropping tablespoons of the cherry mixture over it. Use a butter knife to swirl the layers, but do not mix them together. Bake for 45-50 minutes or until the edges of the brownie begin to pull away and the edges of the cheesecake begin to turn slightly brown. Keep in mind that this brownie will still seem gooey when you first take it out of the oven, let it cool completely and chill for at least 4 hours (I let mine go overnight and am glad I did). Try serving these in cupcake liners, they're super gooey!
No-Bake White Chocolate Key Lime Cheesecake
How's THAT for a title? These bars are surprisingly simple to make and require zero oven time. Since I had all burners blazing at the time, this was a relief. This is another gem from Castsugar, although she calls them bars I consider this a cheesecake. They're perfect for summer and I would imagine they'd be the first thing to go had the bake sale not been rained out. You must try these for your next barbeque or summer celebration!
Crust:
30 Oreo cookies
2 oz white chocolate
Filling:
6 oz white chocolate
1 pint whipping cream
8 oz cream cheese
3 tbsp sugar
3 tbsp lime juice
2 tbsp key lime zest
1/3c confectioners sugar
I recommend using an aluminum cake pan instead of a traditional one for this recipe. If you don't have access to this, line a 8x8 pan with foil.
Melt all the white chocolate in a double broiler. Crush your oreos by hand or in a food processor, and combine them with 2-4 tbsp of the melted chocolate. Press into the bottom of the pan to form a crust.
Beat 1/2c whipping cream until peaks begin to form. Add cream cheese, lime, zest and sugar to a separate bowl, and beat well. Beat in remaining white chocolate. Fold in gently with the whipped cream and spread mixture over the crust. In a clean bowl, pour the remaining whipping cream and confectioners sugar and beat with an electric mixer until fluffy. Make sure to not overbeat or you'll wind up with sweetened butter! Spread the whipping cream over the lime layer, and voila! No bake cheesecake! Allow it to chill for at least 2 hours before serving.
Peanut Butter and Jelly Bars
For the last week I've been working on a major bake sale, so I'd been keeping my eyes out for anything unique to contribute. I found that I need not go any further than Castsugar. True to form, these peanut butter and jelly bars are different from anything I could have found in my current collection of cookbooks. It's a very rich shortbread crust with a smear of jelly in the center; imagine a PB&J sandwich cookie, only as a brownie.
I made a few changes to the recipe, but these are still very rich and very sweet. I couldn't eat a whole bar by myself, which speaks a lot after all the spicy chocolate gingerbread I've scarfed! But more on that later. I used more peanut butter and less real butter, I also used the chunky variety. Instead of full octane jam I used a reduced sugar version. I would not recommend using anything containing a sugar substitute though; aside from messing up the perfect taste, the lack of real sugars would prevent the jelly from setting. Anyways, here's my recipe, with pics soon to come:
1 1/2 sticks unsalted butter
1 1/2c sugar
1 1/2 tsp vanilla extract
2 large eggs
2 1/4c chunky peanut butter
3c AP flour
1 tsp baking powder
1 1/2 tsp kosher salt
18 oz jam (I used blackberry)
Preheat the oven to 350, and grease a 9 x 13 pan.
Cream together the sugar, butter and PB. Add eggs one at a time, then add vanilla. Add the flour, baking powder and salt in small additions, mixing well in between. You should be left with a crumbly but malleable dough. Spread 2/3 of it on the bottom of the pan.
Spread the jam on top of the first layer. Sprinkle the rest of the crumbles on top, taking care to not mix them with the jam too much. Bake for 45 minutes. Allow it to cool completely before cutting into chunks, otherwise you'll get a gooey mess instead of a bar. Enjoy!
Monday, June 2, 2008
Buttermilk Pie

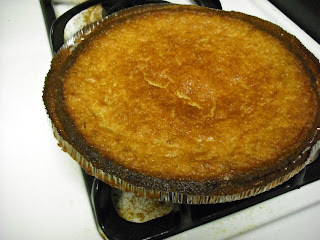
This is a classic Southern recipe for buttermilk pie. Most people who haven't tasted it before will give you strange looks when you combine the words "buttermilk" and "pie". It's actually quite delicious and goes over well especially on holidays.
This recipe comes from Natalie Moore at NPR. Growing up, one of my neighborhood friends' mothers made this and Natalie's recipe comes the closest to hers (although that South Carolina touch can't be replicated). There are many variations of this recipe; it's similar to chess pie, creme brulee and a South African dish called "melktert".
I used a chocolate graham cracker crust since I couldn't find regular pie crust. After my adventure with the apple pie, I wasn't quite ready to dive back into those waters. While the graham crust made it really interesting, it was a bit sweet. I'm posting the reduced-sugar version of the filling for that reason. Also remember to let this pie cool for at least twenty or thirty minutes before serving, it gets VERY HOT!
Buttermilk Pie:
1 graham pie crust
4 eggs
1c sugar
2 tbsp flour
1/2c melted butter
1 1/2c buttermilk
1tsp vanilla extract (I tend to go heavy on this, so you can use up to 1 tbsp)
Beat the eggs with sugar. Add flour and beat well. Add buttermilk and vanilla. The filling will be liquidy, so carefully pour it into the crust and load it into the oven. Bake at 400 for the first 10 minutes and reduce to 325 for 50 more minutes.
Allow to cool, serve either slightly warm or at room temperature.
Ugly Apple Pie

No pain, no gain, right? This pie was definitely one of the worst aesthetic disasters to come out of my kitchen in a long time ;] However, I think you have to know just as much about what doesn't work as you know what does to be a successful cook. Besides, the thing TASTED great! I present, for your viewing pleasure, how to make a very ugly but very tasty apple pie.
Crust:
2c flour (I used cake flour)
1tsp salt
1tbsp sugar
6tbsp butter
6tbsp shortening
6-8tbsp very cold water
Filling:
5 tart apples, peeled and chopped
1c sugar
2tbsp flour
1tbsp cinnamon
1/2tsp clove powder
1/4tsp salt
2tbsp vinegar
1tbsp lemon juice
Combine the dry ingredients for the crust in a large bowl. You're supposed to use a pastry cutter to combine the butter and shortening, which I didn't do. I used the whisk on my countertop mixer -- instead of the crumbly, dry mixture you want for a pie crust, I wound up with a creamy schmaltzy yellow mixture. Either way, let it chill in the fridge for 10-45 minutes.
As you're working on the crust, if your apples are pre-sliced and peeled, let them rest in water combined with the lemon juice so they don't discolor. Drain them when the time comes to make filling. Most people don't cook theirs beforehand; I didn't think it was necessary, and I was right. Anywho. Mix the filling ingredients and set aside.
I brought my crust mixture out of the fridge and it was nowhere near wanting to roll out. So I scooped some in my hand and smeared it all around the bottom of the pan and up the sides, about an inch thick. Put the apple filling into the crust. I still had some left over for the top though, so I decided to attempt a streusel. To do a streusel, you pinch sugar and flour into butter until it turns into crumbs. Instead, after about 1/2c of sugar and 1c flour, I wound up with a mixture that was roll-able. I flattened it and draped it over the apple mixture. Bake at 400 degrees for 50-60 minutes.
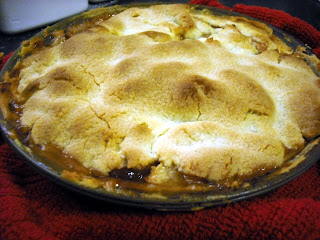
My primary issue was the crust -- while it tasted heavenly and turned out quite nicely when cooked, the bottom layer was way too soft to work with. Definitely combine your crust using a pastry cutter, you want something crumbly that will stick together when rolled out.
The top was a bit too sweet. Since it was basically a sheet of streusel, this is to be expected. Again, this problem can be avoided by making the crust right ;]
Although this pie was delicious, it's incredibly rich. When I come by a recipe that works and has that magic to it I'll make sure to post it. Otherwise, I'll need to find someone who doesn't mind ugly pies to eat the test batch!
Southern Buttermilk Biscuits

These were more of a challenge than you'd think -- mash the dough together, roll it out and bake, right? It turns out there's a big difference between a biscuit (a hard piece of salty bread) and a true Southern buttermilk biscuit. I'd had some buttermilk left over from the pie so I decided to give these a whirl. While they didn't turn out terribly, they definitely could have come out better. For that reason I'm leaving an "improved" recipe and method, along with some helpful information about ingredients.
White Lily flour is touted as the best for making biscuits; it's made from soft winter wheat and has a low protein content. Thanks to Pinch My Salt, I have some good info on different flours and what they do:
The less protein a flour has, the better it is for "quick" breads like biscuits and pizza crusts. A higher protein flour, which also tends to produce more gluten, is better for risen and yeast breads. Hence, bread flour has the most protein while cake flour has the least. I tend to keep cake flour, all purpose flour, self-rising and bread flour in my kitchen along with a little wheat gluten. You can add some of this to all purpose flour to create bread flour, check the box for exact measurements. Long story short, low protein flour creates a light and fluffy bread while high protein flour assists in rising. Here are exact protein percentages:
Cake flours (Swans Down, Softasilk):7.5 to 8.5% proteinBleached southern all-purpose (White Lily, Martha White, Gladiola, Red Band):7.5 to 9.5% protein
National brand self-rising (Gold Medal, Pillsbury):9 to 10% protein
National brand bleached all-purpose (Gold Medal, Pillsbury): 10 to 12% protein
Northern all-purpose (Robin Hood, Hecker’s):11 to 12% protein
Northern unbleached all-purpose (King Arthur):11.7% protein
Bread Flour:11.5 to 12.5% protein
Pinch My Salt suggests using a combination of cake and all purpose flour if you don't have White Lily; this is what I did and it seemed to work.
Pinch My Salt's Buttermilk Biscuits
1-1/4c cake flour
3/4c all-purpose flour
1 1/2tsp baking powder
1/2tsp baking soda
1/2tsp salt
1/4c butter
3/4c buttermilk
Grease a baking sheet and preheat the oven to 450. Combine dry ingredients in a large bowl. Using a dough cutter (a handle with several U-shaped wires), cut the butter into the dry ingredients. It should look like crumbs. Add your buttermilk and shape into a ball.
Knead the dough a few times on a floured surface and roll out. I rolled mine too thin, about 1/2 an inch, I suggest making them about an inch thick. Make sure to coat the surface and rolling pin with flour so there's no sticking. Once your dough is flat, use either a cookie cutter or the top of a drinking glass to cut the biscuits out. Shape the remaining dough into biscuit shapes and place on the cookie sheet. Bake for 10-12 minutes.
Here are a few tips from Salt on how to make the best biscuits:
Make sure your baking powder, baking soda, and/or self-rising flour are fresh!
Start preheating the oven as soon as you start thinking about making the biscuits! You want the oven to be completely preheated before the biscuits go in.
Prepare your ingredients and tools in advance so that once you get started, you can work quickly and efficiently: cut your butter in small pieces and put it back in the fridge, measure out the buttermilk, flour the counter, get out the biscuit cutter and baking sheet.
Use very cold butter, keep it in the fridge until you’re ready for it. Work the butter quickly into the flour so that it doesn’t have a chance to even think about melting!
When you add the buttermilk, stir lightly! This can be done simply with a fork. You just want to get the dough to a point where the flour is all clumped together, not a smooth dough!
Knead lightly and minimally. You aren’t kneading this like bread dough, you are simply finishing the mixing process with your hands. You only want to knead a couple of times to finish dispersing the liquid through the dough. The more you knead, the denser your biscuits will be!
Even if you use self-rising flour in the dough, dust the counter and dough with all-purpose flour. Self-rising flour can give the outside of the biscuits a bitter taste, due to the leavening it contains.
Don’t pat the dough out too thin. If you want high biscuits, don’t roll the dough any thinner than 3/4 - 1 inch.
When cutting biscuits, use a sharp cutter and press straight down and up. Don’t twist! This was the hardest tip for me to adapt. I have always twisted the biscuit cutter. But guess what, it makes a difference!
Place cut biscuits together on the baking sheet so that they are touching. Again, this is something I have never done. But I found that the biscuits do rise well and I really enjoy the texture of the soft-sided biscuits!
Don’t re-roll the scraps. Since it is best to work the dough as little as possible, instead of gathering the scraps, re-rolling and cutting into biscuits, just form the scraps into biscuit shapes by hand. I usually end up with scraps to form two extra biscuits. They might look a little funny, but they rise as well as the others and they taste just as good!
Sunday, June 1, 2008
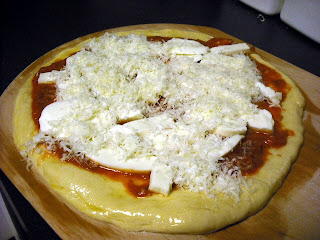
Home Baked Pizza

I made this when I was having a pizza craving but didn't want to order delivery -- it's heavenly with homemade marinara!
3.5c bread flour
1c warm water
2tbsp yeast
1/4c olive oil
1tsp salt
4 oz fresh mozarella
1/2c marinara sauce
1/3c shredded asiago cheese
Combine the warm water and yeast. Add half the olive oil, salt, and flour; let rise for 30 minutes. Preheat oven to 400. Once dough has risen, roll out either by hand or with a pin. Drizzle the rest of the olive oil over the crust and brush thoroughly.
Spoon the marinara onto the crust and top with cheeses (plus other toppings if you want them).
Bake until the crust is browned and the pizza bubbles; this should take around 20 minutes. Allow to cool for a few minutes and slice. 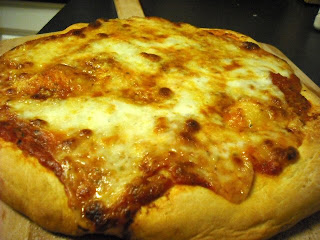
Friday, May 23, 2008
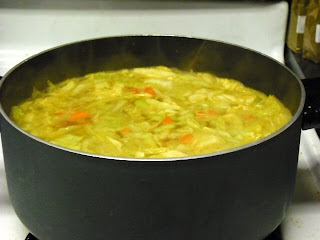
Matzo Ball Soup

This is the recipe for a basic matzo ball spiced up a little. In addition to the vegetables, some unexpected ingredients are used in the stock to enhance the flavor. This is the Jewish take on chicken dumpling soup; perfect for cold or sick days.
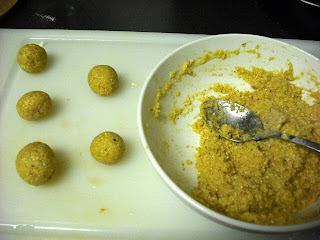
Matzo balls:
3/4c matzo meal
dash pepper
1 tsp kosher salt
2 eggs
2 tbsp veg oil
Soup:
1 small cabbage head, chopped
2 1/2 quarts imitation chicken broth
2 carrots, diced
3-4 celery stalks, diced
1/4tsp paprika
1 tsp garlic salt
1/2 tsp onion powder
1 tbsp vinegar
Heat the soup ingredients in a large pot.
Combine the matzo ball ingredients and allow to chill for 15-30 minutes. Form into small balls and drop into boiling soup.
Cover tightly and allow to cook for 20 minutes. Serve hot.
Famous Egg Rolls
I'll begin this one with a disclaimer: this isn't a light dish. It's vegetarian and only uses vegetable oil, but through trial and many errors I've found there are few ways to successfully make an egg roll, and only one way to make a great egg roll. Deep frying is required, although you can make do by pan frying. Still, deep frying is easier and preserves better.
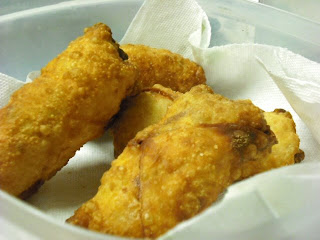


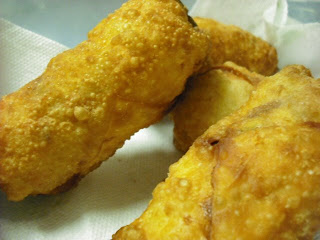
Aside from being fried these are phenomenal. One recipe tends to make a lot so they're good for bringing to parties or for an especially big dinner crowd. I like to serve them with tamari, but any kind of dipping sauce works.
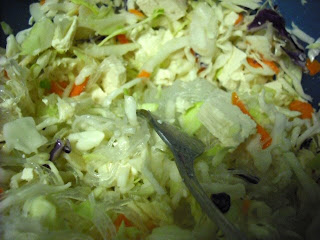
Veggie Egg Rolls:
1 package (15 count) egg roll wraps
1 quart veg oil, for frying
1 beaten egg
Filling:
1/2 cabbage, shredded (I used a mix of red and green cabbage)
1 nest cooked sai fun
1/2lb cubed tofu
1 shredded carrot
1/2 small onion, finely diced
1 tbsp kosher salt
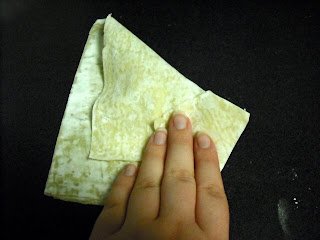
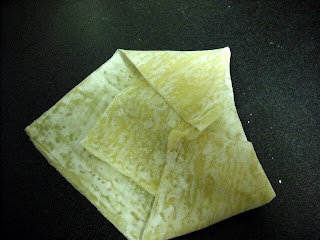
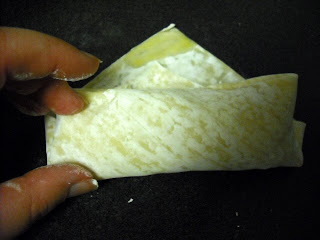
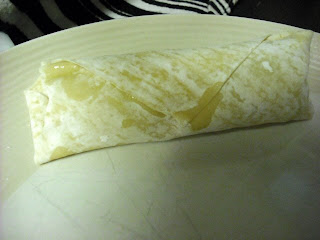
Combine ingredients in a large bowl. Put a few tablespoons of filling into the center of the wrap.
Fold the right corner of the wrap over to the left, the top and bottom corners to the center, and roll toward the furthest left edge. Use a little egg as a glue to hold the edges together. Finish the rest of the egg rolls.
Place a fryer into the oil and slide one of the egg rolls in. Let it cook for 2-3 minutes, then flip to the other side to brown. Remove from oil onto paper towels. Repeat for each egg roll.
Allow to cool for a few moments and serve.
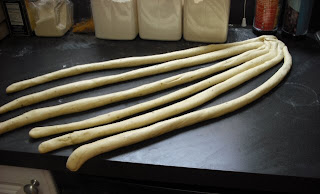
Six Strand Bread
I love braided breads; being able to put artistry back in the kitchen is a passion of mine. I've done three strand loaves for awhile, but chose to tackle something decidedly more challenging this week. I made mine with the regular sourdough, but any type of dough will work. Another fun thing to do is brush filling with cinnamon or cheese between the strands, but that's for another time.
The best resource on this bread is a video I found on YouTube, so thank you MayaSophia! She gives a great visual as to how to braid these loaves, otherwise my explanations would just be confusing.
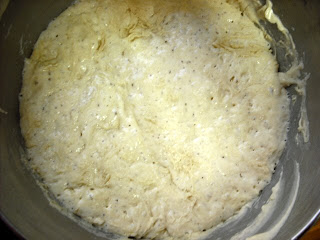
The first step for me was to sponge the bread. I took a photo to show what sourdough sponge should look like:
The next step was to mix the dough and let it rise. I then divided it into six parts and rolled each into a snake, pinching them together at the top:
Then comes the braiding, which is demonstrated in the video:
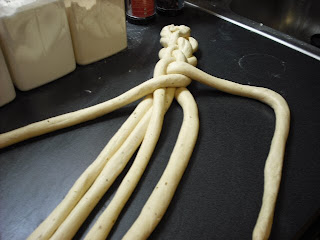
Continue to braid until the entire loaf is finished, then pinch and tuck each end over. Set it on your floured peel and allow to rise for 1 hour.
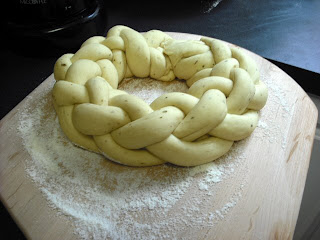
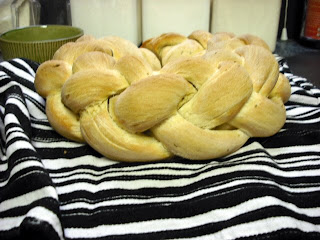
Brush the loaf either with egg or olive oil (used here) and allow to bake at 400 for 30-45 minutes, or until golden brown. These loaves typically take longer since they're more dense. What I love about braided breads is that you can break them apart and dip the little sections in oil or sauce, so this is pictured next to spinach dip (see Spinach Artichoke Dip Rediscovered for recipe).

The best resource on this bread is a video I found on YouTube, so thank you MayaSophia! She gives a great visual as to how to braid these loaves, otherwise my explanations would just be confusing.
The first step for me was to sponge the bread. I took a photo to show what sourdough sponge should look like:
The next step was to mix the dough and let it rise. I then divided it into six parts and rolled each into a snake, pinching them together at the top:
Then comes the braiding, which is demonstrated in the video:
Continue to braid until the entire loaf is finished, then pinch and tuck each end over. Set it on your floured peel and allow to rise for 1 hour.
Brush the loaf either with egg or olive oil (used here) and allow to bake at 400 for 30-45 minutes, or until golden brown. These loaves typically take longer since they're more dense. What I love about braided breads is that you can break them apart and dip the little sections in oil or sauce, so this is pictured next to spinach dip (see Spinach Artichoke Dip Rediscovered for recipe).
Kitchen Must-Haves
Since my entries are so full of little items that I love, I decided to post exactly what these are and where you could procure them. Everyone has a preference, and whatever gives you the best results is what you should stick with. These are all things that help me keep my kitchen organized and accessible; I'm rarely left up a creek when I have my versatile equipment on hand! With that said, here is the hall of fame:
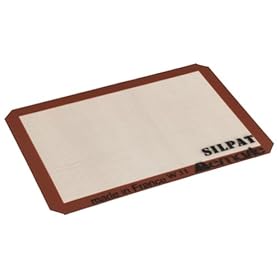 This thing is perfect for baking cookies -- it completely eliminates your need for evil cooking spray! It keeps your baking sheets clean so you don't have to wash them nearly as much. It requires minimal maintenance in and of itself, just a rinse with some hot soapy water after use. My only caution is to not use it in temperatures over 450, or you'll wind up with a crunchy plastic sheet.
KitchenAid Countertop Mixer:

This is the centerpiece of my baking world. As you can see, there are three attachments, which I've waxed on about in my "Fun with Sourdough" entry. It's a lot like a good boyfriend -- steady, non-reactive, and can handle heavy work without complaint :] It's not 100% necessary to own one of these to be a great baker, but if you already have one it's time to use it! You can seek them out used, but because it comes with a lifetime guarantee, it's probably wise to get a new one if you plan on using it a lot. I've seen them sold at Williams-Sonoma in a million different colors and even different sizes, they range from $250 to $600.
Bamboo Cooking Utensils:
Bamboo is an extremely eco-friendly product; since it's technically a grass, you're sparing some lucky trees too! They also perform incredibly well. Dishwasher safe, lightweight yet strong, these also do not scratch cookware. Ideal for any kitchen, they're also a bargain at a few bucks per utensil.
Silicone Cookie Sheet:
This thing is perfect for baking cookies -- it completely eliminates your need for evil cooking spray! It keeps your baking sheets clean so you don't have to wash them nearly as much. It requires minimal maintenance in and of itself, just a rinse with some hot soapy water after use. My only caution is to not use it in temperatures over 450, or you'll wind up with a crunchy plastic sheet. Snapware Containers:
 These containers are absolutely central to the organization of my kitchen. They're airtight, so almost anything can be stored in them. You know how there's always a sprinkling of flour or sugar that falls out when you're measuring ingredients from the bag? That's not an issue with these. I label them and use them to store different kinds of flour and sugar. I'm sure my kitchen would be a much messier place without these guys to help me keep things in order.
Oxo Good Grip Knife Set: These knives are like none I've ever used. They're sharp as a razor, but because of the soft grip they have a safety aspect as well. The set contains 14 knives so you don't have to worry about buying anything else. Worth every penny, these should last forever if you take care of them.
Microplane Zester Grater:
This item completely lives up to its reputation -- lightweight, dishwasher safe, it grates through hardest cheeses like butter. You can usually come by them for under $10 at kitchen supply stores. This is absolutely essential if you grate your own cheese; it leaves piles of feather light shavings instead of chunky slices like a traditional grater. It doesn't work particularly well on soft cheeses, but that's what regular graters are for.
Thursday, May 22, 2008
Baked Garlic Dip
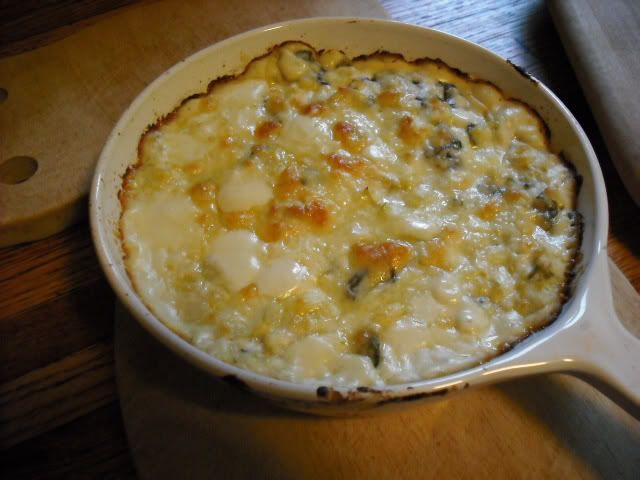
This is my favorite thing to serve alongside the Italian sourdough -- a creamy, garlic-ey dip that tastes a lot more fattening than it is. I read the basis of the recipe in the Herb Companion and made a few changes. For example, the original recipe calls for scallions while I chose to substitute with more garlic -- ripe garlic cloves tend to eminate a richer scent and flavor. Try baking this in a cast iron or stoneware dish so it stays hot and perfect.
Baked Garlic Dip
3 cloves garlic, chopped finely
1/2c cooked spinach
3-5 artichoke hearts, chopped
~2tsp fresh oregano, chopped finely
7 oz fage (Greek low fat yogurt, use plain regular yogurt otherwise)
3/4c light mayonnaise
1c shredded cheddar
1/4c shredded parmesean
salt to taste
Heat the mayonnaise and fage in a saucepan over medium-low heat. Preheat oven to 450. Add garlic, oregano and artichoke hearts; stir occasionally until simmering. Add cheddar and stir until melted, add spinach and salt. Pour into a baking pan or small casserole dish and sprinkle parmesean over the top. Bake for 10 minutes or until bubbling and beginning to brown. Allow several minutes to cool before serving.
Tuesday, May 20, 2008
Mom's Oatmeal Cookies
My mom has always taken a lot of pride in her oatmeal cookies; rather than being dense and crumbly, these are chewy and surprisingly light. She prefers to include nuts and raisins, but many people like chocolate chips or just plain oatmeal. Experiment to figure out what you prefer, and don't forget to have fun!
Oatmeal Cookies:
1/2c room temp butter
1/2c white sugar
1/4c brown sugar
1 egg
1 tsp vanilla extract
3/4c all purpose flour
1/2 tsp baking soda
1 tsp cinnamon
1/4 tsp kosher salt
1 1/2c quick cooking oats
1 c raisins, nuts or chocolate chips
Preheat oven to 375 degrees. Cream butter and sugars together, add egg and vanilla. Combine dry ingredients (no oats) and combine with creamed mixture. Add oats and raisins. Pour into a greased baking pan, and cook for 10-15 minutes. Let cool completely before cutting into bars or squares.
Southwest Salsa
This is one of my favorite salsa recipes because it's easy, the ingredients can be found in any grocery store, and it contains enough different flavors to put plain tomato salsa to shame. I encourage everyone to use as fresh of ingredients as they can find, but the only place where it really makes a difference is in the cilantro and tomatoes. Since I can't stand tomato seeds I pit mine beforehand, but if you don't mind them it doesn't make much of a difference. Enjoy!
Southwest Black Bean Salsa:
15 oz kidney beans
15 oz black beans
15 oz fresh or canned corn
1/2c chopped onion
2 tbsp finely chopped jalapenos
1 tbsp chopped fresh cilantro
1tsp vinegar
1 chipotle pepper, very finely chopped (one can usually contains 4-5 peppers)
15 oz diced tomatoes
3 cloves garlic, finely chopped
1/2 tbsp salt
Combine all ingredients. Allow to chill overnight. Who knew it could be this easy?!
Honey Braided Challah
This is a great holiday bread and doubles as a nice breakfast loaf. It's sweet without being demanding and is perfect with cream cheese or honey butter. Many traditions include seeds or certain herbs sprinkled over the top; sesame seeds work well for this particular loaf.
Honey Cinnamon Challah:
7c bread flour
1 tbsp kosher salt
1/2c agave nectar (low glycemic sweetener, check health food stores or well stocked grocers)
2 packets of yeast dissolved in 1/3c warm water
1/2c veg oil
2 tbsp apple pie spice
4 eggs
1c boiling water
1/2c cold water
1 egg + 2 tbsp honey + 1 tbsp water (set aside)
Beat eggs in a bowl. In separate large bowl mix oil, nectar, spices, salt and add boiling water. Stir until completely dissolved. Add cold water, stir, and add yeast water -- keep in mind that the mixture should be warm, not hot, before the addition of yeast. Add eggs to the large bowl. Combine flour 1/2-1c at a time, as certain climates require more or less of it. If you're kneading by hand, knead for about 15 minutes or until smooth and elastic; if you're using a bread hook it takes around five to ten minutes. Place loaf into a greased bowl and let rise, covered, in a warm place for an hour or until doubled in size.
Before punching the dough down, remove from the bowl and slice into thirds with a sharp knife. Knead each round for 2-5 minutes and use the sharp knife to divide each into thirds again. Roll each section into a "snake" about 1-2 inches in diameter. Pinch the top ends together and braid down the loaf, then pinch the bottom ends and tuck under. Repeat this with the 2 remaining rounds and let each rise on a greased baking sheet for 30-45 minutes. Right before the loaves are ready to go in the oven, take a pastry brush and coat each with the egg and honey mixture. Make sure to cover all exposed areas of the loaf except for the bottom. Sprinkle seeds if desired.
Preheat the oven to 450 with your baking stone, and reduce to 350 for the actual baking time. If you're operating with a baking sheet only, flour with cornmeal or semolina and allow it to preheat. Place the loaf on a greased large plate or a floured peel and slide it onto the baking stone or sheet. Allow to bake for 20-30 minutes or until loaf is a deep golden brown.
Wednesday, May 7, 2008
White Peach Breakfast Tart
This is a specifically modified version of the original breakfast tart, which is usually made with a combination of apples and jellies or jams. White peaches are especially popular in Japan for their light, delicate taste and aroma. This is another recipe where I add rosewater; if you don't like the effect this brings feel free to leave it out or replace with vanilla extract. The olfactory taste of roses combined with fruit is especially decadent; soft and sweet without a hint of tartness. The yogurt takes the place of richer alternatives like whipped cream.
Tart crust:
~2 tbsp butter
2 eggs
1/8tsp kosher salt
1/2c flour
1/2c milk
2tbsp sugar
Grease cake pan with butter. Combine remaining butter with other ingredients, and bake at 400 degrees for 20 minutes.
Filling:
4 oz container vanilla yogurt
4 oz can white peaches (check Asian markets)
2 tbsp peach preserves
a few drops rosewater if desired, use sparingly
1-2 tbsp confectioners sugar
Heat peaches, rosewater and preserves over medium-low heat. Spread vanilla yogurt over tart crust. Once fruit begins to simmer, remove from heat and pour evenly over yogurt layer. Sprinkle with confectioners sugar and either serve hot or chill until ready to eat.
Vegetable Sai Fun (Stir Fry Noodles)
I LOVE sai fun! Also known as bean threads, mung bean noodles, glass noodles, or Chinese vermicelli, these are delicate clear noodles that cook quickly and absorb flavors fabulously. They can be used in darn near anything -- as noted, I love to use them in spring and egg rolls. This could also be called my "everything" stir fry, since the concept originated in a rush of leftover fried rice and precooked sai fun.
This can be made with or without rice. I definitely wouldn't advocate making a fresh batch of it just for this recipe; it can spruce up the texture if you have some leftovers though.
Vegetable Sai Fun:
3 nests sai fun (apx. 1 1/2c cooked)
1/2 lb extra firm tofu, cubed
2tbsp olive oil
1/3c chopped water chestnuts
1/3c peas
1 grated carrot
1c raw chopped cabbage
4 oz can bamboo shoots
1/4c chopped onion
2 cloves garlic, finely chopped
2 tbsp tamari or soy sauce
1/2c cooked rice (optional)
Boil sai fun for 3-5 minutes or until soft. Strain and remove from heat. Steam cabbage and onion until softened, apx 5-10 minutes. Saute tofu with olive oil, garlic and tamari until lightly browned in a large skillet or wok. Add cooked sai fun and all other ingredients over medium heat, toss with spatula every few minutes until noodles start to become crispy and brown, apx. 15-20 minutes. Serve hot with tamari or schezuan sauce for a spicier taste.
Portobello Linguine
I promised I'd pass on the way to use those discarded asparagus stems! This recipe is a combination of Boursin sauce and a fabulous dish I had at La Grotta. La Grotta cooks seasonal fresh Italian food, down to making their own pasta. I recieved a sampler and was pleasantly surprised at the use of asparagus in the linguine; this is a simple recipe that SEEMS much more complicated. Great for fooling anyone you want to impress! :]
Portobello Linguine
Sauce:
1 (8 oz) package neufchatel cheese or low-fat cream cheese
3 finely chopped garlic cloves
1/2c skim milk
1 tbsp oregano
1 tbsp basil
1/2tsp ground black pepper
1/3c grated asiago or other hard cheese
salt to taste
Heat all ingredients over medium-low heat until cheese melts and sauce begins to simmer. Remove from heat immediately.
Pasta:
1 box linguine (I like spinach linguine, but any kind works)
1 tbsp butter
~1 lb portobello mushrooms
1/2c finely chopped asparagus stems
Boil pasta and drain. You may use whole asparagus or just the stems, they should be chopped so finely that the fibrous texture is broken up. Heat the butter over medium in a skillet. Remove stems from portobellos and chop into as large or small pieces as you desire -- I prefer to chop them quite finely, but many people enjoy a "chunkier" dish. Saute the asparagus and mushrooms in the butter for 5-8 minutes and add to cheese sauce. Serve hot over linguine.
Healthy Comfort Dinner
I bet most of you didn't think comfort food and healthy would be in the same sentence! But in this meal, they are and they work wonderfully together. This is a compilation of things I've learned from my mother and the women at my synagogue; a few details are my own creation, of course. But this is a great standby on those nights I don't want to go all out, but I want a homemade, hot meal too.
The chicken isn't pictured due to my vegetarianism, but thanks to my fellow Shebrews I wasn't allowed to leave the seder kitchen without learning how to cook chicken breast. I'm including this recipe as well because it seems like it would go with the rest of the meal.
I ran across some gorgeous purple cauliflower at the grocery store and had to try it. In fruits and vegetables more color usually means a higher level of antioxidants and vitamins, so there seemed to be no harm. Sure enough, when I researched it later, anthocyanin is the antioxidant present -- the same as in red wine and red cabbage.

photo thanks to Wikipedia
Back to the meal. It's high in fiber, high in vitamins, and relatively low in calories while retaining LOTS of flavor!
Cauliflower and cheese sauce:
1 head cauliflower
1 1/2c milk
1/4c olive oil
2 tbsp flour
1/2c sharp cheddar
salt to taste
Chop the clusters from the cauliflower, and boil them until as soft as you desire. Heat the olive oil and milk on medium low, when hot add flour. Stir constantly while adding cheese unti2l melted and no chunks remain. Set aside to cool and thicken.
Cabbage:
1 small head cabbage, chopped or shredded
2 tbsp vinegar
salt to taste
Boil a large pot of water. Add vinegar and cabbage, allow to boil for 15-20 minutes or until desired softness. Add salt.
Roasted potatoes:
1 lb small Yukon potatoes or other small heirloom variety (do NOT use baking potatoes)
1 tsp thyme
1tbsp kosher salt
~1/4c olive oil
2 cloves garlic, finely chopped
1 tsp paprika
a few grinds of black pepper
1/4c grated hard cheese
2 tbsp bread crumbs
Boil potatoes until soft enough to poke with a fork (apx 20 minutes). Preheat the oven to 450, and slice larger potatoes into bite sized pieces. Place into casserole dish. Add salt and spices, drizzle with oil, and toss to coat each piece. Top with cheese and bread crumbs, bake until brown and bubbly.
Chicken breast:
4 boneless, skinless chicken breasts
2 tbsp olive oil
1 tsp thyme
1/2tsp sage
1 tsp rosemary
1 tsp kosher salt
1/2 tsp garlic powder
Combine spices in a small bowl. Rub each chicken breast with the mix. Put olive oil in a skillet (cast iron is my hands-down favorite) and heat on medium. Cook until each side is browned, about 7 to 8 minutes on each side. Serve with a lemon wedge if desired.
Voila! Dinner is served. This is a relatively quick meal, if you're using multiple burners and maximizing your time it can be done in 30 minutes.
The chicken isn't pictured due to my vegetarianism, but thanks to my fellow Shebrews I wasn't allowed to leave the seder kitchen without learning how to cook chicken breast. I'm including this recipe as well because it seems like it would go with the rest of the meal.
I ran across some gorgeous purple cauliflower at the grocery store and had to try it. In fruits and vegetables more color usually means a higher level of antioxidants and vitamins, so there seemed to be no harm. Sure enough, when I researched it later, anthocyanin is the antioxidant present -- the same as in red wine and red cabbage.
photo thanks to Wikipedia
Back to the meal. It's high in fiber, high in vitamins, and relatively low in calories while retaining LOTS of flavor!
Cauliflower and cheese sauce:
1 head cauliflower
1 1/2c milk
1/4c olive oil
2 tbsp flour
1/2c sharp cheddar
salt to taste
Chop the clusters from the cauliflower, and boil them until as soft as you desire. Heat the olive oil and milk on medium low, when hot add flour. Stir constantly while adding cheese unti2l melted and no chunks remain. Set aside to cool and thicken.
Cabbage:
1 small head cabbage, chopped or shredded
2 tbsp vinegar
salt to taste
Boil a large pot of water. Add vinegar and cabbage, allow to boil for 15-20 minutes or until desired softness. Add salt.
Roasted potatoes:
1 lb small Yukon potatoes or other small heirloom variety (do NOT use baking potatoes)
1 tsp thyme
1tbsp kosher salt
~1/4c olive oil
2 cloves garlic, finely chopped
1 tsp paprika
a few grinds of black pepper
1/4c grated hard cheese
2 tbsp bread crumbs
Boil potatoes until soft enough to poke with a fork (apx 20 minutes). Preheat the oven to 450, and slice larger potatoes into bite sized pieces. Place into casserole dish. Add salt and spices, drizzle with oil, and toss to coat each piece. Top with cheese and bread crumbs, bake until brown and bubbly.
Chicken breast:
4 boneless, skinless chicken breasts
2 tbsp olive oil
1 tsp thyme
1/2tsp sage
1 tsp rosemary
1 tsp kosher salt
1/2 tsp garlic powder
Combine spices in a small bowl. Rub each chicken breast with the mix. Put olive oil in a skillet (cast iron is my hands-down favorite) and heat on medium. Cook until each side is browned, about 7 to 8 minutes on each side. Serve with a lemon wedge if desired.
Voila! Dinner is served. This is a relatively quick meal, if you're using multiple burners and maximizing your time it can be done in 30 minutes.
Panko Asparagus
I was doodling around one of my favorite used book stores downtown when I found the cookbook section -- jackpot! After lots of comparison and debating with myself, I decided on The Garden Fresh Vegetable Cookbook by Andrea Chesman. She's a gardener who cooks almost strictly seasonally; similar to the Animal, Vegetable, Miracle venture for Barbara Kingsolver, seasonal cooking involves making the most of what's growing in your garden when its at its best. My mom and stepdad are fans of this as well, during the mid to late summer their garden looks like a little piece of Eden! I'll include some later sections on growing some of your own produce, so sit tight.
Anywho. Back to Ms. Chesman. One of the things about this book that caught my eye is that it has a section for each vegetable, and one of those veggies is asparagus. I've always (well, in my adult life) had an appreciation for asparagus but the vegetable itself seemed a little...intimidating. I had tried a few methods of cooking and while they turned out fine, I felt I must have been doing something wrong since I wasn't getting the "tender and sweet" vegetable these books were raving about.
I ran across a recipe for Asparagus Sticks. This was intriguing; a new way to make asparagus?! Considering I had two bunches in my refridgerator haunting me, I decided to give it a whirl. I used white asparagus because it's what I had, but either type will do.
A few notes on this recipe -- panko is a Japanese style bread crumb. I bought them because it's what the recipe called for, plus they were cheap and on sale. If you can't find them I see no problem with using regular bread crumbs, the panko is mostly for texture (as photos will demonstrate). It's similar to gratings you get from a Microplane zester, which is a must-have for any kitchen aficianado! I used mine to grate the parmesean for this recipe, which definitely assisted in the texture.
Chesman says that the lemon juice is essential and brings all the flavors together. I agree, but I also think the end flavor might be a little intense for some people. The kid in me enjoyed these sticks dipped in marinara sauce, so don't be afraid to branch out. Speaking of which, this would probably be a successful way to sneak vegetables into your kids' diets ;]
Panko Asparagus Sticks
1 egg
1/2tsp Dijon mustard
salt & pepper to taste
3/4c panko
1/2c shredded parmesean or other hard cheese
15-30 asparagus spears (this number is based more on how much you want to eat, batter is flexible)
1. Trim or snap asparagus. If you're unsure how to do this, hold each end of the spear and bend -- it will always snap in the right place, where the fibrous stalk ends and the tender veggie begins. For most cuts of spears at the store, this is around halfway. Note that you can still keep the fibrous portions to flavor other dishes, so don't throw them away just yet! (recipe coming soon)
2. In a shallow bowl, whisk the egg, mustard, pepper and salt together. On a plate, combine the panko and cheese. Preheat the oven to 400, and lightly grease a baking sheet with olive oil.
3. Dip each spear into the egg mixture, then roll in crumbs to coat. Place on the baking sheet.
4. Bake for 12-15 minutes, then flip to the other side. Bake for another 12-15 minutes or until fully browned. Serve with a lemon wedge.
In terms of taste, these were pretty darn good. They were messy though. Something I would suggest is slicing the asparagus you plan to use in half once more to create smaller pieces -- the fibers were the main culprit for the mess, but on some pieces that snapped on their own it wasn't a problem.
The little balls you see are makeshift hush puppies. Thanks to my Southern upbringing, nothing in my kitchen goes to waste! I even have tiny tupperware containers for storing leftover eggs or whites from recipes calling for yolks-only. I still had a good bit of panko and egg mix left over, so I mixed them and rolled them into balls. I baked them with the spears and they came out just fine, very close to "real" hush puppies.
Friday, May 2, 2008
Classic Marinara
Ah, marinara sauce. One of the essentials of a kitchen, it remains a mystery in a glass jar for most. I decided to give it a whirl after reading up on the basics and consulting my mom, who is also a fan of cooking fresh foods. It took a few tries but this is the method I've found that produces the most flavorful, full bodied sauce.
Note that the wine in the final step is critical -- quality doesn't necessarily matter, but the type you use will affect the end product. White wine tends to create a mild orange marinara, comparable to a lean vodka sauce. Red wine will produce a deep burgundy or bright red spicy sauce depending on which you choose; zinfandel produces the darkest sauce, while pinot noir creates a zesty "summertime" marinara.
The first step is roasting the tomatoes. To pit them, slice each in half and use a spoon to scoop out the seeds.
Roasted tomatoes:
3 lbs roma tomatoes, pitted
1/2c olive oil
1 bulb garlic, finely chopped
1 small onion, finely chopped
1 tbsp thyme
2-3 tbsp oregano
3 tbsp basil
1/4 tsp chili powder
2 tbsp kosher salt
Preheat oven to 300. Place tomatoes pitted side-up in a large baking pan, combine garlic onion spices and salt and sprinkle over tomatoes. Drizzle with olive oil. Cover the pan with tin foil and let simmer for 2 1/2 hours. Crank the heat up to 500 for 25 more minutes, and remove to cool.
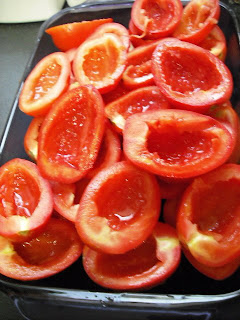
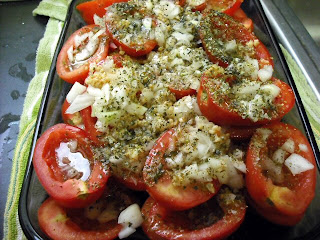
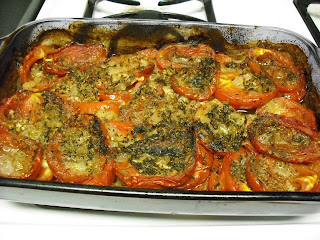
Sauce:
1/2c wine of choice
2 tbsp tomato paste
Take roasted tomatoes and blend in a food processor for 15-30 seconds, or until pureed. Note that there should be some olive oil and spices left in the pan; these are great served with fresh bread, so don't blend them in or chuck them out. Simmer the processed tomatoes in a saucepan with paste, add wine and stir often for 20-30 minutes. Serve fresh.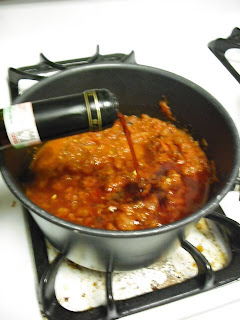
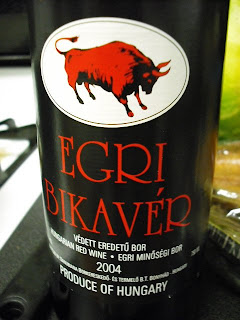
Note that the wine in the final step is critical -- quality doesn't necessarily matter, but the type you use will affect the end product. White wine tends to create a mild orange marinara, comparable to a lean vodka sauce. Red wine will produce a deep burgundy or bright red spicy sauce depending on which you choose; zinfandel produces the darkest sauce, while pinot noir creates a zesty "summertime" marinara.
The first step is roasting the tomatoes. To pit them, slice each in half and use a spoon to scoop out the seeds.
Roasted tomatoes:
3 lbs roma tomatoes, pitted
1/2c olive oil
1 bulb garlic, finely chopped
1 small onion, finely chopped
1 tbsp thyme
2-3 tbsp oregano
3 tbsp basil
1/4 tsp chili powder
2 tbsp kosher salt
Preheat oven to 300. Place tomatoes pitted side-up in a large baking pan, combine garlic onion spices and salt and sprinkle over tomatoes. Drizzle with olive oil. Cover the pan with tin foil and let simmer for 2 1/2 hours. Crank the heat up to 500 for 25 more minutes, and remove to cool.
Sauce:
1/2c wine of choice
2 tbsp tomato paste
Take roasted tomatoes and blend in a food processor for 15-30 seconds, or until pureed. Note that there should be some olive oil and spices left in the pan; these are great served with fresh bread, so don't blend them in or chuck them out. Simmer the processed tomatoes in a saucepan with paste, add wine and stir often for 20-30 minutes. Serve fresh.
Chocolate Chip Meringue Cookies

This is another gem from Cast Sugar's blog (check her out for some awesome baking ideas!) Again, it's slightly modified with less sugar and a little bit simpler to make. The ingredients themselves are very similar to your typical chocolate chip cookies, but they are actually cookie bars. They're also quite rich, so cut them on the smaller side.
This is the second time I've made these, my roommates and friends seem to like them a lot. They would be a huge hit at any party or get together; the perfect cookie bar to pair with a glass of milk.
Chocolate Chip Meringue Cookies
Cookie crust:
This is the second time I've made these, my roommates and friends seem to like them a lot. They would be a huge hit at any party or get together; the perfect cookie bar to pair with a glass of milk.
Chocolate Chip Meringue Cookies
Cookie crust:

2c cake flour
1 stick butter, room temp
1/4 tsp kosher salt
1/4tsp baking soda
1 tsp baking powder
1/4c granulated sugar
1/2c brown sugar
3 egg yolks
1 tsp vanilla
1-12oz package of milk chocolate chunks
Meringue topping:
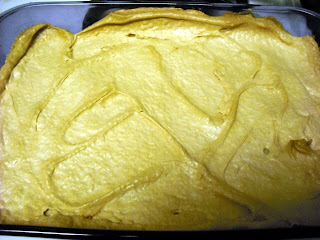
3 egg whites
3/4c brown sugar
Preheat the oven to 350. Cream the butter and sugars for the crust together, add egg yolks and vanilla. Add dry ingredients. Note that this will be a crumbly, somewhat dry mixture. Add chocolate chips. Spread into a brownie pan and tap down with the back of a wooden spoon.
The meringue takes several minutes of mixing, this is one thing I did note. Combine the sugar and egg whites, beat on high until glossy and "soft peaks" form. Spread over cookie crust. Bake for 25 minutes or until top of meringue begins to brown, let cool for at least 15 minutes. Serve and indulge.
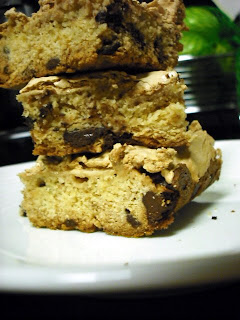
Baked Macaroni and Cheese

This is the comfort food of a lifetime. My great grandmother made it, my grandmother had her recipe, and my mom had her own version. The way I make it is to minimize saturated fat, but sometimes when I've been sick I'll cook it the way my mom did (plenty of butter). This dish actually became quite well known among my college friends as well; leftovers were rare in those days! However, this does preserve well for a few days, so don't be afraid to put the excess in tupperware for later. Try this on a cold day when you need a hearty warming side dish.
I use olive oil in this dish, but a lot of people don't like the flavor of EVOO. Feel free to substitute vegetable oil or, God forbid, butter.
Baked Macaroni and Cheese
Sauce:
2c lowfat milk
1/4c olive oil
1/2c shredded sharp cheddar
2 tbsp all purpose flour
salt to taste
Heat the milk and oil in a double boiler or over low heat in a small saucepan. When hot, add flour and stir well. Continue stirring and adding cheese and salt. Set aside to cool.
Macaroni:
1 box (12 oz dry) penne pasta
1c shredded sharp cheddar
1/4c bread crumbs + 1 tbsp melted butter (optional)
Boil and drain penne. Combine with sauce, and spread in a "9 x "9 baking pan or casserole dish. Top with cheddar and bread crumbs if desired. Bake at 450 for 10-15 minutes or until golden and bubbly; set aside to cool for 20 minutes. Cooling is important, as it makes the macaroni "scoopable". Enjoy!
Pink Lemonade Cupcakes
I ran across these on Cast Sugar's blog, who ran across them on Daisycakes' blog. Each version undergoes a slight transformation, and mine has been no different! They're adorable pretty pink cupcakes with a nice lemony touch. I added a little rosewater to my icing to give it that "candy shop" olfactory taste; as you will soon know, I have a soft spot for olfactory dishes.
Although making these was lots of fun and they turned out fine, my craving had been satisfied after eating a few and I was left with a plate of leftovers. These would be perfect to bring to a barbeque or party, so I'm keeping this recipe around.
Pink Lemonade Cupcakes
Cupcakes:
1c cake flour
1/2tsp baking powder
1/4tsp baking soda
pinch of kosher salt
1/2c sugar
1/4c veg. oil
2 egg whites
1/3c thawed frozen pink lemonade concentrate
1/4c buttermilk
pink food coloring
muffin liners
Frosting:
3c confectioners sugar
1 stick softened butter
1/8tsp salt
2 tbsp lemonade concentrate
pink food coloring
1 tsp rosewater (check among the spices in the baking aisle)
Heat the oven to 350. Combine the dry ingredients in a large bowl and set aside. Cream the oil, egg whites, sugar, concentrate and milk in a bowl. Add the dry ingredients gradually, finishing with a few drops of food coloring. Fill liners about 3/4 full and bake for 25 minutes or until tops of cakes spring back when touched.
Cream the butter together with the confectioner's sugar. Add the concentrate and food coloring, mix well, and finish by adding the rosewater. Beat until smooth and set aside.
Top the cupcakes with frosting when cool, and sprinkle with pink sugar. I added a rosebud on top of each cake as well. These are perfect served with a fruity summer tea; bon appetit!
Subscribe to:
Posts (Atom)