Recently we had a whole lot of extended family visit and decided to hold something of a country potluck to give them a taste, literally, of how we live. These brownies have sold out in countless bake sales and are almost always a favorite. I was shocked that I hadn't already logged them here. Due to some of my family's lactose intolerance I omitted any cream cheese, but a cream cheese glaze or icing pairs wonderfully with this. Instead, I topped it with a sprinkle of confectioner's sugar and chopped pecans.
You will need:
3 eggs
1/2 cup brown sugar
1/2 cup pumpkin puree
3 tbsp butter, melted
1 tbsp baking powder
1 cup flour
1 tsp vanilla extract
1 tbsp pumpkin pie spice, or a mix of cinnamon, allspice, nutmeg and clove
Set the oven to bake at 350. Combine your moist ingredients together first, then sift the dry ones into the mix. Finish by beating the spices in well. Grease a "9x"9 baking pan and put it in the oven for 25-30 minutes. Take it out to cool and then decorate. Simple!
Showing posts with label desserts. Show all posts
Showing posts with label desserts. Show all posts
Saturday, July 6, 2013

Monday, May 10, 2010
Strawberry Morozhenoe (Russian-style Ice Cream)
For the life of me I can't seem to find morozhenoe in my city -- maybe it's the lack of a large Russian population, but what makes it different from regular ice cream is the texture. Unlike American ice cream, which tends to be very dense and heavy, morozhenoe is rich yet lightweight. It's meant to be served slightly soft; the high fat content allows this to happen without the ice cream melting all over. I used vine ripened strawberries for this and it turned out great.
You need:
1 liter heavy cream
1 cup whole milk
2 1/2 pints fresh strawberries
3/4 cup sugar
Put a large metal bowl in the freezer. Quarter the strawberries and heat a saucepan over medium heat. Add the strawberries and 1/2 cup of the sugar. Cook for about 15 minutes, or until the berries are soft and the mixture becomes slightly syrupy. Set aside to cool.
Once the sauce is cooled take the bowl out of the freezer, and pour in the heavy whipping cream. Using an electric mixer begin whipping at medium speed; when the mixture begins to thicken, add the remainder of the sugar and whip at a higher speed. Make sure not to overmix so the cream doesn't separate. Gently fold in the milk and strawberry syrup. In a large bowl freeze for 2 hours, come back and stir, then freeze for 8 more. This is best served within a day or two of making, otherwise the ice crystals stiffen the signature texture.
You need:
1 liter heavy cream
1 cup whole milk
2 1/2 pints fresh strawberries
3/4 cup sugar
Put a large metal bowl in the freezer. Quarter the strawberries and heat a saucepan over medium heat. Add the strawberries and 1/2 cup of the sugar. Cook for about 15 minutes, or until the berries are soft and the mixture becomes slightly syrupy. Set aside to cool.
Once the sauce is cooled take the bowl out of the freezer, and pour in the heavy whipping cream. Using an electric mixer begin whipping at medium speed; when the mixture begins to thicken, add the remainder of the sugar and whip at a higher speed. Make sure not to overmix so the cream doesn't separate. Gently fold in the milk and strawberry syrup. In a large bowl freeze for 2 hours, come back and stir, then freeze for 8 more. This is best served within a day or two of making, otherwise the ice crystals stiffen the signature texture.
Monday, March 8, 2010
Raspberry Vanilla Creme Tart
This is a recipe I actually scrounged from random things I had around before grocery shopping -- phyllo dough, raspberries, vanilla butter, etc. Despite the riskiness of the dough, it was a success.
Phyllo dough is like the grizzly bear of the food world, it can smell fear and will react accordingly. For first timers this is a good recipe to try for getting used to working with it; the sheets don't have to be perfect and you can utilize small pieces that were torn off. So face this bravely and you'll tame the wild phyllo monster...plus you'll have an awesome tart.
To make vanilla butter, bring a liter or two of water to a rolling boil and throw in 2 sticks of butter. Follow with 2-3 vanilla bean pods and turn the heat to a quick simmer, allow to cook for 30 minutes to an hour. Strain the mixture and set in a cool place for a few hours. The butter will rise to the top and solidify, leaving the liquid in the bottom to easily drain out. If you don't have this kind of time, regular butter will work fine as well.
You will need (for the crust):
12 inch round cake pan
1/2 - 1 cup melted vanilla butter
1/2 lb phyllo dough
Preheat the oven to 400 degrees. Brush the bottom and sides of the cake pan with a few tablespoons of butter and stick a sheet of phyllo to it. Repeat the process of brushing with butter and wallpapering the phyllo down. Make sure to get the sides and bottom evenly and do this until you run out of dough. Bake for 5 minutes or until it turns a golden puffy brown, remove from the oven and set aside.
For the pastry creme:
2 cups whole milk
1 tsp vanilla extract
6 egg yolks
4 tbsp salted butter
1/2 cup cane sugar
4 tablespoons flour
Heat the milk, 1/4 cup sugar and the vanilla in a small saucepan over medium heat until it simmers. Whisk the remainder of the sugar and egg yolks together in a bowl, when they become light and fluffy add the flour. Remove the milk from the heat and slowly mix a thin stream of it into the yolks; after about half is added, switch your method and start adding the milk-yolk from the bowl to the rest of the milk in the saucepan, keeping it over medium-low heat. Stir quickly as it heats and once it thickens, remove from the stovetop. Set aside.
For the raspberry filling, you will need 1- 1 1/2 cups fresh raspberries and 3-4 tbsp cane sugar. Heat these in a saucepan over medium heat for 10 or 15 minutes, stirring often.
Take the raspberry syrup and drizzle into the phyllo crust. Follow with the pastry cream, smoothing the top with a spatula. Chill until ready to serve.
Phyllo dough is like the grizzly bear of the food world, it can smell fear and will react accordingly. For first timers this is a good recipe to try for getting used to working with it; the sheets don't have to be perfect and you can utilize small pieces that were torn off. So face this bravely and you'll tame the wild phyllo monster...plus you'll have an awesome tart.
To make vanilla butter, bring a liter or two of water to a rolling boil and throw in 2 sticks of butter. Follow with 2-3 vanilla bean pods and turn the heat to a quick simmer, allow to cook for 30 minutes to an hour. Strain the mixture and set in a cool place for a few hours. The butter will rise to the top and solidify, leaving the liquid in the bottom to easily drain out. If you don't have this kind of time, regular butter will work fine as well.
You will need (for the crust):
12 inch round cake pan
1/2 - 1 cup melted vanilla butter
1/2 lb phyllo dough
Preheat the oven to 400 degrees. Brush the bottom and sides of the cake pan with a few tablespoons of butter and stick a sheet of phyllo to it. Repeat the process of brushing with butter and wallpapering the phyllo down. Make sure to get the sides and bottom evenly and do this until you run out of dough. Bake for 5 minutes or until it turns a golden puffy brown, remove from the oven and set aside.
For the pastry creme:
2 cups whole milk
1 tsp vanilla extract
6 egg yolks
4 tbsp salted butter
1/2 cup cane sugar
4 tablespoons flour
Heat the milk, 1/4 cup sugar and the vanilla in a small saucepan over medium heat until it simmers. Whisk the remainder of the sugar and egg yolks together in a bowl, when they become light and fluffy add the flour. Remove the milk from the heat and slowly mix a thin stream of it into the yolks; after about half is added, switch your method and start adding the milk-yolk from the bowl to the rest of the milk in the saucepan, keeping it over medium-low heat. Stir quickly as it heats and once it thickens, remove from the stovetop. Set aside.
For the raspberry filling, you will need 1- 1 1/2 cups fresh raspberries and 3-4 tbsp cane sugar. Heat these in a saucepan over medium heat for 10 or 15 minutes, stirring often.
Take the raspberry syrup and drizzle into the phyllo crust. Follow with the pastry cream, smoothing the top with a spatula. Chill until ready to serve.
Monday, February 22, 2010
Italian Ricotta Pie
This is a recipe from Foodblogga that I've been wanting to try for a long time but never had the audience. I followed her recipe fairly closely, which is a bit unusual for me but I'm glad I did. It turned out fluffy, sweet and delicious.
You will need for the crust:
1 1/2 cups flour
1/4 cup sugar
1/2 tsp baking powder
3/4 stick salted butter
2 eggs
For the filling:
1 lb whole ricotta cheese, drained
1 cup light cream
1 cup sugar
2 tbsp cornstarch
3 eggs
10 oz crushed pineapple, drained
1/4 teaspoon cinnamon
Using a pastry cutter or food processor with a metal blade, combine the dry ingredients for the crust. Cut in the butter, then add the eggs, being careful not to overmix. Form a ball with the dough once combined and wrap in plastic; refrigerate while you mix the filling or for up to 2 days.
For the filling, combine the ricotta, cream, sugar, cornstarch and vanilla. Add the eggs and finish by adding the pineapple. Set aside and preheat the oven to 425 degrees.
Roll the dough out until the radius is about 10 inches. Grease a 9 inch pie pan and press the dough into it. Pour in the filling and top with a dusting of cinnamon. Bake for 20 minutes at 425, then 30-60 more at 350. Check every ten minutes and once the center is firm, not jiggly, it's ready to come out. Allow to cool and chill before serving.
You will need for the crust:
1 1/2 cups flour
1/4 cup sugar
1/2 tsp baking powder
3/4 stick salted butter
2 eggs
For the filling:
1 lb whole ricotta cheese, drained
1 cup light cream
1 cup sugar
2 tbsp cornstarch
3 eggs
10 oz crushed pineapple, drained
1/4 teaspoon cinnamon
Using a pastry cutter or food processor with a metal blade, combine the dry ingredients for the crust. Cut in the butter, then add the eggs, being careful not to overmix. Form a ball with the dough once combined and wrap in plastic; refrigerate while you mix the filling or for up to 2 days.
For the filling, combine the ricotta, cream, sugar, cornstarch and vanilla. Add the eggs and finish by adding the pineapple. Set aside and preheat the oven to 425 degrees.
Roll the dough out until the radius is about 10 inches. Grease a 9 inch pie pan and press the dough into it. Pour in the filling and top with a dusting of cinnamon. Bake for 20 minutes at 425, then 30-60 more at 350. Check every ten minutes and once the center is firm, not jiggly, it's ready to come out. Allow to cool and chill before serving.
Saturday, January 9, 2010
Swedish Black Forest Cake
This is another recipe I feel I should put a disclaimer on -- this stuff is rich. However, just by looking at it you know that. This dish serves about 8 and is based on kladdkaka, a Swedish recipe for what is basically a very rich, sticky chocolate cake. I had wanted to make a black forest cake, but seeing as my ingredients and time was limited I opted to make this instead and got Scandinavian on the traditional black forest recipe.
You will need:
9 inch round cake pan
1/2 cup cake flour
1/4 cup unsweetened Dutch cocoa powder, 2 tbsp set aside
2 eggs
1 cup white sugar
1 tablespoon vanilla
1/2 cup melted salted European style butter
4 oz lingonberry sauce
1 tube marzipan
2 tbsp butter
1/2 pint heavy whipping cream
1/3 cup sugar
Preheat the oven to 300 and grease the cake pan. Combine the eggs and sugar and the dry ingredients separately. Mix the two until just combined then slowly add the vanilla and butter. Mix well and pour into cake pan, bake for 40 minutes. Allow to cool at least an hour.
Take the 2 tbsp of butter and grease a smooth surface, rolling pin and set aside the rest for your hands in preparation to handle the marzipan. Remove from the packaging and knead into a ball, then roll it out until it's approximately 9 inches in diameter.
Using a spatula, spread the lingonberry sauce over the top of the kladdkaka. Put the marzipan sheet over it and use a knife to trim any extra off the edges. Using an electric mixer, beat the whipped cream and 1/3 cup of sugar until fluffy. Spread over the cake like icing. Using a sifter, sprinkle some cocoa powder over the top. Store in the refrigerator until it is to be served.
You will need:
9 inch round cake pan
1/2 cup cake flour
1/4 cup unsweetened Dutch cocoa powder, 2 tbsp set aside
2 eggs
1 cup white sugar
1 tablespoon vanilla
1/2 cup melted salted European style butter
4 oz lingonberry sauce
1 tube marzipan
2 tbsp butter
1/2 pint heavy whipping cream
1/3 cup sugar
Preheat the oven to 300 and grease the cake pan. Combine the eggs and sugar and the dry ingredients separately. Mix the two until just combined then slowly add the vanilla and butter. Mix well and pour into cake pan, bake for 40 minutes. Allow to cool at least an hour.
Take the 2 tbsp of butter and grease a smooth surface, rolling pin and set aside the rest for your hands in preparation to handle the marzipan. Remove from the packaging and knead into a ball, then roll it out until it's approximately 9 inches in diameter.
Using a spatula, spread the lingonberry sauce over the top of the kladdkaka. Put the marzipan sheet over it and use a knife to trim any extra off the edges. Using an electric mixer, beat the whipped cream and 1/3 cup of sugar until fluffy. Spread over the cake like icing. Using a sifter, sprinkle some cocoa powder over the top. Store in the refrigerator until it is to be served.
Friday, December 12, 2008
Pumpkin Whoopie Pies
Castsugar included this recipe in her blog, and having epically (EPICALLY) failed my previous attempt at whoopie pies I was leery. I had gotten a recipe for something similar, chocolate whoopie pies with pumpkin filling. But I digress, I should probably explain what a whoopie pie is before I say how to make one.
I'd seen these things in the little bakeries and general stores in the town where my mom loves, I'd always wanted to get one but they seemed sort of intimidating. What I was seeing were these huge pies with a dubious looking white filling -- probably something shortening based, which I am staunchly against. Whoopie pies are an Amish dish, especially popular in that Western VA/Pennsylvania area. The original dish are two crumbly chocolate cookies with marshmallow fluff on the inside. So how could someone mess that up?
Apparently I can! My first attempt resulted in misshappen, almost bitter cakey cookies and runny, chunky filling. It was a nightmare. Then I found this recipe, which calls for pumpkin cookies and a regular icing filling. Sure enough, it worked out fine and these babies were a hit among each final exam study group.
Cookies:
3c flour
1 tsp baking soda
1 tsp baking powder
2 tbsp cinnamon
1 tsp ginger
1c sugar
1c dark brown sugar (I took 3/4c white sugar and combined with 1/4c molasses, shhh)
1c oil
1 can pumpkin (15 oz)
2 eggs
1 tsp vanilla
Preheat the oven to 350. Whisk together the oil, sugar and eggs. Follow with your spices and dry ingredients. Carefully spoon 1 tbsp gobs onto a greased baking sheet, you want them to be around "2-"3 in diameter and not too flat or too tall. Bake for 10-12 minutes, the cookies will be very soft and cakey so just let them cool completely.
Filling:
3c confectioner's sugar
1 stick butter
8 oz cream cheese
1 tbsp cinnamon
1 tsp vanilla
1 tbsp maple syrup
Using an electric mixer, cream all of the ingredients together until light and fluffy. I just used a rubber spatula to spread it onto one side of the cookie, but a lot of people like to use a piping bag because it looks a little more sophisticated. Just sandwich them up, and you've got whoopies! I kept mine in freezer bags in the fridge because of their moist consistency, I would definitely recommend storing them this way.
I'd seen these things in the little bakeries and general stores in the town where my mom loves, I'd always wanted to get one but they seemed sort of intimidating. What I was seeing were these huge pies with a dubious looking white filling -- probably something shortening based, which I am staunchly against. Whoopie pies are an Amish dish, especially popular in that Western VA/Pennsylvania area. The original dish are two crumbly chocolate cookies with marshmallow fluff on the inside. So how could someone mess that up?
Apparently I can! My first attempt resulted in misshappen, almost bitter cakey cookies and runny, chunky filling. It was a nightmare. Then I found this recipe, which calls for pumpkin cookies and a regular icing filling. Sure enough, it worked out fine and these babies were a hit among each final exam study group.
Cookies:
3c flour
1 tsp baking soda
1 tsp baking powder
2 tbsp cinnamon
1 tsp ginger
1c sugar
1c dark brown sugar (I took 3/4c white sugar and combined with 1/4c molasses, shhh)
1c oil
1 can pumpkin (15 oz)
2 eggs
1 tsp vanilla
Preheat the oven to 350. Whisk together the oil, sugar and eggs. Follow with your spices and dry ingredients. Carefully spoon 1 tbsp gobs onto a greased baking sheet, you want them to be around "2-"3 in diameter and not too flat or too tall. Bake for 10-12 minutes, the cookies will be very soft and cakey so just let them cool completely.
Filling:
3c confectioner's sugar
1 stick butter
8 oz cream cheese
1 tbsp cinnamon
1 tsp vanilla
1 tbsp maple syrup
Using an electric mixer, cream all of the ingredients together until light and fluffy. I just used a rubber spatula to spread it onto one side of the cookie, but a lot of people like to use a piping bag because it looks a little more sophisticated. Just sandwich them up, and you've got whoopies! I kept mine in freezer bags in the fridge because of their moist consistency, I would definitely recommend storing them this way.
Monday, November 17, 2008
Rasta's Famous Cookies
After some unexpected praise for my "magic cookies" from my sisters at Allure, I figured posting the recipe would be the ONLY fair way to compensate :) Truthfully, most cookie recipes do follow a certain formula so the differences tend to lie in how the batter is prepared. If you like chewier cookies, try using bread flour and refridgerating the dough for about an hour before you spoon it out and bake it. If you like thinner, crispier cookies, you can use cake flour and melted butter. I really could go on and on about the mechanical differences between cookie recipes...point is, every batch can be a little bit different even with the exact same ingredients. This is a great basic recipe with a can't-go-wrong twist (chocolate toffee) so feel free to experiment. I've added dried cherries to this recipe, macadamia nuts, even cocoa powder. The toffee ones seem to be the favorites of all these.
One last note -- I've started using salted butter in my baking mainly because of its versatility and the fact that it tends to last a bit longer. It's an economic decision but if you prefer to use unsalted butter, about a teaspoon of kosher salt will do the trick for this recipe. Whatever you do, don't add salt AND salted butter! It only took me one try for that lesson to hit home ;)
Ingredients:
2 1/4c flour
2 sticks (one cup) salted butter
3/4c granulated white sugar
3/4c light brown sugar
1 tsp baking soda
1 tsp vanilla extract
2 eggs
12 oz milk chocolate chips
1c toffee bits
Preheat the oven to 375. Combine your butter and sugars until uniform and creamy. Add the eggs and vanilla, mix well. Add your dry ingredients and once those are mixed in, add the chocolate chips and toffee. Spoon onto a greased cookie sheet and bake for 10-15 minutes, depending on your oven.
One last note -- I've started using salted butter in my baking mainly because of its versatility and the fact that it tends to last a bit longer. It's an economic decision but if you prefer to use unsalted butter, about a teaspoon of kosher salt will do the trick for this recipe. Whatever you do, don't add salt AND salted butter! It only took me one try for that lesson to hit home ;)
Ingredients:
2 1/4c flour
2 sticks (one cup) salted butter
3/4c granulated white sugar
3/4c light brown sugar
1 tsp baking soda
1 tsp vanilla extract
2 eggs
12 oz milk chocolate chips
1c toffee bits
Preheat the oven to 375. Combine your butter and sugars until uniform and creamy. Add the eggs and vanilla, mix well. Add your dry ingredients and once those are mixed in, add the chocolate chips and toffee. Spoon onto a greased cookie sheet and bake for 10-15 minutes, depending on your oven.
Pomegranate Flan
I've already extolled on my love of pomegranates; now it's time to wax about the wonders of flan. It's a traditional custard dish like creme brulee, except in the Spanish version there's a layer of liquid caramel instead of a caramel crust. It's one of those dishes that seems like it should be difficult to prepare, but I actually only spent around 20 minutes assembling the ingredients. The only special thing you would want to buy would be pomegranate juice, aside from that all ingredients should be found in any basically stocked kitchen.
There's a little trick I like to use with my sugar, and this seems the appropriate time to share it. I got the idea from Alton Brown, bless him. I had some sealed madagascar vanilla beans chillin' around my kitchen for several months; I wasn't quite sure what I could do with them, but I do appreciate the smell. If you keep your sugar in an airtight container (which I think everyone should do) you can add the beans and voila -- within 48 hours, you will have vanilla sugar. It doesn't make a huge difference in the taste of any dish I've made but it smells lovely and can't hurt :)
Back to the flan. The original recipe, from the POM website, lists several unitaskers in its instructions and seems to make the process more complicated than it actually is. So I'm going ahead and posting my method with a few notes from the original recipe.
Pomegranate syrup:
1c pomegranate juice
3/4c sugar
Put these in a saucepan over medium heat and simmer for around 20 minutes, or until you're left with about 2/3c of syrup. Set aside for later.
Flan:
4 eggs
2 1/4c whole milk
1/2c sugar
2 tsp vanilla
pinch of salt
Preheat the oven to 325, and place a large cake pan with about an inch of water in to preheat as well. I used a cupcake pan for my flans, so make sure that the pan can fit into the water-holding one. You want the water to be very hot when the flans go in the oven.
Whisk the eggs together and add your additional ingredients. Scoop the flan liquid into the cups, about 2/3 full. Very carefully place the cupcake pan in the water-holding pan; this lets a more gentle, even heat cook the bottom of the flans similar to a double boiler method.
The original recipe dictates 30-35 minutes of cooking time; mine took well over an hour. They're done when you insert a knife near the center and it emerges clean. Fortunately this isn't a dish you have to worry about "falling", so check frequently if your oven is as slow as mine!
Once the flans are done, remove them and let them cool for at least half an hour before putting them in the fridge. Refridgerate for 3 hours. I cheated, and I only chilled mine for an hour because I had to see how they tasted. Spoon about 1tbsp of the pomegranate syrup over the tops of the flans and put them back in the fridge for up to 24 hours. You can garnish with pomegranate seeds or orange slices; I used raspberries. Once the flans are fully chilled, loosen them from the cups with a butter knife and gently scoop them out.
There's a little trick I like to use with my sugar, and this seems the appropriate time to share it. I got the idea from Alton Brown, bless him. I had some sealed madagascar vanilla beans chillin' around my kitchen for several months; I wasn't quite sure what I could do with them, but I do appreciate the smell. If you keep your sugar in an airtight container (which I think everyone should do) you can add the beans and voila -- within 48 hours, you will have vanilla sugar. It doesn't make a huge difference in the taste of any dish I've made but it smells lovely and can't hurt :)
Back to the flan. The original recipe, from the POM website, lists several unitaskers in its instructions and seems to make the process more complicated than it actually is. So I'm going ahead and posting my method with a few notes from the original recipe.
Pomegranate syrup:
1c pomegranate juice
3/4c sugar
Put these in a saucepan over medium heat and simmer for around 20 minutes, or until you're left with about 2/3c of syrup. Set aside for later.
Flan:
4 eggs
2 1/4c whole milk
1/2c sugar
2 tsp vanilla
pinch of salt
Preheat the oven to 325, and place a large cake pan with about an inch of water in to preheat as well. I used a cupcake pan for my flans, so make sure that the pan can fit into the water-holding one. You want the water to be very hot when the flans go in the oven.
Whisk the eggs together and add your additional ingredients. Scoop the flan liquid into the cups, about 2/3 full. Very carefully place the cupcake pan in the water-holding pan; this lets a more gentle, even heat cook the bottom of the flans similar to a double boiler method.
The original recipe dictates 30-35 minutes of cooking time; mine took well over an hour. They're done when you insert a knife near the center and it emerges clean. Fortunately this isn't a dish you have to worry about "falling", so check frequently if your oven is as slow as mine!
Once the flans are done, remove them and let them cool for at least half an hour before putting them in the fridge. Refridgerate for 3 hours. I cheated, and I only chilled mine for an hour because I had to see how they tasted. Spoon about 1tbsp of the pomegranate syrup over the tops of the flans and put them back in the fridge for up to 24 hours. You can garnish with pomegranate seeds or orange slices; I used raspberries. Once the flans are fully chilled, loosen them from the cups with a butter knife and gently scoop them out.
Saturday, October 4, 2008
Tiramisu Cupcakes
I came up with these from the chiffon cake recipe posted earlier this month. They're delish! I include the recipe for whipped cream, but canned is just as good in this particular dish. Enjoy :)
3/4c cake flour
1 1/2 tsp baking powder
1/2tsp kosher salt
5 large eggs, separated
1/2 c sugar with 3 tbsp separated
1/4c water
1/4c instant cappucino powder
1/4c vegetable oil
1 tsp vanilla extract
5/8 tsp cream of tartar
1/2c heavy whipping cream
3 tbsp confectioners sugar
2 tbsp kahlua
Preheat the oven to 325 degrees. Mix your egg yolks, oil, sugar, cappucino powder and vanilla. Using an electric mixer, beat until they're at the ribbon stage. Add your dry ingredients and beat well.
Whip your egg yolks with an electric mixer and add the remaining sugar. Beat until stiff peaks form and gently fold into your batter. Scoop into cupcake pans with liners, about 3/4 full. Bake for 30 minutes *remember, DO NOT OPEN THE OVEN!*
Whip your cream and confectioners sugar until creamy -- don't overbeat unless you want butter. When you take the cupcakes out of the oven drizzle with the kahlua. When they cool completely frost the top with whipped cream. Chill for an hour before serving.
3/4c cake flour
1 1/2 tsp baking powder
1/2tsp kosher salt
5 large eggs, separated
1/2 c sugar with 3 tbsp separated
1/4c water
1/4c instant cappucino powder
1/4c vegetable oil
1 tsp vanilla extract
5/8 tsp cream of tartar
1/2c heavy whipping cream
3 tbsp confectioners sugar
2 tbsp kahlua
Preheat the oven to 325 degrees. Mix your egg yolks, oil, sugar, cappucino powder and vanilla. Using an electric mixer, beat until they're at the ribbon stage. Add your dry ingredients and beat well.
Whip your egg yolks with an electric mixer and add the remaining sugar. Beat until stiff peaks form and gently fold into your batter. Scoop into cupcake pans with liners, about 3/4 full. Bake for 30 minutes *remember, DO NOT OPEN THE OVEN!*
Whip your cream and confectioners sugar until creamy -- don't overbeat unless you want butter. When you take the cupcakes out of the oven drizzle with the kahlua. When they cool completely frost the top with whipped cream. Chill for an hour before serving.
Saturday, September 20, 2008
Vanilla Chiffon Cake
Aside from my love-hate relationship with Anthony Bourdain, Alton Brown is the TV cook of my heart. I make it a point to take breaks in my homework to catch his show, Good Eats, every weeknight -- it gives me ideas of how to better my already existing recipes, even if he's making something I'd never eat like pork BBQ. But I digress. As soon as I saw it was the cupcake episode, I was completely fascinated.
The recipe he uses for cupcakes is a chiffon cake batter, which is exquisitely light and very different from a traditional cake. It uses oil instead of butter and lots of eggs. You could compare this cake to angel food but it just wouldn't do it justice. The only problem I had was that mine tasted a *wee* bit salty, so I've cut the salt in half for this recipe. Try this next time you feel like making a cake, I guarantee it will be a pleasant surprise!
You will need:
3/4c cake flour
1 1/2 tsp baking powder
1/2tsp kosher salt
5 large eggs, separated
3/4 c sugar with 3 tbsp separated
1/4c water
1/4c vegetable oil
1 tsp vanilla extract
5/8 tsp cream of tartar
1/2c heavy whipping cream
3 tbsp confectioners sugar
Preheat the oven to 325. Grease a 9 x 11 pan and set aside. Using an electric mixer, whip the egg yolks, sugar, and oil until it is smooth and forms "ribbons". Add the vanilla and water. Add your dry ingredients and set aside.
Combine the egg whites and cream of tartar in a separate bowl. Whisk with an electric mixer until it becomes foamy, then add the 3 tbsp of sugar gradually. Whip until stiff peaks form.
Very gently fold the egg white mixture into the yellow batter 1/3 at a time. Pour into the pan and bake for 30 minutes or until a toothpick comes out clean when inserted. Remember not to take this cake out early or open the oven door for the first 30 minutes or it will fall -- a chiffon cake is characterized by a very light, fluffy texture. Once removed, allow to cool completely.
While this cools whip your cream and confectioners sugar together. Be sure not to overwhip so you don't wind up with sweet butter! Coat the top of the cake with this as if it were icing and serve. Keep any leftovers refridgerated so the cream doesn't go funky :)
The recipe he uses for cupcakes is a chiffon cake batter, which is exquisitely light and very different from a traditional cake. It uses oil instead of butter and lots of eggs. You could compare this cake to angel food but it just wouldn't do it justice. The only problem I had was that mine tasted a *wee* bit salty, so I've cut the salt in half for this recipe. Try this next time you feel like making a cake, I guarantee it will be a pleasant surprise!
You will need:
3/4c cake flour
1 1/2 tsp baking powder
1/2tsp kosher salt
5 large eggs, separated
3/4 c sugar with 3 tbsp separated
1/4c water
1/4c vegetable oil
1 tsp vanilla extract
5/8 tsp cream of tartar
1/2c heavy whipping cream
3 tbsp confectioners sugar
Preheat the oven to 325. Grease a 9 x 11 pan and set aside. Using an electric mixer, whip the egg yolks, sugar, and oil until it is smooth and forms "ribbons". Add the vanilla and water. Add your dry ingredients and set aside.
Combine the egg whites and cream of tartar in a separate bowl. Whisk with an electric mixer until it becomes foamy, then add the 3 tbsp of sugar gradually. Whip until stiff peaks form.
Very gently fold the egg white mixture into the yellow batter 1/3 at a time. Pour into the pan and bake for 30 minutes or until a toothpick comes out clean when inserted. Remember not to take this cake out early or open the oven door for the first 30 minutes or it will fall -- a chiffon cake is characterized by a very light, fluffy texture. Once removed, allow to cool completely.
While this cools whip your cream and confectioners sugar together. Be sure not to overwhip so you don't wind up with sweet butter! Coat the top of the cake with this as if it were icing and serve. Keep any leftovers refridgerated so the cream doesn't go funky :)
Tuesday, June 24, 2008
Spicy Chocolate Gingerbread
I ran across this recipe in Castsugar's blog -- my mom is a fan of gingerbread so I had originally planned on making it for her birthday. I wound up doing a "test batch" for the bake sale, and WOW. This is possibly one of the better things that has come out of my kitchen.
It literally warms your throat when you eat it, but isn't sharp or spicy like so many recipes that call for chili powder. You can taste each ingredient when you take a bite, which is rare for recipes that call for so many complex flavors in one dish. I was skeptical of Castsugar's raves about this cake but I'm a true believer now. If you bake nothing else from this blog, try this recipe. It will blow you away. This one is going in the green box -- the old tin box where all of my great grandmother's favorite recipes are kept. This is where I turn when I need something utterly original and delicious that no one was expecting but everyone loves. You simply gotta try it!
1 1/2 sticks unsalted butter
1 c. plus 2 Tbsp. dark brown sugar
2 Tbsp. white sugar
3/4 c. light syrup
3/4 c. molasses
1 1/2 tsp apple pie spice
2 1/2 tsp. ground ginger
1 1/2 tsp. chili powder
1 1/4 tsp. baking soda
2 tbsp warm water
2 eggs
1 c. milk
2 c. all-purpose flour
1/3 c. unsweetened cocoa
6 oz. semisweet chocolate chunks
Preheat the oven to 325 and line 3 loaf pans with tin foil.
Meld the sugars, syrups, and butter together over medium-low heat in a large saucepan. Add your spices and allow to cool very slightly.
Combine the milk and eggs together. Mix the water with the baking soda and add to the egg mixture. Add the syrup mixture and stir well. Finish by adding the flour and cocoa. Finish by adding the chocolate chunks.
Pour into loaf pans and bake for 45 minutes. This will still appear liquidy on top; allow it to cool completely, as this creates a very moist cake. I find that this is just as good, if not better after a day or two of maturation time. You could add a glaze or frosting, but I find it to be perfect plain.
It literally warms your throat when you eat it, but isn't sharp or spicy like so many recipes that call for chili powder. You can taste each ingredient when you take a bite, which is rare for recipes that call for so many complex flavors in one dish. I was skeptical of Castsugar's raves about this cake but I'm a true believer now. If you bake nothing else from this blog, try this recipe. It will blow you away. This one is going in the green box -- the old tin box where all of my great grandmother's favorite recipes are kept. This is where I turn when I need something utterly original and delicious that no one was expecting but everyone loves. You simply gotta try it!
1 1/2 sticks unsalted butter
1 c. plus 2 Tbsp. dark brown sugar
2 Tbsp. white sugar
3/4 c. light syrup
3/4 c. molasses
1 1/2 tsp apple pie spice
2 1/2 tsp. ground ginger
1 1/2 tsp. chili powder
1 1/4 tsp. baking soda
2 tbsp warm water
2 eggs
1 c. milk
2 c. all-purpose flour
1/3 c. unsweetened cocoa
6 oz. semisweet chocolate chunks
Preheat the oven to 325 and line 3 loaf pans with tin foil.
Meld the sugars, syrups, and butter together over medium-low heat in a large saucepan. Add your spices and allow to cool very slightly.
Combine the milk and eggs together. Mix the water with the baking soda and add to the egg mixture. Add the syrup mixture and stir well. Finish by adding the flour and cocoa. Finish by adding the chocolate chunks.
Pour into loaf pans and bake for 45 minutes. This will still appear liquidy on top; allow it to cool completely, as this creates a very moist cake. I find that this is just as good, if not better after a day or two of maturation time. You could add a glaze or frosting, but I find it to be perfect plain.
Cherry Cheesecake Brownies
I had been looking forward to making these ever since I found the recipe -- cheesecake, cherry, AND brownie?! All of my favorite things! While these did turn out well and I'm sure would be a hit at any bake sale or party, it seemed that it was almost too much of a good thing. There were so many flavors going on that none of them could really sing; I would have preferred the cheesecake and cherries over a plain ol' chocolate crumb crust. But these are worth a try!
Cheesecake:
16 oz cream cheese
1/2c sugar
1 egg
1 tsp vanilla
Brownie:
1c unsalted butter
6 oz baking chocolate
2c sugar
1 tsp vanilla
3/4tsp salt
4 eggs
1 1/4c AP flour
21 oz. cherry pie filling + 1 tsp lemon juice
Preheat the oven to 350, and grease a 9 x 13 baking pan.
Melt the baking chocolate in a double broiler. Cream together the butter and sugar for the brownie layer, then add the eggs. Add the vanilla and melted chocolate and mix well. Stir in flour and salt and pour into the baking pan.
For the cheesecake layer, beat all ingredients together until smooth. Drop it by the tablespoon over the brownie layer, and follow by dropping tablespoons of the cherry mixture over it. Use a butter knife to swirl the layers, but do not mix them together. Bake for 45-50 minutes or until the edges of the brownie begin to pull away and the edges of the cheesecake begin to turn slightly brown. Keep in mind that this brownie will still seem gooey when you first take it out of the oven, let it cool completely and chill for at least 4 hours (I let mine go overnight and am glad I did). Try serving these in cupcake liners, they're super gooey!
Cheesecake:
16 oz cream cheese
1/2c sugar
1 egg
1 tsp vanilla
Brownie:
1c unsalted butter
6 oz baking chocolate
2c sugar
1 tsp vanilla
3/4tsp salt
4 eggs
1 1/4c AP flour
21 oz. cherry pie filling + 1 tsp lemon juice
Preheat the oven to 350, and grease a 9 x 13 baking pan.
Melt the baking chocolate in a double broiler. Cream together the butter and sugar for the brownie layer, then add the eggs. Add the vanilla and melted chocolate and mix well. Stir in flour and salt and pour into the baking pan.
For the cheesecake layer, beat all ingredients together until smooth. Drop it by the tablespoon over the brownie layer, and follow by dropping tablespoons of the cherry mixture over it. Use a butter knife to swirl the layers, but do not mix them together. Bake for 45-50 minutes or until the edges of the brownie begin to pull away and the edges of the cheesecake begin to turn slightly brown. Keep in mind that this brownie will still seem gooey when you first take it out of the oven, let it cool completely and chill for at least 4 hours (I let mine go overnight and am glad I did). Try serving these in cupcake liners, they're super gooey!
No-Bake White Chocolate Key Lime Cheesecake
How's THAT for a title? These bars are surprisingly simple to make and require zero oven time. Since I had all burners blazing at the time, this was a relief. This is another gem from Castsugar, although she calls them bars I consider this a cheesecake. They're perfect for summer and I would imagine they'd be the first thing to go had the bake sale not been rained out. You must try these for your next barbeque or summer celebration!
Crust:
30 Oreo cookies
2 oz white chocolate
Filling:
6 oz white chocolate
1 pint whipping cream
8 oz cream cheese
3 tbsp sugar
3 tbsp lime juice
2 tbsp key lime zest
1/3c confectioners sugar
I recommend using an aluminum cake pan instead of a traditional one for this recipe. If you don't have access to this, line a 8x8 pan with foil.
Melt all the white chocolate in a double broiler. Crush your oreos by hand or in a food processor, and combine them with 2-4 tbsp of the melted chocolate. Press into the bottom of the pan to form a crust.
Beat 1/2c whipping cream until peaks begin to form. Add cream cheese, lime, zest and sugar to a separate bowl, and beat well. Beat in remaining white chocolate. Fold in gently with the whipped cream and spread mixture over the crust. In a clean bowl, pour the remaining whipping cream and confectioners sugar and beat with an electric mixer until fluffy. Make sure to not overbeat or you'll wind up with sweetened butter! Spread the whipping cream over the lime layer, and voila! No bake cheesecake! Allow it to chill for at least 2 hours before serving.
Crust:
30 Oreo cookies
2 oz white chocolate
Filling:
6 oz white chocolate
1 pint whipping cream
8 oz cream cheese
3 tbsp sugar
3 tbsp lime juice
2 tbsp key lime zest
1/3c confectioners sugar
I recommend using an aluminum cake pan instead of a traditional one for this recipe. If you don't have access to this, line a 8x8 pan with foil.
Melt all the white chocolate in a double broiler. Crush your oreos by hand or in a food processor, and combine them with 2-4 tbsp of the melted chocolate. Press into the bottom of the pan to form a crust.
Beat 1/2c whipping cream until peaks begin to form. Add cream cheese, lime, zest and sugar to a separate bowl, and beat well. Beat in remaining white chocolate. Fold in gently with the whipped cream and spread mixture over the crust. In a clean bowl, pour the remaining whipping cream and confectioners sugar and beat with an electric mixer until fluffy. Make sure to not overbeat or you'll wind up with sweetened butter! Spread the whipping cream over the lime layer, and voila! No bake cheesecake! Allow it to chill for at least 2 hours before serving.
Peanut Butter and Jelly Bars
For the last week I've been working on a major bake sale, so I'd been keeping my eyes out for anything unique to contribute. I found that I need not go any further than Castsugar. True to form, these peanut butter and jelly bars are different from anything I could have found in my current collection of cookbooks. It's a very rich shortbread crust with a smear of jelly in the center; imagine a PB&J sandwich cookie, only as a brownie.
I made a few changes to the recipe, but these are still very rich and very sweet. I couldn't eat a whole bar by myself, which speaks a lot after all the spicy chocolate gingerbread I've scarfed! But more on that later. I used more peanut butter and less real butter, I also used the chunky variety. Instead of full octane jam I used a reduced sugar version. I would not recommend using anything containing a sugar substitute though; aside from messing up the perfect taste, the lack of real sugars would prevent the jelly from setting. Anyways, here's my recipe, with pics soon to come:
1 1/2 sticks unsalted butter
1 1/2c sugar
1 1/2 tsp vanilla extract
2 large eggs
2 1/4c chunky peanut butter
3c AP flour
1 tsp baking powder
1 1/2 tsp kosher salt
18 oz jam (I used blackberry)
Preheat the oven to 350, and grease a 9 x 13 pan.
Cream together the sugar, butter and PB. Add eggs one at a time, then add vanilla. Add the flour, baking powder and salt in small additions, mixing well in between. You should be left with a crumbly but malleable dough. Spread 2/3 of it on the bottom of the pan.
Spread the jam on top of the first layer. Sprinkle the rest of the crumbles on top, taking care to not mix them with the jam too much. Bake for 45 minutes. Allow it to cool completely before cutting into chunks, otherwise you'll get a gooey mess instead of a bar. Enjoy!
I made a few changes to the recipe, but these are still very rich and very sweet. I couldn't eat a whole bar by myself, which speaks a lot after all the spicy chocolate gingerbread I've scarfed! But more on that later. I used more peanut butter and less real butter, I also used the chunky variety. Instead of full octane jam I used a reduced sugar version. I would not recommend using anything containing a sugar substitute though; aside from messing up the perfect taste, the lack of real sugars would prevent the jelly from setting. Anyways, here's my recipe, with pics soon to come:
1 1/2 sticks unsalted butter
1 1/2c sugar
1 1/2 tsp vanilla extract
2 large eggs
2 1/4c chunky peanut butter
3c AP flour
1 tsp baking powder
1 1/2 tsp kosher salt
18 oz jam (I used blackberry)
Preheat the oven to 350, and grease a 9 x 13 pan.
Cream together the sugar, butter and PB. Add eggs one at a time, then add vanilla. Add the flour, baking powder and salt in small additions, mixing well in between. You should be left with a crumbly but malleable dough. Spread 2/3 of it on the bottom of the pan.
Spread the jam on top of the first layer. Sprinkle the rest of the crumbles on top, taking care to not mix them with the jam too much. Bake for 45 minutes. Allow it to cool completely before cutting into chunks, otherwise you'll get a gooey mess instead of a bar. Enjoy!
Monday, June 2, 2008
Buttermilk Pie

This is a classic Southern recipe for buttermilk pie. Most people who haven't tasted it before will give you strange looks when you combine the words "buttermilk" and "pie". It's actually quite delicious and goes over well especially on holidays.
This recipe comes from Natalie Moore at NPR. Growing up, one of my neighborhood friends' mothers made this and Natalie's recipe comes the closest to hers (although that South Carolina touch can't be replicated). There are many variations of this recipe; it's similar to chess pie, creme brulee and a South African dish called "melktert".
I used a chocolate graham cracker crust since I couldn't find regular pie crust. After my adventure with the apple pie, I wasn't quite ready to dive back into those waters. While the graham crust made it really interesting, it was a bit sweet. I'm posting the reduced-sugar version of the filling for that reason. Also remember to let this pie cool for at least twenty or thirty minutes before serving, it gets VERY HOT!
Buttermilk Pie:
1 graham pie crust
4 eggs
1c sugar
2 tbsp flour
1/2c melted butter
1 1/2c buttermilk
1tsp vanilla extract (I tend to go heavy on this, so you can use up to 1 tbsp)
Beat the eggs with sugar. Add flour and beat well. Add buttermilk and vanilla. The filling will be liquidy, so carefully pour it into the crust and load it into the oven. Bake at 400 for the first 10 minutes and reduce to 325 for 50 more minutes.
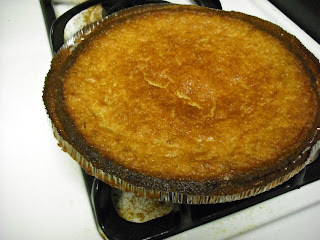
Allow to cool, serve either slightly warm or at room temperature.
Ugly Apple Pie

No pain, no gain, right? This pie was definitely one of the worst aesthetic disasters to come out of my kitchen in a long time ;] However, I think you have to know just as much about what doesn't work as you know what does to be a successful cook. Besides, the thing TASTED great! I present, for your viewing pleasure, how to make a very ugly but very tasty apple pie.
Crust:
2c flour (I used cake flour)
1tsp salt
1tbsp sugar
6tbsp butter
6tbsp shortening
6-8tbsp very cold water
Filling:
5 tart apples, peeled and chopped
1c sugar
2tbsp flour
1tbsp cinnamon
1/2tsp clove powder
1/4tsp salt
2tbsp vinegar
1tbsp lemon juice
Combine the dry ingredients for the crust in a large bowl. You're supposed to use a pastry cutter to combine the butter and shortening, which I didn't do. I used the whisk on my countertop mixer -- instead of the crumbly, dry mixture you want for a pie crust, I wound up with a creamy schmaltzy yellow mixture. Either way, let it chill in the fridge for 10-45 minutes.
As you're working on the crust, if your apples are pre-sliced and peeled, let them rest in water combined with the lemon juice so they don't discolor. Drain them when the time comes to make filling. Most people don't cook theirs beforehand; I didn't think it was necessary, and I was right. Anywho. Mix the filling ingredients and set aside.
I brought my crust mixture out of the fridge and it was nowhere near wanting to roll out. So I scooped some in my hand and smeared it all around the bottom of the pan and up the sides, about an inch thick. Put the apple filling into the crust. I still had some left over for the top though, so I decided to attempt a streusel. To do a streusel, you pinch sugar and flour into butter until it turns into crumbs. Instead, after about 1/2c of sugar and 1c flour, I wound up with a mixture that was roll-able. I flattened it and draped it over the apple mixture. Bake at 400 degrees for 50-60 minutes.
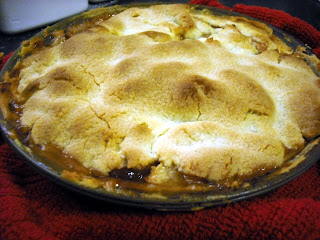
My primary issue was the crust -- while it tasted heavenly and turned out quite nicely when cooked, the bottom layer was way too soft to work with. Definitely combine your crust using a pastry cutter, you want something crumbly that will stick together when rolled out.
The top was a bit too sweet. Since it was basically a sheet of streusel, this is to be expected. Again, this problem can be avoided by making the crust right ;]
Although this pie was delicious, it's incredibly rich. When I come by a recipe that works and has that magic to it I'll make sure to post it. Otherwise, I'll need to find someone who doesn't mind ugly pies to eat the test batch!
Tuesday, May 20, 2008
Mom's Oatmeal Cookies
My mom has always taken a lot of pride in her oatmeal cookies; rather than being dense and crumbly, these are chewy and surprisingly light. She prefers to include nuts and raisins, but many people like chocolate chips or just plain oatmeal. Experiment to figure out what you prefer, and don't forget to have fun!
Oatmeal Cookies:
1/2c room temp butter
1/2c white sugar
1/4c brown sugar
1 egg
1 tsp vanilla extract
3/4c all purpose flour
1/2 tsp baking soda
1 tsp cinnamon
1/4 tsp kosher salt
1 1/2c quick cooking oats
1 c raisins, nuts or chocolate chips
Preheat oven to 375 degrees. Cream butter and sugars together, add egg and vanilla. Combine dry ingredients (no oats) and combine with creamed mixture. Add oats and raisins. Pour into a greased baking pan, and cook for 10-15 minutes. Let cool completely before cutting into bars or squares.
Oatmeal Cookies:
1/2c room temp butter
1/2c white sugar
1/4c brown sugar
1 egg
1 tsp vanilla extract
3/4c all purpose flour
1/2 tsp baking soda
1 tsp cinnamon
1/4 tsp kosher salt
1 1/2c quick cooking oats
1 c raisins, nuts or chocolate chips
Preheat oven to 375 degrees. Cream butter and sugars together, add egg and vanilla. Combine dry ingredients (no oats) and combine with creamed mixture. Add oats and raisins. Pour into a greased baking pan, and cook for 10-15 minutes. Let cool completely before cutting into bars or squares.
Friday, May 2, 2008
Chocolate Chip Meringue Cookies

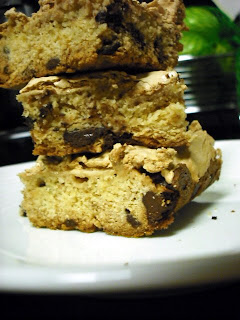
This is another gem from Cast Sugar's blog (check her out for some awesome baking ideas!) Again, it's slightly modified with less sugar and a little bit simpler to make. The ingredients themselves are very similar to your typical chocolate chip cookies, but they are actually cookie bars. They're also quite rich, so cut them on the smaller side.
This is the second time I've made these, my roommates and friends seem to like them a lot. They would be a huge hit at any party or get together; the perfect cookie bar to pair with a glass of milk.
Chocolate Chip Meringue Cookies
Cookie crust:
This is the second time I've made these, my roommates and friends seem to like them a lot. They would be a huge hit at any party or get together; the perfect cookie bar to pair with a glass of milk.
Chocolate Chip Meringue Cookies
Cookie crust:

2c cake flour
1 stick butter, room temp
1/4 tsp kosher salt
1/4tsp baking soda
1 tsp baking powder
1/4c granulated sugar
1/2c brown sugar
3 egg yolks
1 tsp vanilla
1-12oz package of milk chocolate chunks
Meringue topping:
3 egg whites
3/4c brown sugar
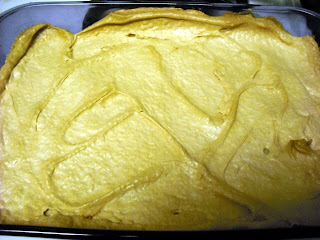
Preheat the oven to 350. Cream the butter and sugars for the crust together, add egg yolks and vanilla. Add dry ingredients. Note that this will be a crumbly, somewhat dry mixture. Add chocolate chips. Spread into a brownie pan and tap down with the back of a wooden spoon.
The meringue takes several minutes of mixing, this is one thing I did note. Combine the sugar and egg whites, beat on high until glossy and "soft peaks" form. Spread over cookie crust. Bake for 25 minutes or until top of meringue begins to brown, let cool for at least 15 minutes. Serve and indulge.
Pink Lemonade Cupcakes
I ran across these on Cast Sugar's blog, who ran across them on Daisycakes' blog. Each version undergoes a slight transformation, and mine has been no different! They're adorable pretty pink cupcakes with a nice lemony touch. I added a little rosewater to my icing to give it that "candy shop" olfactory taste; as you will soon know, I have a soft spot for olfactory dishes.
Although making these was lots of fun and they turned out fine, my craving had been satisfied after eating a few and I was left with a plate of leftovers. These would be perfect to bring to a barbeque or party, so I'm keeping this recipe around.
Pink Lemonade Cupcakes
Cupcakes:
1c cake flour
1/2tsp baking powder
1/4tsp baking soda
pinch of kosher salt
1/2c sugar
1/4c veg. oil
2 egg whites
1/3c thawed frozen pink lemonade concentrate
1/4c buttermilk
pink food coloring
muffin liners
Frosting:
3c confectioners sugar
1 stick softened butter
1/8tsp salt
2 tbsp lemonade concentrate
pink food coloring
1 tsp rosewater (check among the spices in the baking aisle)
Heat the oven to 350. Combine the dry ingredients in a large bowl and set aside. Cream the oil, egg whites, sugar, concentrate and milk in a bowl. Add the dry ingredients gradually, finishing with a few drops of food coloring. Fill liners about 3/4 full and bake for 25 minutes or until tops of cakes spring back when touched.
Cream the butter together with the confectioner's sugar. Add the concentrate and food coloring, mix well, and finish by adding the rosewater. Beat until smooth and set aside.
Top the cupcakes with frosting when cool, and sprinkle with pink sugar. I added a rosebud on top of each cake as well. These are perfect served with a fruity summer tea; bon appetit!
Although making these was lots of fun and they turned out fine, my craving had been satisfied after eating a few and I was left with a plate of leftovers. These would be perfect to bring to a barbeque or party, so I'm keeping this recipe around.
Pink Lemonade Cupcakes
Cupcakes:
1c cake flour
1/2tsp baking powder
1/4tsp baking soda
pinch of kosher salt
1/2c sugar
1/4c veg. oil
2 egg whites
1/3c thawed frozen pink lemonade concentrate
1/4c buttermilk
pink food coloring
muffin liners
Frosting:
3c confectioners sugar
1 stick softened butter
1/8tsp salt
2 tbsp lemonade concentrate
pink food coloring
1 tsp rosewater (check among the spices in the baking aisle)
Heat the oven to 350. Combine the dry ingredients in a large bowl and set aside. Cream the oil, egg whites, sugar, concentrate and milk in a bowl. Add the dry ingredients gradually, finishing with a few drops of food coloring. Fill liners about 3/4 full and bake for 25 minutes or until tops of cakes spring back when touched.
Cream the butter together with the confectioner's sugar. Add the concentrate and food coloring, mix well, and finish by adding the rosewater. Beat until smooth and set aside.
Top the cupcakes with frosting when cool, and sprinkle with pink sugar. I added a rosebud on top of each cake as well. These are perfect served with a fruity summer tea; bon appetit!
Subscribe to:
Posts (Atom)