I'm reporting to you from Finland, so while it is evening here many of you in the States are probably just awakening from a champagne induced stupor. Here's a recipe I meant to publish awhile back but preparing to go abroad wound up eating up a lot of time. If you don't have the time or energy to do a traditional black eyed peas, greens and cornbread dinner, here's a one pot dish to keep warm with.
You will need:
I lb fresh collard greens
1 quart chicken broth
3-4 whole, uncut cloves of garlic
1 tsp red chili flakes
2 tbsp olive oil
1 bunch mung bean threads, uncooked (you could use rice noodles but I like the texture of the bean threads better, these are also known as cellophane noodles)
1/4 cup tamari or soy sauce
2/3 cup water
Rinse the collard greens well and lay them flat on a cutting board. Using a sharp knife, cut out the stem and fold in half. Roll from the bottom up and slice into segments, this will give you fine long pieces of greens. Bring the chicken broth and water to a strong simmer and throw in the garlic and greens. Cook for about 45 minutes, checking every now and then to make sure the liquid doesn't boil off. If you're running low, add a bit more chicken broth or salt water.
After 45 minutes add the oil, tamari, chili flakes and mung bean threads. Cook for about 5 more minutes and remove from the heat. Serve it hot, ideally with some crusty bread to soak up the potliquor.
Showing posts with label Southern. Show all posts
Showing posts with label Southern. Show all posts
Saturday, January 1, 2011

Wednesday, November 3, 2010
Beans and Rice, My Way
No food is more familiar to me from my childhood than red beans and rice. At least once a week my mom would concoct kidney beans and kielbasa to serve over buttered rice, which was ironically one of my least favorite dishes. Now that I know stuff about nutrition and have to cook on a budget, beans and rice and I have become friends. I found a way to make it right for me. Maybe it will be right for you too.
NOTE: You could use canned beans for this if you must, but I prefer the dried so that's how I'm listing it. You'll want to soak them for about 8 hours in cold water.
you will need:
2/3 cup dried black beans, soaked and rinsed
2-3 whole cloves of garlic
2-3 cups chicken or vegetable broth
1 tsp salt
1 tbsp Mexican seasoning (some people have their own mixtures, I buy mine premixed)
5-6 small potatoes, like French fingerlings
1 cup jasmine rice
1 cup water
1/2 cup chicken broth
3 tbsp butter
1 cup monterrey jack cheese
1 onion, chopped into small strips when separated
oil for frying
Simmer the black beans and potatoes over low heat with the whole garlic cloves, spices and chicken broth. Cook the jasmine rice with the combination of water and chicken broth provided. Heat the oil over medium and once it reaches its full temperature, put in the onion. Allow to cook until barely browned and crispy then set aside. Stir the beans occasionally and set the rice aside once it's done, the beans should cook for 40-60 minutes. Add more broth if they start getting dry or if you're low on gravy. Combine the rice with the butter once it's finished while it's still hot, throw in a pinch of salt if you want. Serve the beans over a bed of rice, topped with the monterrey jack and fried onion.
Sunday, July 4, 2010
Potatoes Au Gratin
Potatoes and squash au gratin is a recipe I grew up eating but until recently never thought of recreating. I suppose I didn't realize the comforting powers of potatoes, cheese and bread crumbs until recently, oops. Either way, I used a mixture of cheeses for my version and you could vary it up as you like -- if you don't like swiss or brie, cheddar and cream cheese would work too. The sauce with Icelandic brie, which is much less ammoniac and strong as French brie, on top of the buttery yellow slices of Yukon potatoes gives this version an almost sweet taste. It's creamy and delicate as opposed to the results of using a robust Irish cheddar. Anywho.
You will need:
2 1/2 lbs golden Yukon potatoes
6 tbsp butter
1/3 cup flour
3 cups milk
4 oz Icelandic brie, wax removed
3/4 cup shredded Swiss cheese
Salt to taste
2 stale slices of bread, dry and toasted (I like sourdough)
1/2 cup shredded sharp cheddar
Preheat the oven to 400 degrees. Carefully slice the potatoes thinly -- "1/4 or smaller, dropping each slice into a bowl of salt water so they don't oxidize. Once all the potatoes are cut, heat the butter in a saucepan over medium heat. Whisk together with the flour and add about 1/3 cup of the milk, stirring until most of the lumps are gone. Once the sauce becomes hot add the brie and Swiss cheese, stir together until melted. Taste the sauce at this point and salt it to your liking. Remove from the heat.
Put several tablespoons of the cheese sauce in the bottom of the casserole dish and put a layer of potatoes over it. Repeat, and shred one of the slices of bread over the second potato layer. Keep doing this until you've used all the potatoes, pour the remainder of the sauce on top. Follow with the shredded cheddar and crumble the second slice of bread on top as well. Cover dish with tin foil and bake for an hour; after an hour, remove the tin foil and cook for 30 more minutes or until browned. Allow to cool for at least 20 minutes before serving, it's like molten lava!
Monday, June 2, 2008
Buttermilk Pie

This is a classic Southern recipe for buttermilk pie. Most people who haven't tasted it before will give you strange looks when you combine the words "buttermilk" and "pie". It's actually quite delicious and goes over well especially on holidays.
This recipe comes from Natalie Moore at NPR. Growing up, one of my neighborhood friends' mothers made this and Natalie's recipe comes the closest to hers (although that South Carolina touch can't be replicated). There are many variations of this recipe; it's similar to chess pie, creme brulee and a South African dish called "melktert".
I used a chocolate graham cracker crust since I couldn't find regular pie crust. After my adventure with the apple pie, I wasn't quite ready to dive back into those waters. While the graham crust made it really interesting, it was a bit sweet. I'm posting the reduced-sugar version of the filling for that reason. Also remember to let this pie cool for at least twenty or thirty minutes before serving, it gets VERY HOT!
Buttermilk Pie:
1 graham pie crust
4 eggs
1c sugar
2 tbsp flour
1/2c melted butter
1 1/2c buttermilk
1tsp vanilla extract (I tend to go heavy on this, so you can use up to 1 tbsp)
Beat the eggs with sugar. Add flour and beat well. Add buttermilk and vanilla. The filling will be liquidy, so carefully pour it into the crust and load it into the oven. Bake at 400 for the first 10 minutes and reduce to 325 for 50 more minutes.
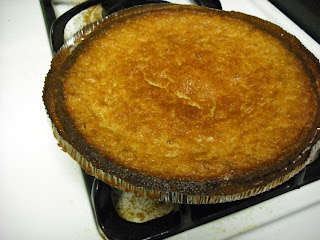
Allow to cool, serve either slightly warm or at room temperature.
Southern Buttermilk Biscuits

These were more of a challenge than you'd think -- mash the dough together, roll it out and bake, right? It turns out there's a big difference between a biscuit (a hard piece of salty bread) and a true Southern buttermilk biscuit. I'd had some buttermilk left over from the pie so I decided to give these a whirl. While they didn't turn out terribly, they definitely could have come out better. For that reason I'm leaving an "improved" recipe and method, along with some helpful information about ingredients.
White Lily flour is touted as the best for making biscuits; it's made from soft winter wheat and has a low protein content. Thanks to Pinch My Salt, I have some good info on different flours and what they do:
The less protein a flour has, the better it is for "quick" breads like biscuits and pizza crusts. A higher protein flour, which also tends to produce more gluten, is better for risen and yeast breads. Hence, bread flour has the most protein while cake flour has the least. I tend to keep cake flour, all purpose flour, self-rising and bread flour in my kitchen along with a little wheat gluten. You can add some of this to all purpose flour to create bread flour, check the box for exact measurements. Long story short, low protein flour creates a light and fluffy bread while high protein flour assists in rising. Here are exact protein percentages:
Cake flours (Swans Down, Softasilk):7.5 to 8.5% proteinBleached southern all-purpose (White Lily, Martha White, Gladiola, Red Band):7.5 to 9.5% protein
National brand self-rising (Gold Medal, Pillsbury):9 to 10% protein
National brand bleached all-purpose (Gold Medal, Pillsbury): 10 to 12% protein
Northern all-purpose (Robin Hood, Hecker’s):11 to 12% protein
Northern unbleached all-purpose (King Arthur):11.7% protein
Bread Flour:11.5 to 12.5% protein
Pinch My Salt suggests using a combination of cake and all purpose flour if you don't have White Lily; this is what I did and it seemed to work.
Pinch My Salt's Buttermilk Biscuits
1-1/4c cake flour
3/4c all-purpose flour
1 1/2tsp baking powder
1/2tsp baking soda
1/2tsp salt
1/4c butter
3/4c buttermilk
Grease a baking sheet and preheat the oven to 450. Combine dry ingredients in a large bowl. Using a dough cutter (a handle with several U-shaped wires), cut the butter into the dry ingredients. It should look like crumbs. Add your buttermilk and shape into a ball.
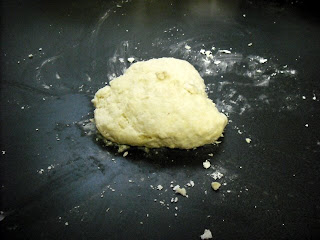
Knead the dough a few times on a floured surface and roll out. I rolled mine too thin, about 1/2 an inch, I suggest making them about an inch thick. Make sure to coat the surface and rolling pin with flour so there's no sticking. Once your dough is flat, use either a cookie cutter or the top of a drinking glass to cut the biscuits out. Shape the remaining dough into biscuit shapes and place on the cookie sheet. Bake for 10-12 minutes.
Here are a few tips from Salt on how to make the best biscuits:
Make sure your baking powder, baking soda, and/or self-rising flour are fresh!
Start preheating the oven as soon as you start thinking about making the biscuits! You want the oven to be completely preheated before the biscuits go in.
Prepare your ingredients and tools in advance so that once you get started, you can work quickly and efficiently: cut your butter in small pieces and put it back in the fridge, measure out the buttermilk, flour the counter, get out the biscuit cutter and baking sheet.
Use very cold butter, keep it in the fridge until you’re ready for it. Work the butter quickly into the flour so that it doesn’t have a chance to even think about melting!
When you add the buttermilk, stir lightly! This can be done simply with a fork. You just want to get the dough to a point where the flour is all clumped together, not a smooth dough!
Knead lightly and minimally. You aren’t kneading this like bread dough, you are simply finishing the mixing process with your hands. You only want to knead a couple of times to finish dispersing the liquid through the dough. The more you knead, the denser your biscuits will be!
Even if you use self-rising flour in the dough, dust the counter and dough with all-purpose flour. Self-rising flour can give the outside of the biscuits a bitter taste, due to the leavening it contains.
Don’t pat the dough out too thin. If you want high biscuits, don’t roll the dough any thinner than 3/4 - 1 inch.
When cutting biscuits, use a sharp cutter and press straight down and up. Don’t twist! This was the hardest tip for me to adapt. I have always twisted the biscuit cutter. But guess what, it makes a difference!
Place cut biscuits together on the baking sheet so that they are touching. Again, this is something I have never done. But I found that the biscuits do rise well and I really enjoy the texture of the soft-sided biscuits!
Don’t re-roll the scraps. Since it is best to work the dough as little as possible, instead of gathering the scraps, re-rolling and cutting into biscuits, just form the scraps into biscuit shapes by hand. I usually end up with scraps to form two extra biscuits. They might look a little funny, but they rise as well as the others and they taste just as good!
Friday, May 2, 2008
Baked Macaroni and Cheese

This is the comfort food of a lifetime. My great grandmother made it, my grandmother had her recipe, and my mom had her own version. The way I make it is to minimize saturated fat, but sometimes when I've been sick I'll cook it the way my mom did (plenty of butter). This dish actually became quite well known among my college friends as well; leftovers were rare in those days! However, this does preserve well for a few days, so don't be afraid to put the excess in tupperware for later. Try this on a cold day when you need a hearty warming side dish.
I use olive oil in this dish, but a lot of people don't like the flavor of EVOO. Feel free to substitute vegetable oil or, God forbid, butter.
Baked Macaroni and Cheese
Sauce:
2c lowfat milk
1/4c olive oil
1/2c shredded sharp cheddar
2 tbsp all purpose flour
salt to taste
Heat the milk and oil in a double boiler or over low heat in a small saucepan. When hot, add flour and stir well. Continue stirring and adding cheese and salt. Set aside to cool.
Macaroni:
1 box (12 oz dry) penne pasta
1c shredded sharp cheddar
1/4c bread crumbs + 1 tbsp melted butter (optional)
Boil and drain penne. Combine with sauce, and spread in a "9 x "9 baking pan or casserole dish. Top with cheddar and bread crumbs if desired. Bake at 450 for 10-15 minutes or until golden and bubbly; set aside to cool for 20 minutes. Cooling is important, as it makes the macaroni "scoopable". Enjoy!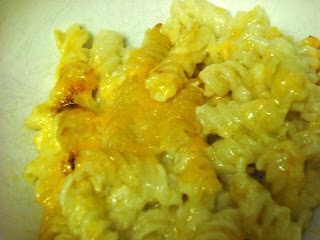
I use olive oil in this dish, but a lot of people don't like the flavor of EVOO. Feel free to substitute vegetable oil or, God forbid, butter.
Baked Macaroni and Cheese
Sauce:
2c lowfat milk
1/4c olive oil
1/2c shredded sharp cheddar
2 tbsp all purpose flour
salt to taste
Heat the milk and oil in a double boiler or over low heat in a small saucepan. When hot, add flour and stir well. Continue stirring and adding cheese and salt. Set aside to cool.
Macaroni:
1 box (12 oz dry) penne pasta
1c shredded sharp cheddar
1/4c bread crumbs + 1 tbsp melted butter (optional)
Boil and drain penne. Combine with sauce, and spread in a "9 x "9 baking pan or casserole dish. Top with cheddar and bread crumbs if desired. Bake at 450 for 10-15 minutes or until golden and bubbly; set aside to cool for 20 minutes. Cooling is important, as it makes the macaroni "scoopable". Enjoy!
Subscribe to:
Posts (Atom)