Paneer is a fresh cheese often used in vegetarian Indian dishes, especially in the Punjabi region up into Nepal. It's vegetarian because it requires no rennet, only minimally processed milk and an acid. Once you get the hang of it, it's easy to make at home if you have a supply of raw or minimally pasteurized milk. I prefer the raw, as do most cheesemakers, but it's not available commercially in all places. Some Indian and Pakistani markets sell paneer that's either imported or made in house, and other fresh non-melting cheeses like leijpajuusto can be used, so you don't have to make it every time you want some palak or shahi paneer. But it does help. Wrapped in cheesecloth in plastic or a ziploc bag, this is best used fresh or within 2-3 days of making it.
About buying proper milk -- you want to stay away from ultra high pasteurized products, and find the closest thing to raw as possible. If the expiration date is within a week, and the milk is not old, you've found what you need. UHP milk will leave you with a soupy mess that, at best, can be turned into makeshift ricotta.
What you need:
1/2 gallon raw or minimally pasteurized milk
1/3 cup lemon juice mixed with 1/4 cup water OR 3 tsp citric acid dissolved in 1/2 cup of water
a colander or strainer
a large square of single layer cheesecloth, apx "18x18
a bowl of ice water
kosher salt
Start by lining the colander or strainer with cheesecloth and placing it over a large pan or bowl, assuming you want to keep the whey. Bring the milk to boil on the stovetop, constantly stirring so the bottom doesn't burn. After around 15-20 minutes of this the milk should start to "rise" -- watch carefully for this. Pour the lemon juice or citric acid into the mixture and stir gently, taking the pot off the heat. You should have sizeable curds, like very liquidy American cottage cheese. If the curds are small and not sticking to each other, add more lemon juice or citric acid. It's always better to keep more acid on hand than you need when making cheeses like this to aid in coagulation. Pour it out of the pot through the cheesecloth lined strainer and allow as much whey as possible to filter through, and give it about five minutes to settle in. Use this time to get your pot and stirring spoon cleaned or soaking, those leftover curds stick when they dry!
Tie each corner of the cheesecloth together and lift the strained curds up. I prefer to hang the cheesecloth over the sink for another ten minutes or so to let the curds come together while they're still quite hot; they shouldn't be sticking too hard to the cheesecloth. Once they've cooled for a few minutes, twist the top of the cheesecloth tightly so it coils into itself and you're left with a rounded, covered soft ball. Place it between two towels and put something heavy on top, like a ceramic plate or bottle of water, for at least 30 minutes. The longer you allow it to press, the firmer the cheese will be.
Dissolve a few tablespoons of kosher salt into the ice water, and place the pressed paneer into the cold water. Keep it in the refrigerator or somewhere cool for 1-3 hours, then remove it and pat it dry. This is when you can either slice it up and add it to a dish or put it in a ziploc bag for later use. When you're ready to use it, the cheesecloth should peel away easily without taking much (if any) curd along with it. Paneer is great to simmer in gravies and sauces because it absorbs flavors well and doesn't melt (although it can be overworked and start to crumble).
Showing posts with label how-to. Show all posts
Showing posts with label how-to. Show all posts
Thursday, January 22, 2015

Monday, March 8, 2010
I Artichoke You: How to Prepare, Steam and Serve an Artichoke and Hollandaise
So I'll start this off with a nod to Susan Russo of Foodblogga. She has an absolutely fabulous guide to selecting and preparing fresh artichokes so I can't take complete credit for the guidelines on how to do those things. However, I've repeated her method several times and it always works. What never fails to escape me is which poor sap initially thought this strange vegetable would be good to eat.
Whoever they were, they took one for the team -- the combination of sweet artichoke with the spicy, lemony, creamy goodness of Hollandaise sauce is alarmingly decadent. However, I consider this something every good cook should know how to make, so I'm sharing my methods.
To prepare the artichoke:
Using a large sharp knife, cut off the base stem and top 1/5 of the artichoke. Pull off any dead or bruised leaves and use kitchen shears to trim the tips off of the leaves on the sides. Very carefully pull the sides of the artichoke open until the purple flower of the choke is visible. I like to use a grapefruit spoon for this, but a regular spoon works fine -- pluck out the flower and scrape out the fuzz in the bottom of the choke. Working quickly, rub the surface with a sliced lemon and squeeze some juice into the cavern where the flower once was, lest you want a brown and oxidized artichoke.
For this recipe, you will need:
2-3 artichokes
3 egg yolks
1/2 tsp mustard
1 tablespoon lemon juice
a few dashes of red pepper flakes
1/2 cup melted butter
In a large covered pot, heat the artichokes in about 2 inches of water over medium heat with a dash of salt and lemon juice. Allow to simmer and steam for about half an hour. Remove with a slotted spoon and set aside, being careful to not let them fall apart.
Using either a blender or a countertop mixer with a whisk setting, combine the egg yolks, mustard, lemon juice and pepper flakes. Heat the butter in a small saucepan until very hot, but watch it to make sure it doesn't burn. With the blender or whisk on high speed, pour the butter in a very thin stream into the yolk mixture. It will end up thickening almost immediately, so there's no need to continue mixing after the butter is all incorporated.
I like to serve the artichoke with a bit of Hollandaise put into the center of the cavern, but others prefer to serve it on the side. Pluck a leaf off, dip into the sauce and using your bottom teeth, scrape the meat off of the fibrous outer leaf. As you progress to the center the leaves will get more tender, eventually ending with the coup de grace: the heart. Smother it in Hollandaise and smile.
Whoever they were, they took one for the team -- the combination of sweet artichoke with the spicy, lemony, creamy goodness of Hollandaise sauce is alarmingly decadent. However, I consider this something every good cook should know how to make, so I'm sharing my methods.
To prepare the artichoke:
Using a large sharp knife, cut off the base stem and top 1/5 of the artichoke. Pull off any dead or bruised leaves and use kitchen shears to trim the tips off of the leaves on the sides. Very carefully pull the sides of the artichoke open until the purple flower of the choke is visible. I like to use a grapefruit spoon for this, but a regular spoon works fine -- pluck out the flower and scrape out the fuzz in the bottom of the choke. Working quickly, rub the surface with a sliced lemon and squeeze some juice into the cavern where the flower once was, lest you want a brown and oxidized artichoke.
For this recipe, you will need:
2-3 artichokes
3 egg yolks
1/2 tsp mustard
1 tablespoon lemon juice
a few dashes of red pepper flakes
1/2 cup melted butter
In a large covered pot, heat the artichokes in about 2 inches of water over medium heat with a dash of salt and lemon juice. Allow to simmer and steam for about half an hour. Remove with a slotted spoon and set aside, being careful to not let them fall apart.
Using either a blender or a countertop mixer with a whisk setting, combine the egg yolks, mustard, lemon juice and pepper flakes. Heat the butter in a small saucepan until very hot, but watch it to make sure it doesn't burn. With the blender or whisk on high speed, pour the butter in a very thin stream into the yolk mixture. It will end up thickening almost immediately, so there's no need to continue mixing after the butter is all incorporated.
I like to serve the artichoke with a bit of Hollandaise put into the center of the cavern, but others prefer to serve it on the side. Pluck a leaf off, dip into the sauce and using your bottom teeth, scrape the meat off of the fibrous outer leaf. As you progress to the center the leaves will get more tender, eventually ending with the coup de grace: the heart. Smother it in Hollandaise and smile.
Wednesday, December 30, 2009
Vereniki (Non-Meat Pierogies)
My stepfather grew up with two nationalities -- German and Polish. His grandfather on the German side was a baker, but every time he mentions a dish he wants my mother and I to attempt it's something from his Polish grandmother's repertoire. The famed cheesecake recipe is coming soon!
Anywho, his birthday runs dangerously close to Christmas day, so my mother and I typically plan a larger celebration on the birthday than on Christmas. This year we went totally Polish and because we made several things, I'm adding that as a tag on my recipe collection. My stepfather's primary request was pierogies -- or vereniki in Russian -- which are essentially wheat pasta pockets filled with some variation of mushrooms, mashed potato, onions and cheese. The following recipe includes the ingredients for all of the aforementioned fillings.
These can be prepared several ways. A lot of people boil their pierogies, but this detracts from the flavor in my experience, as well as causing the homemade variety to fray apart and become pierogie soup. Therefore I recommend a method quite similar to cooking potstickers, which begins with steaming and ends with a short pan fry.
Ingredients for dough:
2-3 cups all purpose flour
1 tsp salt
2 tbsp full fat sour cream
1 egg
1/3 c warm water
This is easy -- knead the dough together until smooth and elastic, adding flour as needed. Roll into a ball and place under an upside down bowl for an hour.
Filling:
2/3 c mushrooms, chopped finely (you may want to use a food processor for this)
4 tbsp chopped leeks
1 tbsp vegetable oil
1 lb boiled potatoes
3-4 tbsp heavy cream
2 tsp salt
1 1/2 cups finely cubed cheese of choice (fontina works well)
2 containers, 1/2 cup water in each
4 tbsp butter
large skillet with cover
Boil the potatoes until tender. Mash with the salt and cream until all but the smallest lumps are gone. Heat the oil, mushrooms and leeks over medium heat with a dash of salt and continue to cook until well browned, then set aside. Roll the dough out in small handfuls to about "1/8 and using a "3 cookie cutter, cut pieces of dough and set them aside. Heat the skillet over medium high.
Set to work on filling the pierogies -- we found it easiest and the most fun to mix and match fillings, since all the flavors were compatible. To do this takes practice with the dough but I will attempt to describe how I did it: taking the round of dough in my hand, I smooshed it down one last time to eliminate any large lumps and held it flat in my left hand. Using the right, I put fillings off center and rolled the unfilled end over. I pinched the sides together to get a small half moon. Repeat, setting the raw pierogies on an oiled cookie sheet once completed.
When you've assembled all the pierogies, it's time to cook them. Put 2 tbsp of butter in the pan and once melted, assemble approximately half the pierogies in the pan. Put in half a cup of water along with a dash of salt and cover for three minutes. After this, take off the cover and allow to cook until the water has evaporated. At this point, the side on the pan should be barely browning. Flip the pierogies and allow them to brown more completely on the other side, anywhere from three to seven minutes depending on your stove, so keep checking them.
Chances are with this recipe you'll wind up doing two batches in the pan. If you don't have a large party to serve or want to save some for later, they can be frozen before being fried for at least a month.
Once cooked, serve hot with sour cream on the side. Za zdarovy!
Anywho, his birthday runs dangerously close to Christmas day, so my mother and I typically plan a larger celebration on the birthday than on Christmas. This year we went totally Polish and because we made several things, I'm adding that as a tag on my recipe collection. My stepfather's primary request was pierogies -- or vereniki in Russian -- which are essentially wheat pasta pockets filled with some variation of mushrooms, mashed potato, onions and cheese. The following recipe includes the ingredients for all of the aforementioned fillings.
These can be prepared several ways. A lot of people boil their pierogies, but this detracts from the flavor in my experience, as well as causing the homemade variety to fray apart and become pierogie soup. Therefore I recommend a method quite similar to cooking potstickers, which begins with steaming and ends with a short pan fry.
Ingredients for dough:
2-3 cups all purpose flour
1 tsp salt
2 tbsp full fat sour cream
1 egg
1/3 c warm water
This is easy -- knead the dough together until smooth and elastic, adding flour as needed. Roll into a ball and place under an upside down bowl for an hour.
Filling:
2/3 c mushrooms, chopped finely (you may want to use a food processor for this)
4 tbsp chopped leeks
1 tbsp vegetable oil
1 lb boiled potatoes
3-4 tbsp heavy cream
2 tsp salt
1 1/2 cups finely cubed cheese of choice (fontina works well)
2 containers, 1/2 cup water in each
4 tbsp butter
large skillet with cover
Boil the potatoes until tender. Mash with the salt and cream until all but the smallest lumps are gone. Heat the oil, mushrooms and leeks over medium heat with a dash of salt and continue to cook until well browned, then set aside. Roll the dough out in small handfuls to about "1/8 and using a "3 cookie cutter, cut pieces of dough and set them aside. Heat the skillet over medium high.
Set to work on filling the pierogies -- we found it easiest and the most fun to mix and match fillings, since all the flavors were compatible. To do this takes practice with the dough but I will attempt to describe how I did it: taking the round of dough in my hand, I smooshed it down one last time to eliminate any large lumps and held it flat in my left hand. Using the right, I put fillings off center and rolled the unfilled end over. I pinched the sides together to get a small half moon. Repeat, setting the raw pierogies on an oiled cookie sheet once completed.
When you've assembled all the pierogies, it's time to cook them. Put 2 tbsp of butter in the pan and once melted, assemble approximately half the pierogies in the pan. Put in half a cup of water along with a dash of salt and cover for three minutes. After this, take off the cover and allow to cook until the water has evaporated. At this point, the side on the pan should be barely browning. Flip the pierogies and allow them to brown more completely on the other side, anywhere from three to seven minutes depending on your stove, so keep checking them.
Chances are with this recipe you'll wind up doing two batches in the pan. If you don't have a large party to serve or want to save some for later, they can be frozen before being fried for at least a month.
Once cooked, serve hot with sour cream on the side. Za zdarovy!
Friday, May 23, 2008
Six Strand Bread
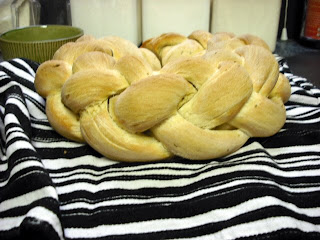
I love braided breads; being able to put artistry back in the kitchen is a passion of mine. I've done three strand loaves for awhile, but chose to tackle something decidedly more challenging this week. I made mine with the regular sourdough, but any type of dough will work. Another fun thing to do is brush filling with cinnamon or cheese between the strands, but that's for another time.
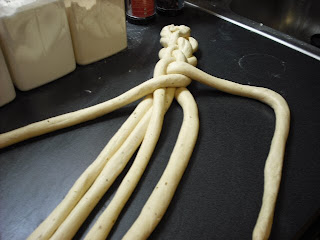
The best resource on this bread is a video I found on YouTube, so thank you MayaSophia! She gives a great visual as to how to braid these loaves, otherwise my explanations would just be confusing.
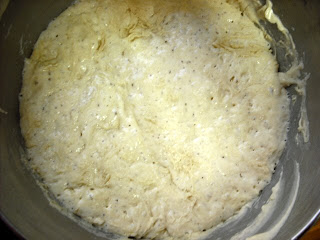
The first step for me was to sponge the bread. I took a photo to show what sourdough sponge should look like:
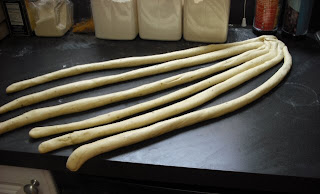
The next step was to mix the dough and let it rise. I then divided it into six parts and rolled each into a snake, pinching them together at the top:
Then comes the braiding, which is demonstrated in the video:
Continue to braid until the entire loaf is finished, then pinch and tuck each end over. Set it on your floured peel and allow to rise for 1 hour.
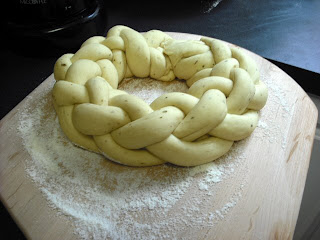
Brush the loaf either with egg or olive oil (used here) and allow to bake at 400 for 30-45 minutes, or until golden brown. These loaves typically take longer since they're more dense. What I love about braided breads is that you can break them apart and dip the little sections in oil or sauce, so this is pictured next to spinach dip (see Spinach Artichoke Dip Rediscovered for recipe).

The best resource on this bread is a video I found on YouTube, so thank you MayaSophia! She gives a great visual as to how to braid these loaves, otherwise my explanations would just be confusing.
The first step for me was to sponge the bread. I took a photo to show what sourdough sponge should look like:
The next step was to mix the dough and let it rise. I then divided it into six parts and rolled each into a snake, pinching them together at the top:
Then comes the braiding, which is demonstrated in the video:
Continue to braid until the entire loaf is finished, then pinch and tuck each end over. Set it on your floured peel and allow to rise for 1 hour.
Brush the loaf either with egg or olive oil (used here) and allow to bake at 400 for 30-45 minutes, or until golden brown. These loaves typically take longer since they're more dense. What I love about braided breads is that you can break them apart and dip the little sections in oil or sauce, so this is pictured next to spinach dip (see Spinach Artichoke Dip Rediscovered for recipe).
Kitchen Must-Haves
Since my entries are so full of little items that I love, I decided to post exactly what these are and where you could procure them. Everyone has a preference, and whatever gives you the best results is what you should stick with. These are all things that help me keep my kitchen organized and accessible; I'm rarely left up a creek when I have my versatile equipment on hand! With that said, here is the hall of fame:
 This thing is perfect for baking cookies -- it completely eliminates your need for evil cooking spray! It keeps your baking sheets clean so you don't have to wash them nearly as much. It requires minimal maintenance in and of itself, just a rinse with some hot soapy water after use. My only caution is to not use it in temperatures over 450, or you'll wind up with a crunchy plastic sheet.
KitchenAid Countertop Mixer:

This is the centerpiece of my baking world. As you can see, there are three attachments, which I've waxed on about in my "Fun with Sourdough" entry. It's a lot like a good boyfriend -- steady, non-reactive, and can handle heavy work without complaint :] It's not 100% necessary to own one of these to be a great baker, but if you already have one it's time to use it! You can seek them out used, but because it comes with a lifetime guarantee, it's probably wise to get a new one if you plan on using it a lot. I've seen them sold at Williams-Sonoma in a million different colors and even different sizes, they range from $250 to $600.
Bamboo Cooking Utensils:

Silicone Cookie Sheet:
This thing is perfect for baking cookies -- it completely eliminates your need for evil cooking spray! It keeps your baking sheets clean so you don't have to wash them nearly as much. It requires minimal maintenance in and of itself, just a rinse with some hot soapy water after use. My only caution is to not use it in temperatures over 450, or you'll wind up with a crunchy plastic sheet. Snapware Containers:

Oxo Good Grip Knife Set:
Microplane Zester Grater:
This item completely lives up to its reputation -- lightweight, dishwasher safe, it grates through hardest cheeses like butter. You can usually come by them for under $10 at kitchen supply stores. This is absolutely essential if you grate your own cheese; it leaves piles of feather light shavings instead of chunky slices like a traditional grater. It doesn't work particularly well on soft cheeses, but that's what regular graters are for.


Friday, May 2, 2008
Fun with Sourdough
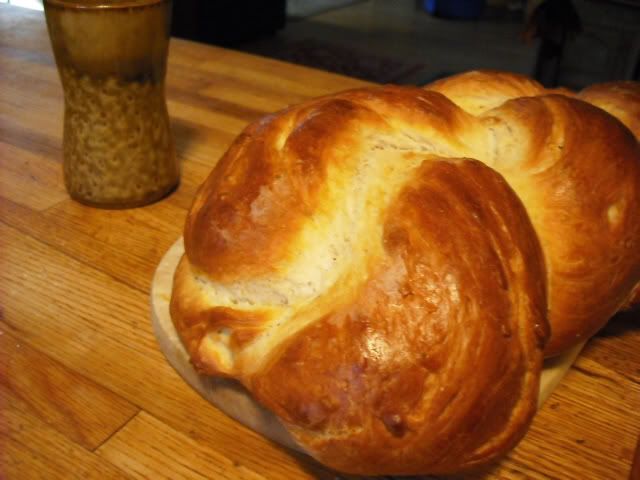
There are few things more delectable than steaming fresh sourdough. While yeast breads are fine and have their place in many dishes, there's something special about sourdough. Maybe it's the labor of love or the savory scent of wild yeast as it bakes; either way, once you get the hang of it, no other bread can compare (except maybe a braid of cinnamon challah).
Every great loaf of bread begins with a starter. Many people choose to make their own, but seeing as even I have time limits in my kitchen, I decided to order a fresh starter. King Arthur Flour, who publishes an awesome catalog and makes great bread flour, sells a fresh starter that's been kept alive for nearly 300 years! This guarantees a distinctive, fully developed taste -- I highly recommend giving theirs a try. They also include some great recipes and detailed instructions on how to care for your starter.
This is a recipe I happened upon while experimenting with breads to go with pasta and Italian dishes, but it's delicious enough to eat on its own. Never underestimate what you can do to a basic recipe with a well stocked spice cabinet!
There are a few pointers I can give for turning out your best, most stress-free loaf. The first is to get a baking stone; you can either purchase one at a cooking store or make do with some unfinished quarry tiles. Especially if you're like me and operating with a gas stove, this is an investment that can last a lifetime if you care for it. Remember to preheat the oven to 450-500 degrees at least an hour before baking, that way the stone can get fully heated. In addition to this is a pizza or bread peel, which you can find at restaurant supply stores. You powder it with cornstarch, stick the loaf to it and slide the bread onto the stone -- easy as pie!
Another piece of equipment that is vital to my kitchen is my countertop Kitchen-Aid mixer. I'm not sure where my culinary skills would be without this! They tend to be a bit pricey, but are worth every penny. They can handle most doughs with ease where a regular mixer would combust. They're also great for multitasking, as you can let things knead or mix while working on another aspect of the recipe. I keep three different attachments for mine -- a whisk for general mixing, a bread hook, and a flat attachment that works wonders for meringue and whipped cream.
Every great loaf of bread begins with a starter. Many people choose to make their own, but seeing as even I have time limits in my kitchen, I decided to order a fresh starter. King Arthur Flour, who publishes an awesome catalog and makes great bread flour, sells a fresh starter that's been kept alive for nearly 300 years! This guarantees a distinctive, fully developed taste -- I highly recommend giving theirs a try. They also include some great recipes and detailed instructions on how to care for your starter.
This is a recipe I happened upon while experimenting with breads to go with pasta and Italian dishes, but it's delicious enough to eat on its own. Never underestimate what you can do to a basic recipe with a well stocked spice cabinet!
There are a few pointers I can give for turning out your best, most stress-free loaf. The first is to get a baking stone; you can either purchase one at a cooking store or make do with some unfinished quarry tiles. Especially if you're like me and operating with a gas stove, this is an investment that can last a lifetime if you care for it. Remember to preheat the oven to 450-500 degrees at least an hour before baking, that way the stone can get fully heated. In addition to this is a pizza or bread peel, which you can find at restaurant supply stores. You powder it with cornstarch, stick the loaf to it and slide the bread onto the stone -- easy as pie!
Another piece of equipment that is vital to my kitchen is my countertop Kitchen-Aid mixer. I'm not sure where my culinary skills would be without this! They tend to be a bit pricey, but are worth every penny. They can handle most doughs with ease where a regular mixer would combust. They're also great for multitasking, as you can let things knead or mix while working on another aspect of the recipe. I keep three different attachments for mine -- a whisk for general mixing, a bread hook, and a flat attachment that works wonders for meringue and whipped cream.

Rustic Italian Sourdough
Sponge:
1c fresh "fed" starter
3c bread flour
1 1/2c warm water
Combine these ingredients in a large, non-reactive bowl. Cover with plastic wrap and allow to "sponge" for 6-12 hours. I tend to let mine sponge overnight, so begin this recipe the day before you plan to serve it.
Bread:
Sponge
2-3c flour
1 tbsp kosher salt
1/2 c finely grated hard cheese (Asiago works well)
2 tbsp oregano
Garlic olive oil
cornstarch
Knead or mix your sponge with the remaining flour. Add the salt, herbs, and cheese, and knead until smooth and elastic. Grease a large bowl with garlic oil, place and turn the dough into it. Cover and allow to rise for around an hour.
Splice the dough into two loaves. Knead each into a round and allow to rise for 1-2 more hours, until doubled in size. Slice the tops of each loaf and place on cornstarched peel. Slide onto baking stone, and bake for 20-25 minutes at 450. Serve hot.
I like to hand shape my loaves to maximize the "crustiness" of each piece. If you want an even thicker crust, mist the loaf with water midway through baking. I like to serve this particular loaf with cream cheese. Enjoy!
Subscribe to:
Posts (Atom)