This is a recipe that just never fails. It's seasonal, relatively cheap to make, and I have yet to find someone who doesn't adore it. Feel free to adjust the seasoning as you see fit; smoked paprika can add a lot of heat to an otherwise mellow comfort food, so you do you. Since one butternut squash makes a lot of puree, I'm posting the version that uses all of the puree. Feel free to halve it if you don't intend on using the whole squash, or freeze some for another day.
You will need:
1 small to medium butternut squash; I try to find the smallest of the bunch, something that will yield around 3 cups of puree is ideal
8 oz light cream
4 oz chevre
1/4 tsp smoked paprika
1/3 cup crushed cashews
1 tbsp fresh sage, chopped
a few sprigs of rosemary
1/3 cup chopped white onion
1 tbsp butter
6 cups vegetable or chicken broth
salt to taste
turmeric for color
You've got to roast a squash to do this right. Halve it, scoop out the seeds, and place it cut side down in a roasting pan. Fill it with about half an inch of salted water. Preheat the oven to 350, and let it bake for 60-90 minutes. Some people roast at 400 for a much shorter time, but I prefer the longer method -- you get a more tender, sweet result. Let the halves cool completely before scooping out the puree.
After that, it's pretty simple. Using a large soup pot, throw in the onion and butter and let them cook until the onion begins to brown. Add your 3-4 cups of squash puree and the broth of your choice. Whisk it together over medium heat until it's more or less uniform. Add the paprika, cashews, herbs and chevre, and simmer on medium-low. Check it about every 5-10 minutes and give it a nice whisk each time. After around 15 minutes, add the cream and turmeric and whisk, whisk, whisk. Some people like to use an immersion blender for this, it does yield a creamier result. Taste it and add however much salt you need.
I've found that keeping this on very low heat for some more time brings out the flavor more, but it can be served immediately as well.
Showing posts with label kosher. Show all posts
Showing posts with label kosher. Show all posts
Sunday, February 14, 2016

Friday, September 17, 2010
Russki Style Potato Salad
This recipe is so freaking easy. It's also very flavorful and generally well received, somewhat to my surprise as I tend to use vinegar more than the average bear. Anywho, here ya go.
You will need:
about 1 lb Russian Fingerling potatoes, cooked until tender
1 white onion, chopped finely
1/2 cup fresh dill, de-stemmed but you don't have to chop it if you don't want to
3 tbsp herbed vinegar (look in the kosher section of the grocery store, it's in a green bottle)
2/3 cup sour cream
salt to taste, about 1 1/2 tsp
Chop the potatoes into bite sized pieces. Mix the ingredients together and chill for about half an hour. Voila, done!
You will need:
about 1 lb Russian Fingerling potatoes, cooked until tender
1 white onion, chopped finely
1/2 cup fresh dill, de-stemmed but you don't have to chop it if you don't want to
3 tbsp herbed vinegar (look in the kosher section of the grocery store, it's in a green bottle)
2/3 cup sour cream
salt to taste, about 1 1/2 tsp
Chop the potatoes into bite sized pieces. Mix the ingredients together and chill for about half an hour. Voila, done!
La Fin Du Monde Roasted Chicken with Fig Chutney
This was a recipe made under duress. As Till Lindemann would say, you can't have art without pain but art exists for compensating pain. The name of the beer was merely ironic, although the taste it imparted was far from ironic.
You will need:
1 3.5 lb chicken
16 oz can whole coconut milk (please, please don't use the stuff in the soy milk sector)
1 bottle La Fin Du Monde beer
1 tbsp kosher salt
1 lb fresh figs, chopped into quarters
1/3 cup tamari or soy sauce
1 1/2 tsp red chili flakes
1/2 tsp fresh grated ginger
1/3 cup sugar
Heat the oven to 350 degrees and set the chicken spine up in a roasting pan. Sprinkle the salt over it and pour the beer over the chicken, then pour the coconut milk. Bake for about 80-90 minutes, basting about every 20 minutes. Remove from the heat and set aside 2 cups of the drippings.
In a saucepan, heat the figs and tamari sauce together. Add the spices and cook until the figs start to become soft from the heat; add the sugar and gradually add the drippings. Stir and keep adding and reducing the broth. Keep cooking and stirring until it begins to thicken and the sugar begins to form bubbles in the sauce. Remove from the heat and set aside.
Divide the chicken into whatever portions you desire and serve the chutney on the side -- it is a bit spicy, so some may want more or less of it than others.
You will need:
1 3.5 lb chicken
16 oz can whole coconut milk (please, please don't use the stuff in the soy milk sector)
1 bottle La Fin Du Monde beer
1 tbsp kosher salt
1 lb fresh figs, chopped into quarters
1/3 cup tamari or soy sauce
1 1/2 tsp red chili flakes
1/2 tsp fresh grated ginger
1/3 cup sugar
Heat the oven to 350 degrees and set the chicken spine up in a roasting pan. Sprinkle the salt over it and pour the beer over the chicken, then pour the coconut milk. Bake for about 80-90 minutes, basting about every 20 minutes. Remove from the heat and set aside 2 cups of the drippings.
In a saucepan, heat the figs and tamari sauce together. Add the spices and cook until the figs start to become soft from the heat; add the sugar and gradually add the drippings. Stir and keep adding and reducing the broth. Keep cooking and stirring until it begins to thicken and the sugar begins to form bubbles in the sauce. Remove from the heat and set aside.
Divide the chicken into whatever portions you desire and serve the chutney on the side -- it is a bit spicy, so some may want more or less of it than others.
Monday, March 8, 2010
Roast Chakhokhbili: Roasted Georgian Chicken
Making this dish was an adventure in and of itself; eating it was another. Chakhokhbili is a Georgian chicken stew infused with lots of spices and vegetables; instead of making a stew, I decided to roast the chicken whole to give my guests their desired selection of meat. This was the hands-down favorite at my last dinner party. Georgian cuisine is very flavorful and based on ingredients native to the region; one cannot categorize it as Middle Eastern, Indian or Russian, it is an entity in and of itself. The Georgian people are fiercely proud of the culinary bounty provided by their native land, which is clear from the first bite.
The recipe is based on Clarissa Hyman's chakhokhbili recipe published in The Jewish Kitchen, one of my favorite cookbooks. I had to adjust a few ingredients and the cooking time, as always, but I stuck fairly close to the original recipe. However, the sauce came out a little too chunky for my taste, so I'm describing each step separately.
For the sauce:
2 tbsp vegetable oil
2 medium onions, finely chopped
1 lb peeled and boiled potatoes
15 oz can plain tomato sauce
1 tsp turmeric
1 tsp ground coriander
1 tsp hot paprika
1/2 tsp red pepper flakes
1 tsp salt
2 bay leaves
1 cup Shiraz or other red wine
Put the oil in a skillet over medium heat. Add the onions and cook until they become translucent and slightly browned; remove from the heat. Combine all sauce ingredients and mash together, not all lumps need to be gone but the potatoes should be mashed enough to contribute to the texture of the sauce. Heat for about 10 minutes.
For the chicken:
1 medium chicken
1 large roasting pan, lined with foil
1 cup chicken broth
several tablespoons chopped fresh mint
Heat the oven to 350 degrees. Pour the broth into the roasting pan and after salting and rinsing, add the chicken. Top the chicken with a cup to a cup and a half of the sauce and bake for an hour and a half. Remove from the oven and increase the heat to 400. Using a wooden spoon, gently clear some of the sauce from the top of the chicken -- this will allow the outside to become crispy. Put it back in the oven and cook until the outside is brown and crispy; using a meat thermometer, check to make sure the meat on the thigh hits at least 165 degrees before removing for good. You can either serve this whole and allow people to sauce it as they desire or you can divide it into about 8 sections, toss and coat with the remainder of the sauce and finally, top with the fresh mint.
The recipe is based on Clarissa Hyman's chakhokhbili recipe published in The Jewish Kitchen, one of my favorite cookbooks. I had to adjust a few ingredients and the cooking time, as always, but I stuck fairly close to the original recipe. However, the sauce came out a little too chunky for my taste, so I'm describing each step separately.
For the sauce:
2 tbsp vegetable oil
2 medium onions, finely chopped
1 lb peeled and boiled potatoes
15 oz can plain tomato sauce
1 tsp turmeric
1 tsp ground coriander
1 tsp hot paprika
1/2 tsp red pepper flakes
1 tsp salt
2 bay leaves
1 cup Shiraz or other red wine
Put the oil in a skillet over medium heat. Add the onions and cook until they become translucent and slightly browned; remove from the heat. Combine all sauce ingredients and mash together, not all lumps need to be gone but the potatoes should be mashed enough to contribute to the texture of the sauce. Heat for about 10 minutes.
For the chicken:
1 medium chicken
1 large roasting pan, lined with foil
1 cup chicken broth
several tablespoons chopped fresh mint
Heat the oven to 350 degrees. Pour the broth into the roasting pan and after salting and rinsing, add the chicken. Top the chicken with a cup to a cup and a half of the sauce and bake for an hour and a half. Remove from the oven and increase the heat to 400. Using a wooden spoon, gently clear some of the sauce from the top of the chicken -- this will allow the outside to become crispy. Put it back in the oven and cook until the outside is brown and crispy; using a meat thermometer, check to make sure the meat on the thigh hits at least 165 degrees before removing for good. You can either serve this whole and allow people to sauce it as they desire or you can divide it into about 8 sections, toss and coat with the remainder of the sauce and finally, top with the fresh mint.
Wednesday, December 23, 2009
Latkes: There Can Never Be Too Little, Too Late
Scrolling through my posts I realized I hadn't included one of the cheapest, easiest and oldest recipes in my repertoire: latkes. The pancakes themselves are composed of three to five ingredients, depending on just how good of a chef you are. This is a dish traditionally eaten during Hanukkah although it can be enjoyed any time of the year. Still, this is a wintery food to me, maybe because the potatoes and onions are sometimes all you've got to work with this time of year.
Despite my mother's near-neurotic insistence that potatoes are NOT truly Russian/Jewish/Ashekenazi fare, I'm classifying latkes under all three. She is correct, technically: potatoes were cultivated in the Americas and weren't brought to Europe until around the 18th century. Peter the Great can be credited with bringing a wide variety of fruits and vegetables into the Russian tradition, with potatoes becoming a staple due to their ability to grow in the harsh climate. Before potatoes, however, turnips and other similar root vegetables were used not only in Russian cuisine but in Western Europe as well. So while turnips have been substituted with potatoes, the dishes themselves and the methods used date much further back.
One word of advice before I bestow my recipe: if you're not familiar with using a grater, this will take you much longer than it should. I'm normally a do-it-by-hand girl but seeing as I have injured said hands on cheese graters way too many times in my earlier days, I recommend using a food processor with a shredder feature if you have one. If not, grab a cheese grater and start at it. With some practice you'll be safely shredding by hand in no time but don't rush things, lest the thought of grated knuckle in your potatoes is appealing.
You will need:
2 lbs potatoes, shredded (I leave the skin on, they're easier to grip while grating and add some nutrition)
2 large eggs
1/2 tsp salt
1 medium onion, grated (this is harder to grate than the potatoes so leave one end intact to grip)
1/4 c flour
"1.5 of oil in a shallow pan
Shred the onion first -- its juices will stop the reaction that causes potatoes to turn pink when cut. Follow with the potatoes and mix well. Mix in the eggs and salt, then finally the flour. Heat the oil over the medium setting and, forming a round about the size of your palm and placing it on a spatula, slide it into the oil. I can usually cook 2-3 latkes at a time but remember that they will cook faster the fewer you attempt each round. Cook each side until browned and place on paper to absorb any excess grease. Keep adding, flipping and setting aside the rounds until you're out of potato -- there should be liquid left over. Don't be alarmed if you see it start to pool soon after mixing all of the ingredients. I just get rid of it once I'm done.
There are a number of condiments to serve these with; the traditional Hanukkah way is with applesauce, but that's not to everyone's taste, especially year-round. My personal favorite is sour cream and chopped pickles. Ketchup or pepper, salt and vinegar tend to be popular as well.
Despite my mother's near-neurotic insistence that potatoes are NOT truly Russian/Jewish/Ashekenazi fare, I'm classifying latkes under all three. She is correct, technically: potatoes were cultivated in the Americas and weren't brought to Europe until around the 18th century. Peter the Great can be credited with bringing a wide variety of fruits and vegetables into the Russian tradition, with potatoes becoming a staple due to their ability to grow in the harsh climate. Before potatoes, however, turnips and other similar root vegetables were used not only in Russian cuisine but in Western Europe as well. So while turnips have been substituted with potatoes, the dishes themselves and the methods used date much further back.
One word of advice before I bestow my recipe: if you're not familiar with using a grater, this will take you much longer than it should. I'm normally a do-it-by-hand girl but seeing as I have injured said hands on cheese graters way too many times in my earlier days, I recommend using a food processor with a shredder feature if you have one. If not, grab a cheese grater and start at it. With some practice you'll be safely shredding by hand in no time but don't rush things, lest the thought of grated knuckle in your potatoes is appealing.
You will need:
2 lbs potatoes, shredded (I leave the skin on, they're easier to grip while grating and add some nutrition)
2 large eggs
1/2 tsp salt
1 medium onion, grated (this is harder to grate than the potatoes so leave one end intact to grip)
1/4 c flour
"1.5 of oil in a shallow pan
Shred the onion first -- its juices will stop the reaction that causes potatoes to turn pink when cut. Follow with the potatoes and mix well. Mix in the eggs and salt, then finally the flour. Heat the oil over the medium setting and, forming a round about the size of your palm and placing it on a spatula, slide it into the oil. I can usually cook 2-3 latkes at a time but remember that they will cook faster the fewer you attempt each round. Cook each side until browned and place on paper to absorb any excess grease. Keep adding, flipping and setting aside the rounds until you're out of potato -- there should be liquid left over. Don't be alarmed if you see it start to pool soon after mixing all of the ingredients. I just get rid of it once I'm done.
There are a number of condiments to serve these with; the traditional Hanukkah way is with applesauce, but that's not to everyone's taste, especially year-round. My personal favorite is sour cream and chopped pickles. Ketchup or pepper, salt and vinegar tend to be popular as well.
Wednesday, August 12, 2009
Draniki
This is a Russian potato-mushroom pancake, essentially. I had them as my first real meal in St. Petersburg and made it a point to get to biz-nes-lench (funny cognate!) on time when possible. They're definitely best served with sour cream and a bit of salt.
What you need:
about 4 large potatoes, lightly boiled and shredded
1c white mushrooms, chopped (I don't remember the actual name but you know the ones I'm talking about)
2 eggs
1 tsp salt
1/3c flour
3 tbsp vegetable oil
This is an easy one. Heat the oil in a skillet over medium-high and whisk the potatoes together with the eggs, add the flour and salt and stir until well mixed. Add the chopped mushrooms and stir until even. Spoon the batter into the skillet and let it cook until the surface browns -- this can go from three to ten minutes depending on the temperament of your stovetop. Flip, as with any pancake, and serve after it browns on both sides :)
What you need:
about 4 large potatoes, lightly boiled and shredded
1c white mushrooms, chopped (I don't remember the actual name but you know the ones I'm talking about)
2 eggs
1 tsp salt
1/3c flour
3 tbsp vegetable oil
This is an easy one. Heat the oil in a skillet over medium-high and whisk the potatoes together with the eggs, add the flour and salt and stir until well mixed. Add the chopped mushrooms and stir until even. Spoon the batter into the skillet and let it cook until the surface browns -- this can go from three to ten minutes depending on the temperament of your stovetop. Flip, as with any pancake, and serve after it browns on both sides :)
Monday, March 2, 2009
Tahitian Blinis
Tahitian blinis -- it's a contradiction in and of itself. Blinis, also known as blin or blintzes, are a traditional Russian food often seen in Jewish cooking as well. Pineapple and vanilla don't need an explanation, but when combined they create a taste that is way beyond the sum of its parts. I like to put a little vanilla extract in the syrup pineapple comes stored in, it adds a hint of luxuriousness to an otherwise simple and sunny fruit. Blinis are often filled with everything from meat and cream cheese to various regional fruits.
This recipe took a bit of practice; without going into detail I'll just say that the initial first attempt at the filling was an utter failure. The blinis themselves took some handling but I got the hang of it by the second or third one. The batter is supposed to be very thin, and a large nonstick skillet without tapered sides is your best bet (i.e. the flat portion at the bottom of the skillet is large versus curving inward like a wok). This gives the batter plenty of surface area to spread out and create the characteristic thinness. You could also use a crepe maker, as the dishes are quite similar. This recipe makes around 20 blin, but they store very well in a freezer bag in the fridge for a couple of days. I found them much easier to work with the second day.
Ingredients for blinis:
4 eggs
1 1/2c whole milk
1 1/2c flour
1/2 tsp salt
3 tbsp sugar
Whisk together the eggs and milk. Add the salt and sugar and continue to whisk. Finally, add the flour and whisk until the batter is smooth. Place a large nonstick skillet over medium heat, I used a tiny bit of butter before each blin to make them easier to handle after cooking. Using a 1/4c measuring cup, put one scoop of batter in the skillet. Allow to cook for 2-3 minutes or until the sides begin to curl up and you can shimmy a spatula under the blin. Flip and allow the other side to cook for about 30 seconds, then take the pan and flip the blin onto a plate. Do this until you're out of batter.
Filling:
*This makes enough filling for all the blinis, adjust accordingly if you're making fewer and don't want leftovers. This goes nicely on bagels as well.*
1 1/2c finely chopped and shredded pineapple (if you're getting it from a can, strain all the syrup out first and reduce the sugar by 2-3 tsp)
12 oz cream cheese
8 tsp sugar
1 1/2 tsp vanilla extract
Let the cream cheese soften to room temperature and cream it with the sugar and vanilla extract. Mix in the pineapple until the consistency is about even and there are no chunks of cream cheese left.
Taking the blini, put a tablespoon or two of filling into the center. The way you roll these is very similar to the egg roll method; bring the right edge over, tuck the top edge down and the bottom edge up and roll from the folded side. Once all of these are done you can either serve them as is or fry them.
Some people choose to fry these, especially on Hanukkah when frying is a religious observance. To do this, heat about an inch of vegetable oil over medium heat in a skillet. Very carefully place the blinis seam side up in the pan; you will probably have to hover by them and use a spatula or tongs to keep the seams from falling apart. After a few minutes flip to the other side with tongs. Allow to brown for another minute or so and transfer to a paper towel. Do the same with the rest of the blinis; fit as many as you can into the pan without crowding them and giving yourself ample space for flipping. Serve and enjoy!
This recipe took a bit of practice; without going into detail I'll just say that the initial first attempt at the filling was an utter failure. The blinis themselves took some handling but I got the hang of it by the second or third one. The batter is supposed to be very thin, and a large nonstick skillet without tapered sides is your best bet (i.e. the flat portion at the bottom of the skillet is large versus curving inward like a wok). This gives the batter plenty of surface area to spread out and create the characteristic thinness. You could also use a crepe maker, as the dishes are quite similar. This recipe makes around 20 blin, but they store very well in a freezer bag in the fridge for a couple of days. I found them much easier to work with the second day.
Ingredients for blinis:
4 eggs
1 1/2c whole milk
1 1/2c flour
1/2 tsp salt
3 tbsp sugar
Whisk together the eggs and milk. Add the salt and sugar and continue to whisk. Finally, add the flour and whisk until the batter is smooth. Place a large nonstick skillet over medium heat, I used a tiny bit of butter before each blin to make them easier to handle after cooking. Using a 1/4c measuring cup, put one scoop of batter in the skillet. Allow to cook for 2-3 minutes or until the sides begin to curl up and you can shimmy a spatula under the blin. Flip and allow the other side to cook for about 30 seconds, then take the pan and flip the blin onto a plate. Do this until you're out of batter.
Filling:
*This makes enough filling for all the blinis, adjust accordingly if you're making fewer and don't want leftovers. This goes nicely on bagels as well.*
1 1/2c finely chopped and shredded pineapple (if you're getting it from a can, strain all the syrup out first and reduce the sugar by 2-3 tsp)
12 oz cream cheese
8 tsp sugar
1 1/2 tsp vanilla extract
Let the cream cheese soften to room temperature and cream it with the sugar and vanilla extract. Mix in the pineapple until the consistency is about even and there are no chunks of cream cheese left.
Taking the blini, put a tablespoon or two of filling into the center. The way you roll these is very similar to the egg roll method; bring the right edge over, tuck the top edge down and the bottom edge up and roll from the folded side. Once all of these are done you can either serve them as is or fry them.
Some people choose to fry these, especially on Hanukkah when frying is a religious observance. To do this, heat about an inch of vegetable oil over medium heat in a skillet. Very carefully place the blinis seam side up in the pan; you will probably have to hover by them and use a spatula or tongs to keep the seams from falling apart. After a few minutes flip to the other side with tongs. Allow to brown for another minute or so and transfer to a paper towel. Do the same with the rest of the blinis; fit as many as you can into the pan without crowding them and giving yourself ample space for flipping. Serve and enjoy!
Friday, May 23, 2008
Matzo Ball Soup

This is the recipe for a basic matzo ball spiced up a little. In addition to the vegetables, some unexpected ingredients are used in the stock to enhance the flavor. This is the Jewish take on chicken dumpling soup; perfect for cold or sick days.
Matzo balls:
3/4c matzo meal
dash pepper
1 tsp kosher salt
2 eggs
2 tbsp veg oil
Soup:
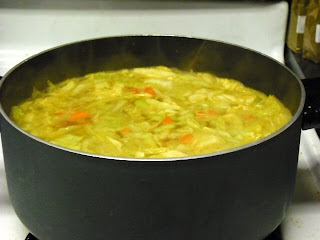
1 small cabbage head, chopped
2 1/2 quarts imitation chicken broth
2 carrots, diced
3-4 celery stalks, diced
1/4tsp paprika
1 tsp garlic salt
1/2 tsp onion powder
1 tbsp vinegar
Heat the soup ingredients in a large pot.
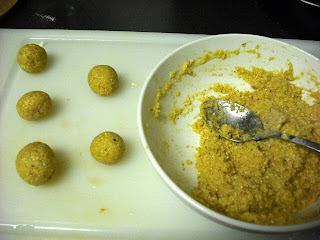
Combine the matzo ball ingredients and allow to chill for 15-30 minutes. Form into small balls and drop into boiling soup.
Cover tightly and allow to cook for 20 minutes. Serve hot.
Six Strand Bread
I love braided breads; being able to put artistry back in the kitchen is a passion of mine. I've done three strand loaves for awhile, but chose to tackle something decidedly more challenging this week. I made mine with the regular sourdough, but any type of dough will work. Another fun thing to do is brush filling with cinnamon or cheese between the strands, but that's for another time.
The best resource on this bread is a video I found on YouTube, so thank you MayaSophia! She gives a great visual as to how to braid these loaves, otherwise my explanations would just be confusing.
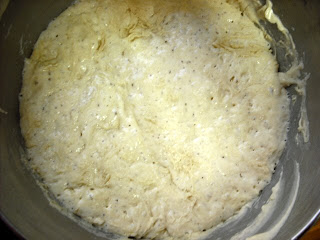
The first step for me was to sponge the bread. I took a photo to show what sourdough sponge should look like:
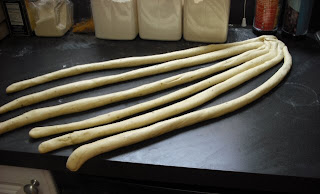
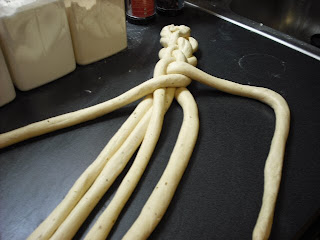
The next step was to mix the dough and let it rise. I then divided it into six parts and rolled each into a snake, pinching them together at the top:
Then comes the braiding, which is demonstrated in the video:
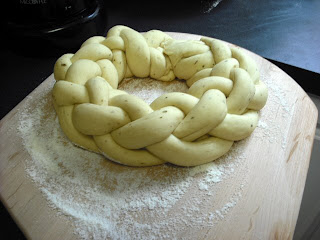
Continue to braid until the entire loaf is finished, then pinch and tuck each end over. Set it on your floured peel and allow to rise for 1 hour.
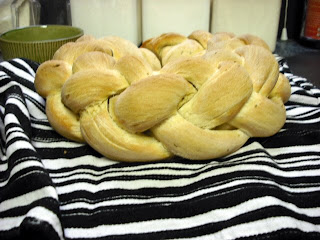
Brush the loaf either with egg or olive oil (used here) and allow to bake at 400 for 30-45 minutes, or until golden brown. These loaves typically take longer since they're more dense. What I love about braided breads is that you can break them apart and dip the little sections in oil or sauce, so this is pictured next to spinach dip (see Spinach Artichoke Dip Rediscovered for recipe).

The best resource on this bread is a video I found on YouTube, so thank you MayaSophia! She gives a great visual as to how to braid these loaves, otherwise my explanations would just be confusing.
The first step for me was to sponge the bread. I took a photo to show what sourdough sponge should look like:

The next step was to mix the dough and let it rise. I then divided it into six parts and rolled each into a snake, pinching them together at the top:
Then comes the braiding, which is demonstrated in the video:
Continue to braid until the entire loaf is finished, then pinch and tuck each end over. Set it on your floured peel and allow to rise for 1 hour.
Brush the loaf either with egg or olive oil (used here) and allow to bake at 400 for 30-45 minutes, or until golden brown. These loaves typically take longer since they're more dense. What I love about braided breads is that you can break them apart and dip the little sections in oil or sauce, so this is pictured next to spinach dip (see Spinach Artichoke Dip Rediscovered for recipe).
Tuesday, May 20, 2008
Honey Braided Challah
This is a great holiday bread and doubles as a nice breakfast loaf. It's sweet without being demanding and is perfect with cream cheese or honey butter. Many traditions include seeds or certain herbs sprinkled over the top; sesame seeds work well for this particular loaf.
Honey Cinnamon Challah:
7c bread flour
1 tbsp kosher salt
1/2c agave nectar (low glycemic sweetener, check health food stores or well stocked grocers)
2 packets of yeast dissolved in 1/3c warm water
1/2c veg oil
2 tbsp apple pie spice
4 eggs
1c boiling water
1/2c cold water
1 egg + 2 tbsp honey + 1 tbsp water (set aside)
Beat eggs in a bowl. In separate large bowl mix oil, nectar, spices, salt and add boiling water. Stir until completely dissolved. Add cold water, stir, and add yeast water -- keep in mind that the mixture should be warm, not hot, before the addition of yeast. Add eggs to the large bowl. Combine flour 1/2-1c at a time, as certain climates require more or less of it. If you're kneading by hand, knead for about 15 minutes or until smooth and elastic; if you're using a bread hook it takes around five to ten minutes. Place loaf into a greased bowl and let rise, covered, in a warm place for an hour or until doubled in size.
Before punching the dough down, remove from the bowl and slice into thirds with a sharp knife. Knead each round for 2-5 minutes and use the sharp knife to divide each into thirds again. Roll each section into a "snake" about 1-2 inches in diameter. Pinch the top ends together and braid down the loaf, then pinch the bottom ends and tuck under. Repeat this with the 2 remaining rounds and let each rise on a greased baking sheet for 30-45 minutes. Right before the loaves are ready to go in the oven, take a pastry brush and coat each with the egg and honey mixture. Make sure to cover all exposed areas of the loaf except for the bottom. Sprinkle seeds if desired.
Preheat the oven to 450 with your baking stone, and reduce to 350 for the actual baking time. If you're operating with a baking sheet only, flour with cornmeal or semolina and allow it to preheat. Place the loaf on a greased large plate or a floured peel and slide it onto the baking stone or sheet. Allow to bake for 20-30 minutes or until loaf is a deep golden brown.
Honey Cinnamon Challah:
7c bread flour
1 tbsp kosher salt
1/2c agave nectar (low glycemic sweetener, check health food stores or well stocked grocers)
2 packets of yeast dissolved in 1/3c warm water
1/2c veg oil
2 tbsp apple pie spice
4 eggs
1c boiling water
1/2c cold water
1 egg + 2 tbsp honey + 1 tbsp water (set aside)
Beat eggs in a bowl. In separate large bowl mix oil, nectar, spices, salt and add boiling water. Stir until completely dissolved. Add cold water, stir, and add yeast water -- keep in mind that the mixture should be warm, not hot, before the addition of yeast. Add eggs to the large bowl. Combine flour 1/2-1c at a time, as certain climates require more or less of it. If you're kneading by hand, knead for about 15 minutes or until smooth and elastic; if you're using a bread hook it takes around five to ten minutes. Place loaf into a greased bowl and let rise, covered, in a warm place for an hour or until doubled in size.
Before punching the dough down, remove from the bowl and slice into thirds with a sharp knife. Knead each round for 2-5 minutes and use the sharp knife to divide each into thirds again. Roll each section into a "snake" about 1-2 inches in diameter. Pinch the top ends together and braid down the loaf, then pinch the bottom ends and tuck under. Repeat this with the 2 remaining rounds and let each rise on a greased baking sheet for 30-45 minutes. Right before the loaves are ready to go in the oven, take a pastry brush and coat each with the egg and honey mixture. Make sure to cover all exposed areas of the loaf except for the bottom. Sprinkle seeds if desired.
Preheat the oven to 450 with your baking stone, and reduce to 350 for the actual baking time. If you're operating with a baking sheet only, flour with cornmeal or semolina and allow it to preheat. Place the loaf on a greased large plate or a floured peel and slide it onto the baking stone or sheet. Allow to bake for 20-30 minutes or until loaf is a deep golden brown.
Subscribe to:
Posts (Atom)