Miso is one of the most versatile ingredients to work with in vegetarian cuisine -- it can be used as a marinade, dressing, in side sauces or most commonly, as a soup base. This is a fantastic dish that only takes about 15 minutes to make, and can be used either as a light starter or an easy main course if you want something nutritious and comforting. The miso paste can be adjusted depending on your taste, and the vegetables can be switched around to your liking. This is how I was taught to make it, and very similar to what I've had in most Japanese restaurants.
The zucchini can be left out completely, but I just love the soba-like effect of spiralized zucchini noodles in this particular soup. It adds a nice texture on top of the nutritional punch it packs.
You will need:
1/4 cup miso paste
1/3 cup warm water
4 cups water
2 tbsp tamari sauce
1 scallion, sliced
1 handful sliced white or Cremini mushrooms (about 3-4 whole mushrooms)
1 small zucchini, spiralized
4 oz tofu, cubed
2 tbsp olive oil
In a small bowl, whisk together the miso paste and warm water. Set aside.
In a medium sized saucepan, heat the olive oil, scallions, tofu, and mushrooms over medium heat. Sautee them all together until the mixture becomes fragrant and the tofu begins to brown on more than one side. Add the water and tamari sauce and bring to a strong simmer, then add the zucchini noodles. Cook until the zucchini is at the desired texture -- 4-5 minutes if you want more crisp noodles, 7-8 for softer noodles. Once you've gotten the zucchini cooked, immediately remove the saucepan from the heat and allow to cool for a few minutes. Thoroughly stir and add the miso paste while the soup is still hot but not simmering. Serve immediately.
Showing posts with label vegan. Show all posts
Showing posts with label vegan. Show all posts
Sunday, July 10, 2016

Saturday, December 5, 2015
Give Peas a Chance: A Guide to Meat Substitutes
It's easy to become accustomed to doing things a certain way -- soups are made with chicken broth, gravy is made with beef or poultry stock, chili has ground beef -- that it's easy to go-to the traditional meaty bases of so many dishes. Meat can be an incredible flavoring agent, and certain cuts are definitely worth tasting every now and then if you enjoy them, but replacing everyday meals with vegetarian alternatives can make a huge difference both in your wallet and in your general health. Here's a quick guide to which substitutes work best.
Soy meat substitutes -- This is probably the easiest. There are frozen ground beef substitutes, veggie burgers, and chicken patties available in nearly every grocery store that mimic the real thing so well you might never notice. But they tend to be higher in sodium, so just don't rely on meat substitutes too often.
As for more natural alternatives, tempeh is my personal favorite. It's quite versatile and there are different varieties available, usually various combinations of soy and whole grains. It's a block that's been fermented, so it has a mild nutty flavor and firm texture similar to lean ground beef. Crumble it into a stir fry, grill into patties whole, or cube it and marinate for a kebob, it can fill in with aplomb on most dishes.
Tofu -- Tofu is polarizing. People either love it or hate it, although most have only tried it a few times at best. There are different varieties, the most common are silken and regular tofu. Silken tofu is better for using in smoothies or baked goods and has a slippery feel, while regular tofu is more rough and granular but makes for a much better addition to savory dishes.
Silken tofu is best blended into other things, like aforementioned smoothies. It's often used in place of eggs in baked goods, and can be similarly scrambled like eggs for a breakfast dish.
Regular tofu is more appropriate for stir fries, salads, and other dishes where it's kept in larger pieces. It absorbs marinades and sauce flavors much better than silken tofu and retains its shape more. However, it can be slower to cook. To mimic the Chinese restaurant experience, cut your tofu into pieces the night before and freeze them in a ziploc. Fry the frozen pieces, being careful of any splattering from oil, and you'll have that signature chewy, delicious texture.
Nuts -- These can impart good fats along with protein in many dishes, they can be toasted or added raw. Crushed cashews are fantastic for thickening up sauces and soups, especially curries.
As for being a meat substitute, these are best used either as a topping or well blended with whole grains. They can add new dimensions to everything from casseroles to stir fries, just be careful not to overcook them.
Beans -- Similar to nuts, these are best used as an addition or filler to dishes with other flavorful agents. They're more versatile than nuts because they can be heated on a higher temperature for a longer time, although anything will burn if you really put your mind to it.
Some people prefer to use them whole, others like a refried or crushed version. For dishes like black bean burgers, crushed is best, but in soups, casseroles, or enchiladas, either whole or refried can work. Refried has a deceiving name, but it does not require a lot of extra fat to taste good.
Chickpeas -- These are extremely versatile, being used in batters to pizza crusts to salad toppings. They do well being marinated, pureed into hummus and batter, baked alongside other vegetables and absorbing their flavor, being a high protein topping to a salad, the list goes on. They do contain carbs, as do most things in life, but the fiber and protein of whole chickpeas offsets it in moderation.
Wild Rice -- This is one of my favorite additions to vegetarian soups, because it thickens and adds texture without being intrusive. It's not low carb, but it has enough protein to justify itself in moderate doses. I use it to thicken soups, and it's especially divine in chili. It can also be used with balsamic dressing and/or olive oil with herbs, fresh chopped vegetables, garlic, and brined cheeses like feta to make a portable cold salad. This also applies to whole grains like farro and quinoa.
Polenta -- Also not a member of the non low-carb family, but it's similar to pasta. I like it in breakfast hash in place of potatoes.
Seitan -- This is pure gluten. Yes, evil gluten! It's stretchier and spongier, so this works well sliced into thinner pieces and treated like stewed barbeque, or used in place of steak or shredded chicken and beef in tacos. It can hold onto a lot of flavor, it's best combined with vegetables or other sources of protein due to the texture. However, its ability to absorb sauces and marinades make it more versatile than meets the eye!
Soy meat substitutes -- This is probably the easiest. There are frozen ground beef substitutes, veggie burgers, and chicken patties available in nearly every grocery store that mimic the real thing so well you might never notice. But they tend to be higher in sodium, so just don't rely on meat substitutes too often.
As for more natural alternatives, tempeh is my personal favorite. It's quite versatile and there are different varieties available, usually various combinations of soy and whole grains. It's a block that's been fermented, so it has a mild nutty flavor and firm texture similar to lean ground beef. Crumble it into a stir fry, grill into patties whole, or cube it and marinate for a kebob, it can fill in with aplomb on most dishes.
Tofu -- Tofu is polarizing. People either love it or hate it, although most have only tried it a few times at best. There are different varieties, the most common are silken and regular tofu. Silken tofu is better for using in smoothies or baked goods and has a slippery feel, while regular tofu is more rough and granular but makes for a much better addition to savory dishes.
Silken tofu is best blended into other things, like aforementioned smoothies. It's often used in place of eggs in baked goods, and can be similarly scrambled like eggs for a breakfast dish.
Regular tofu is more appropriate for stir fries, salads, and other dishes where it's kept in larger pieces. It absorbs marinades and sauce flavors much better than silken tofu and retains its shape more. However, it can be slower to cook. To mimic the Chinese restaurant experience, cut your tofu into pieces the night before and freeze them in a ziploc. Fry the frozen pieces, being careful of any splattering from oil, and you'll have that signature chewy, delicious texture.
Nuts -- These can impart good fats along with protein in many dishes, they can be toasted or added raw. Crushed cashews are fantastic for thickening up sauces and soups, especially curries.
As for being a meat substitute, these are best used either as a topping or well blended with whole grains. They can add new dimensions to everything from casseroles to stir fries, just be careful not to overcook them.
Beans -- Similar to nuts, these are best used as an addition or filler to dishes with other flavorful agents. They're more versatile than nuts because they can be heated on a higher temperature for a longer time, although anything will burn if you really put your mind to it.
Some people prefer to use them whole, others like a refried or crushed version. For dishes like black bean burgers, crushed is best, but in soups, casseroles, or enchiladas, either whole or refried can work. Refried has a deceiving name, but it does not require a lot of extra fat to taste good.
Chickpeas -- These are extremely versatile, being used in batters to pizza crusts to salad toppings. They do well being marinated, pureed into hummus and batter, baked alongside other vegetables and absorbing their flavor, being a high protein topping to a salad, the list goes on. They do contain carbs, as do most things in life, but the fiber and protein of whole chickpeas offsets it in moderation.
Wild Rice -- This is one of my favorite additions to vegetarian soups, because it thickens and adds texture without being intrusive. It's not low carb, but it has enough protein to justify itself in moderate doses. I use it to thicken soups, and it's especially divine in chili. It can also be used with balsamic dressing and/or olive oil with herbs, fresh chopped vegetables, garlic, and brined cheeses like feta to make a portable cold salad. This also applies to whole grains like farro and quinoa.
Polenta -- Also not a member of the non low-carb family, but it's similar to pasta. I like it in breakfast hash in place of potatoes.
Seitan -- This is pure gluten. Yes, evil gluten! It's stretchier and spongier, so this works well sliced into thinner pieces and treated like stewed barbeque, or used in place of steak or shredded chicken and beef in tacos. It can hold onto a lot of flavor, it's best combined with vegetables or other sources of protein due to the texture. However, its ability to absorb sauces and marinades make it more versatile than meets the eye!
Friday, September 17, 2010
Heirloom Squash Risotto
Sorry about the lateness of this seasonal recipe, but summer squash is still coming in so it's versatile enough to make while the zucchini is cheap. I made this with a friend of mine using a few different varieties of squash, namely some heirloom patty pan varieties and good old zucchini. This is also a very easy recipe to keep vegan, just disregard the feta.
We used three heirlooms and a zucchini cubed into bite sized pieces, so the measurement on the squash is estimated. This isn't baking so it doesn't have to be exact. I estimate we had about four cups cubed, but it was also a large batch.
You will need:
4 cups cubed various squash
1 bowl cold salted water
3 quarts mock chicken broth (obviously you can use regular chicken broth, but this is what we used to keep it veg)
1/2 lb arborio rice
4 tbsp olive oil
1 medium white onion, chopped
1/2 cup white wine (optional)
1 tsp red chili flakes
1/3 cup chopped red basil
1 tsp lemon juice OR 1/4 teaspoon lemon zest
salt to taste
1/2 to 1 lb sheep's feta (optional)
Begin by slicing the squash into bite sized cubes. Be careful and use a sharp knife, especially when working with larger squash. Put the cubes in the salt water and begin heating the stock in a large pot over medium-low.
Preheat another large pot to medium, ideally with the stock on the back burner and the new pot on the front to prevent mess. Throw in the olive oil and onions and stir frequently until they become translucent and floppy, for lack of a better word. Add the rice and continue to stir until the rice just barely begins to brown, then step back and add the wine. Often there will be a loud hiss or spatter when the wine hits the pot so you don't want to be facing down into it while you do this.
Stir quickly and as soon as most of the liquid has been absorbed by the rice, add about half a cup of broth and stir. Some people believe constant stirring is absolutely crucial, but I have not found that to be the case. However, you definitely want to give it a good stir every 30 to 60 seconds. Continue adding broth, stirring until thick and adding more until you're about halfway through the broth. Drain the squash and add to the risotto along with another half cup of broth and the red chili flakes. Now for this part you want to stir continuously. Continue adding broth slowly...surely the idea is beginning to sink in now.
When you're about three cups of broth from the finish line throw in the basil and lemon. Finish it off, and the only way to do this is by taste. Take a fork and lift a few grains -- they should be al dente. If it's crunchy, heat up more broth and keep adding gradually until it hits the point of al dente (you can also use salted water if you're out). If it's overcooked it's not the end of the world, but you want to strive for that point of firmness with the grain of the arborio.
Turn off the heat and cover the pot, allow to set for about five to ten minutes. Serve with crumbled sheep's feta on top. This recipe serves about 8 people.
We used three heirlooms and a zucchini cubed into bite sized pieces, so the measurement on the squash is estimated. This isn't baking so it doesn't have to be exact. I estimate we had about four cups cubed, but it was also a large batch.
You will need:
4 cups cubed various squash
1 bowl cold salted water
3 quarts mock chicken broth (obviously you can use regular chicken broth, but this is what we used to keep it veg)
1/2 lb arborio rice
4 tbsp olive oil
1 medium white onion, chopped
1/2 cup white wine (optional)
1 tsp red chili flakes
1/3 cup chopped red basil
1 tsp lemon juice OR 1/4 teaspoon lemon zest
salt to taste
1/2 to 1 lb sheep's feta (optional)
Begin by slicing the squash into bite sized cubes. Be careful and use a sharp knife, especially when working with larger squash. Put the cubes in the salt water and begin heating the stock in a large pot over medium-low.
Preheat another large pot to medium, ideally with the stock on the back burner and the new pot on the front to prevent mess. Throw in the olive oil and onions and stir frequently until they become translucent and floppy, for lack of a better word. Add the rice and continue to stir until the rice just barely begins to brown, then step back and add the wine. Often there will be a loud hiss or spatter when the wine hits the pot so you don't want to be facing down into it while you do this.
Stir quickly and as soon as most of the liquid has been absorbed by the rice, add about half a cup of broth and stir. Some people believe constant stirring is absolutely crucial, but I have not found that to be the case. However, you definitely want to give it a good stir every 30 to 60 seconds. Continue adding broth, stirring until thick and adding more until you're about halfway through the broth. Drain the squash and add to the risotto along with another half cup of broth and the red chili flakes. Now for this part you want to stir continuously. Continue adding broth slowly...surely the idea is beginning to sink in now.
When you're about three cups of broth from the finish line throw in the basil and lemon. Finish it off, and the only way to do this is by taste. Take a fork and lift a few grains -- they should be al dente. If it's crunchy, heat up more broth and keep adding gradually until it hits the point of al dente (you can also use salted water if you're out). If it's overcooked it's not the end of the world, but you want to strive for that point of firmness with the grain of the arborio.
Turn off the heat and cover the pot, allow to set for about five to ten minutes. Serve with crumbled sheep's feta on top. This recipe serves about 8 people.
Sunday, January 3, 2010
Vegan Spiced Vanilla Kasha
Kasha was a dish I got very familiar with in Russia -- it's a hot cereal made from roasted buckwheat, usually cooked in milk. As someone excessively averse to sausages and other breakfast meats, this became my first meal of the day nearly every day for the second portion of the trip.
What was served, however, is not exactly this. This recipe is a professionalized version of what I mixed myself every morning in the cafeteria. The kasha served was bland and not quite salty, not quite sweet so I bought lot of vanilla sugar and cinnamon at the store and used them to add some flair.
I made mine in a rice cooker, but the same method would apply if you were using a large covered pot over medium-low heat.
Ingredients:
14 oz can regular coconut milk
2/3 cup sugar
1 tsp vanilla extract
2 tsp cinnamon
1 cup rinsed buckwheat grains
6 oz water
Set all ingredients to cook for 45 minutes on the stove top or however long specified by your rice cooker. With the exception of a dash of sugar, it shouldn't need anything else before serving.
What was served, however, is not exactly this. This recipe is a professionalized version of what I mixed myself every morning in the cafeteria. The kasha served was bland and not quite salty, not quite sweet so I bought lot of vanilla sugar and cinnamon at the store and used them to add some flair.
I made mine in a rice cooker, but the same method would apply if you were using a large covered pot over medium-low heat.
Ingredients:
14 oz can regular coconut milk
2/3 cup sugar
1 tsp vanilla extract
2 tsp cinnamon
1 cup rinsed buckwheat grains
6 oz water
Set all ingredients to cook for 45 minutes on the stove top or however long specified by your rice cooker. With the exception of a dash of sugar, it shouldn't need anything else before serving.
Friday, February 13, 2009
Candied Carrots and Beets in Red Currant Sauce
As I've said, I'm a sucker for a bargain. What I haven't said is that I'm a sucker for unique berries. I've always been a fan of huckleberries and boysenberries since I picked them from the bushes at my grandmother's house. I saw these small, ruby red berries on special and saw that they were red currants. I immediately thought of black currants and threw them in my cart.
When I got home I tasted them and was unprepared for the tart flavor. It wasn't as bad as a raw cranberry, but still sour. I also had these beautiful beets and carrots waiting to be used, and thought it might be a good alternative to the sour flavor of lemon in a more sweet dish. Thus, this was born.
Ingredients:
2 large beets, about the size of a softball each
6 small carrots or 4 medium ones, chopped into bite sized pieces
1/3c sugar
1 tsp ginger
1 tsp cinnamon
1 box red currants, about 6 oz
Bring a large pot of water to a boil. Cut the tops off the beets and slice them into quarters. Allow to boil for about 20 minutes, then add the carrots to the boiling water. Boil for 15-20 minutes longer. Drain and allow to cool. Running under cold water, pull the skin off the beets. Slice them into bite sized pieces as well.
Preheat the oven to 400 degrees. Pull the currants off of their stems and rinse well. Combine with the sugar, ginger and cinnamon in a small saucepan over medium heat until it becomes syrupy, toss with the beets and carrots in a casserole dish. Bake for around 20 minutes or until it bubbles. Remove from the oven and allow to cool. Serve with chilled sour cream.
When I got home I tasted them and was unprepared for the tart flavor. It wasn't as bad as a raw cranberry, but still sour. I also had these beautiful beets and carrots waiting to be used, and thought it might be a good alternative to the sour flavor of lemon in a more sweet dish. Thus, this was born.
Ingredients:
2 large beets, about the size of a softball each
6 small carrots or 4 medium ones, chopped into bite sized pieces
1/3c sugar
1 tsp ginger
1 tsp cinnamon
1 box red currants, about 6 oz
Bring a large pot of water to a boil. Cut the tops off the beets and slice them into quarters. Allow to boil for about 20 minutes, then add the carrots to the boiling water. Boil for 15-20 minutes longer. Drain and allow to cool. Running under cold water, pull the skin off the beets. Slice them into bite sized pieces as well.
Preheat the oven to 400 degrees. Pull the currants off of their stems and rinse well. Combine with the sugar, ginger and cinnamon in a small saucepan over medium heat until it becomes syrupy, toss with the beets and carrots in a casserole dish. Bake for around 20 minutes or until it bubbles. Remove from the oven and allow to cool. Serve with chilled sour cream.
Friday, December 12, 2008
Beet Salad
As a part of a dinner party at my parents' house one of their friends brought this dish and I was heartily impressed. I'm not too familiar with beets but after trying this at home I'm definitely going to have to use them more often. It's a bit labor intensive with the boiling, peeling and pickling but it's worth it -- just trust me on this one. This is a great pre-workout meal because it gives a nice burst of energy without being heavy or greasy.
The key to this dish are the preserved lemons, without which it might taste pretty boring. They take from 3 to 7 days to make and last up to a year in your fridge; I will be including more recipes containing them since I have a jar waiting for me!
Lastly, this recipe can easily be made vegan by substituting soy cheese or nuts for the feta. The primary effect is textural so feel free to experiment.
To preserve lemons:
6-10 medium lemons
kosher salt (just buy a can of it, you won't need the whole thing but you need a lot)
a quart mason jar or tupperware
Slice the ends off the lemons and juice them into the jar, there's no need to pickle them. Slice the lemons thinly and create a layer then a layer of salt (a few tablespoons). Do this until you've used up all the lemons. Some people might add vinegar but I think they're fine without it, fill the jar with just enough water to cover the lemons. Let them chill in the fridge for three to seven days, shaking every few days to dissolve the salt.
Salad:
3 medium sized beets
2 bartlett pears
around 1/2-3/4c crumbled feta or cubed ricotta salata
Chop the the tops off the beets and boil for twenty to thirty minutes. Remove from the water and allow to cool. Peel them over a sink, this can get messy so I suggest using gloves. Follow up by julienning the beets, or slicing into long, thin strips. Chop the pears in a similar fashion, I don't peel mine. Add the cheese and then bring out your preserved lemons. The membrane and rind aren't needed so free up the pulp, similar to a relish. Add to the pears and beets and toss -- everything will turn red, but it will taste delicious :)
The key to this dish are the preserved lemons, without which it might taste pretty boring. They take from 3 to 7 days to make and last up to a year in your fridge; I will be including more recipes containing them since I have a jar waiting for me!
Lastly, this recipe can easily be made vegan by substituting soy cheese or nuts for the feta. The primary effect is textural so feel free to experiment.
To preserve lemons:
6-10 medium lemons
kosher salt (just buy a can of it, you won't need the whole thing but you need a lot)
a quart mason jar or tupperware
Slice the ends off the lemons and juice them into the jar, there's no need to pickle them. Slice the lemons thinly and create a layer then a layer of salt (a few tablespoons). Do this until you've used up all the lemons. Some people might add vinegar but I think they're fine without it, fill the jar with just enough water to cover the lemons. Let them chill in the fridge for three to seven days, shaking every few days to dissolve the salt.
Salad:
3 medium sized beets
2 bartlett pears
around 1/2-3/4c crumbled feta or cubed ricotta salata
Chop the the tops off the beets and boil for twenty to thirty minutes. Remove from the water and allow to cool. Peel them over a sink, this can get messy so I suggest using gloves. Follow up by julienning the beets, or slicing into long, thin strips. Chop the pears in a similar fashion, I don't peel mine. Add the cheese and then bring out your preserved lemons. The membrane and rind aren't needed so free up the pulp, similar to a relish. Add to the pears and beets and toss -- everything will turn red, but it will taste delicious :)
Saturday, September 20, 2008
Real Fruit Smoothie
Fruit smoothies have gotten a bad rap with all of the syrupy, chunky gunky drinks being churned out by chain restaurants and smoothie stands. Or they've been labeled as tasteless and bland by those who have been browbeaten into drinking the watery slush handed to them. I was looking at a load of seasonal fruits my mom sent me home with and decided to do something different and this creation was born. It is positively delicious and takes about 15 minutes to throw together.
You will need:
3 small or 2 medium apples, cored and chopped but not peeled
2 medium pears, chopped into chunks but again, not peeled
1 asian pear, chopped and not peeled
1/3c grape juice
1/4c agave nectar
The first step is to refridgerate your fruit and juice, this way you don't have to use ice and don't wind up with a watery smoothie. Put everything in a blender and pulse until the chunks of fruit have been broken up, then puree until smooth. It's important to keep the skins on the fruit so you get all that nutrition and fiber, make sure you blend well. Pour into a glass and enjoy :)
You will need:
3 small or 2 medium apples, cored and chopped but not peeled
2 medium pears, chopped into chunks but again, not peeled
1 asian pear, chopped and not peeled
1/3c grape juice
1/4c agave nectar
The first step is to refridgerate your fruit and juice, this way you don't have to use ice and don't wind up with a watery smoothie. Put everything in a blender and pulse until the chunks of fruit have been broken up, then puree until smooth. It's important to keep the skins on the fruit so you get all that nutrition and fiber, make sure you blend well. Pour into a glass and enjoy :)
Wednesday, August 20, 2008
10-Minute Marinara
My post of Classic Marinara is indeed a winner, but most women don't have hours to spare marinating and firing tomatoes. I decided to include this recipe because it requires minimal effort and is cheap, cheap CHEAP to make. It also tastes great! Prep time is about 10 minutes, cooking time is 45 but doesn't require much of a watchful eye.
10 Minute Marinara:
28 oz can of diced tomatoes
5-6 large basil leaves (or 1tbsp dried)
1.5tbsp oregano
3 cloves garlic, finely chopped
1 tsp salt
dash of chili powder
2 tbsp olive oil
Squish the tomatoes well with your fingers, throwing out stems. Add the spices and oil and simmer for 45 minutes or until most of the moisture has evaporated. I prefer to keep mine a bit runny so the grease doesn't take over. Serve and enjoy!
10 Minute Marinara:
28 oz can of diced tomatoes
5-6 large basil leaves (or 1tbsp dried)
1.5tbsp oregano
3 cloves garlic, finely chopped
1 tsp salt
dash of chili powder
2 tbsp olive oil
Squish the tomatoes well with your fingers, throwing out stems. Add the spices and oil and simmer for 45 minutes or until most of the moisture has evaporated. I prefer to keep mine a bit runny so the grease doesn't take over. Serve and enjoy!
Fake Chicken Salad
This is an oldie but a goody. My mom came up with this when I went through my hardcore vegan phase in high school -- that only lasted a few months, but I still make this years later. I dare you to serve this to your meat loving, vegetarian hating friends..I haven't had any complaints yet! I'm including the tofu but this recipe is fine without it, I think it adds a more interesting texture to have a mix of tofu and tempeh.
Fake Chicken Salad:
1.5c cubed tempeh (I use 5-grain)
1c cubed extra firm tofu
3/4c veganaise
1/3c diced celery
1 tbsp mustard
1/4tsp black pepper
1 avocado, cubed (optional)
Combine the veganaise, mustard and pepper. Add the tempeh then the tofu. Drop the avocado bits on top, roll into a tortilla or sandwich and enjoy!
Fake Chicken Salad:
1.5c cubed tempeh (I use 5-grain)
1c cubed extra firm tofu
3/4c veganaise
1/3c diced celery
1 tbsp mustard
1/4tsp black pepper
1 avocado, cubed (optional)
Combine the veganaise, mustard and pepper. Add the tempeh then the tofu. Drop the avocado bits on top, roll into a tortilla or sandwich and enjoy!
Friday, May 23, 2008
Famous Egg Rolls
I'll begin this one with a disclaimer: this isn't a light dish. It's vegetarian and only uses vegetable oil, but through trial and many errors I've found there are few ways to successfully make an egg roll, and only one way to make a great egg roll. Deep frying is required, although you can make do by pan frying. Still, deep frying is easier and preserves better.
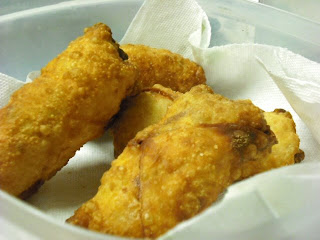
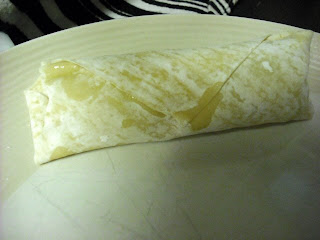

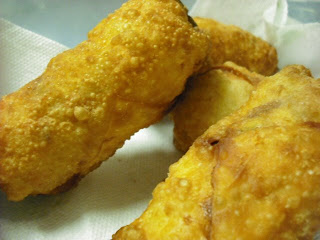
Aside from being fried these are phenomenal. One recipe tends to make a lot so they're good for bringing to parties or for an especially big dinner crowd. I like to serve them with tamari, but any kind of dipping sauce works.
Veggie Egg Rolls:
1 package (15 count) egg roll wraps
1 quart veg oil, for frying
1 beaten egg
Filling:
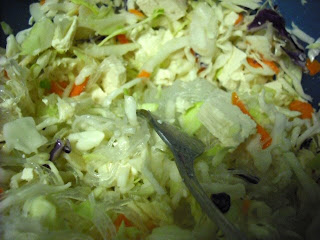
1/2 cabbage, shredded (I used a mix of red and green cabbage)
1 nest cooked sai fun
1/2lb cubed tofu
1 shredded carrot
1/2 small onion, finely diced
1 tbsp kosher salt
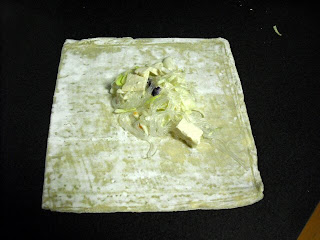
Combine ingredients in a large bowl. Put a few tablespoons of filling into the center of the wrap.
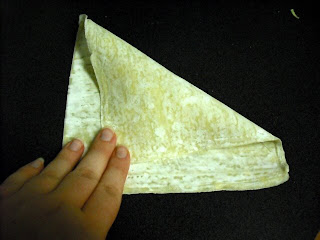
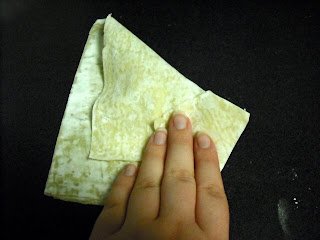
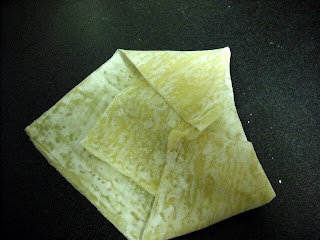
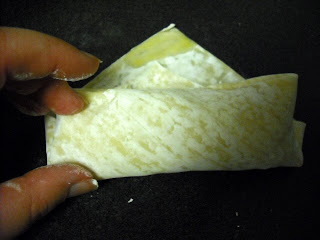
Fold the right corner of the wrap over to the left, the top and bottom corners to the center, and roll toward the furthest left edge. Use a little egg as a glue to hold the edges together. Finish the rest of the egg rolls.
Place a fryer into the oil and slide one of the egg rolls in. Let it cook for 2-3 minutes, then flip to the other side to brown. Remove from oil onto paper towels. Repeat for each egg roll.
Allow to cool for a few moments and serve.
Tuesday, May 20, 2008
Southwest Salsa
This is one of my favorite salsa recipes because it's easy, the ingredients can be found in any grocery store, and it contains enough different flavors to put plain tomato salsa to shame. I encourage everyone to use as fresh of ingredients as they can find, but the only place where it really makes a difference is in the cilantro and tomatoes. Since I can't stand tomato seeds I pit mine beforehand, but if you don't mind them it doesn't make much of a difference. Enjoy!
Southwest Black Bean Salsa:
15 oz kidney beans
15 oz black beans
15 oz fresh or canned corn
1/2c chopped onion
2 tbsp finely chopped jalapenos
1 tbsp chopped fresh cilantro
1tsp vinegar
1 chipotle pepper, very finely chopped (one can usually contains 4-5 peppers)
15 oz diced tomatoes
3 cloves garlic, finely chopped
1/2 tbsp salt
Combine all ingredients. Allow to chill overnight. Who knew it could be this easy?!
Southwest Black Bean Salsa:
15 oz kidney beans
15 oz black beans
15 oz fresh or canned corn
1/2c chopped onion
2 tbsp finely chopped jalapenos
1 tbsp chopped fresh cilantro
1tsp vinegar
1 chipotle pepper, very finely chopped (one can usually contains 4-5 peppers)
15 oz diced tomatoes
3 cloves garlic, finely chopped
1/2 tbsp salt
Combine all ingredients. Allow to chill overnight. Who knew it could be this easy?!
Wednesday, May 7, 2008
Vegetable Sai Fun (Stir Fry Noodles)
I LOVE sai fun! Also known as bean threads, mung bean noodles, glass noodles, or Chinese vermicelli, these are delicate clear noodles that cook quickly and absorb flavors fabulously. They can be used in darn near anything -- as noted, I love to use them in spring and egg rolls. This could also be called my "everything" stir fry, since the concept originated in a rush of leftover fried rice and precooked sai fun.
This can be made with or without rice. I definitely wouldn't advocate making a fresh batch of it just for this recipe; it can spruce up the texture if you have some leftovers though.
Vegetable Sai Fun:
3 nests sai fun (apx. 1 1/2c cooked)
1/2 lb extra firm tofu, cubed
2tbsp olive oil
1/3c chopped water chestnuts
1/3c peas
1 grated carrot
1c raw chopped cabbage
4 oz can bamboo shoots
1/4c chopped onion
2 cloves garlic, finely chopped
2 tbsp tamari or soy sauce
1/2c cooked rice (optional)
Boil sai fun for 3-5 minutes or until soft. Strain and remove from heat. Steam cabbage and onion until softened, apx 5-10 minutes. Saute tofu with olive oil, garlic and tamari until lightly browned in a large skillet or wok. Add cooked sai fun and all other ingredients over medium heat, toss with spatula every few minutes until noodles start to become crispy and brown, apx. 15-20 minutes. Serve hot with tamari or schezuan sauce for a spicier taste.
This can be made with or without rice. I definitely wouldn't advocate making a fresh batch of it just for this recipe; it can spruce up the texture if you have some leftovers though.
Vegetable Sai Fun:
3 nests sai fun (apx. 1 1/2c cooked)
1/2 lb extra firm tofu, cubed
2tbsp olive oil
1/3c chopped water chestnuts
1/3c peas
1 grated carrot
1c raw chopped cabbage
4 oz can bamboo shoots
1/4c chopped onion
2 cloves garlic, finely chopped
2 tbsp tamari or soy sauce
1/2c cooked rice (optional)
Boil sai fun for 3-5 minutes or until soft. Strain and remove from heat. Steam cabbage and onion until softened, apx 5-10 minutes. Saute tofu with olive oil, garlic and tamari until lightly browned in a large skillet or wok. Add cooked sai fun and all other ingredients over medium heat, toss with spatula every few minutes until noodles start to become crispy and brown, apx. 15-20 minutes. Serve hot with tamari or schezuan sauce for a spicier taste.
Friday, May 2, 2008
Classic Marinara
Ah, marinara sauce. One of the essentials of a kitchen, it remains a mystery in a glass jar for most. I decided to give it a whirl after reading up on the basics and consulting my mom, who is also a fan of cooking fresh foods. It took a few tries but this is the method I've found that produces the most flavorful, full bodied sauce.
Note that the wine in the final step is critical -- quality doesn't necessarily matter, but the type you use will affect the end product. White wine tends to create a mild orange marinara, comparable to a lean vodka sauce. Red wine will produce a deep burgundy or bright red spicy sauce depending on which you choose; zinfandel produces the darkest sauce, while pinot noir creates a zesty "summertime" marinara.
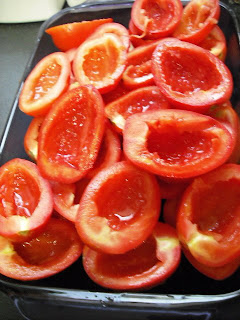
The first step is roasting the tomatoes. To pit them, slice each in half and use a spoon to scoop out the seeds.
Roasted tomatoes:
3 lbs roma tomatoes, pitted
1/2c olive oil
1 bulb garlic, finely chopped
1 small onion, finely chopped
1 tbsp thyme
2-3 tbsp oregano
3 tbsp basil
1/4 tsp chili powder
2 tbsp kosher salt
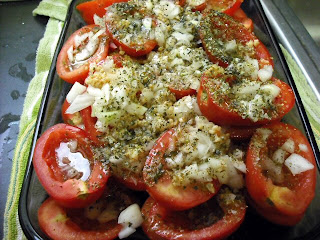
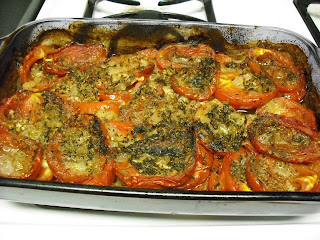
Preheat oven to 300. Place tomatoes pitted side-up in a large baking pan, combine garlic onion spices and salt and sprinkle over tomatoes. Drizzle with olive oil. Cover the pan with tin foil and let simmer for 2 1/2 hours. Crank the heat up to 500 for 25 more minutes, and remove to cool.
Sauce:
1/2c wine of choice
2 tbsp tomato paste
Take roasted tomatoes and blend in a food processor for 15-30 seconds, or until pureed. Note that there should be some olive oil and spices left in the pan; these are great served with fresh bread, so don't blend them in or chuck them out. Simmer the processed tomatoes in a saucepan with paste, add wine and stir often for 20-30 minutes. Serve fresh.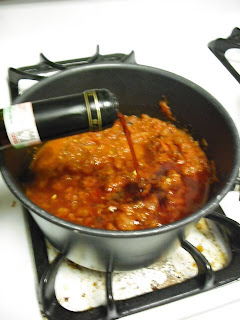

Note that the wine in the final step is critical -- quality doesn't necessarily matter, but the type you use will affect the end product. White wine tends to create a mild orange marinara, comparable to a lean vodka sauce. Red wine will produce a deep burgundy or bright red spicy sauce depending on which you choose; zinfandel produces the darkest sauce, while pinot noir creates a zesty "summertime" marinara.
The first step is roasting the tomatoes. To pit them, slice each in half and use a spoon to scoop out the seeds.
Roasted tomatoes:
3 lbs roma tomatoes, pitted
1/2c olive oil
1 bulb garlic, finely chopped
1 small onion, finely chopped
1 tbsp thyme
2-3 tbsp oregano
3 tbsp basil
1/4 tsp chili powder
2 tbsp kosher salt
Preheat oven to 300. Place tomatoes pitted side-up in a large baking pan, combine garlic onion spices and salt and sprinkle over tomatoes. Drizzle with olive oil. Cover the pan with tin foil and let simmer for 2 1/2 hours. Crank the heat up to 500 for 25 more minutes, and remove to cool.
Sauce:
1/2c wine of choice
2 tbsp tomato paste
Take roasted tomatoes and blend in a food processor for 15-30 seconds, or until pureed. Note that there should be some olive oil and spices left in the pan; these are great served with fresh bread, so don't blend them in or chuck them out. Simmer the processed tomatoes in a saucepan with paste, add wine and stir often for 20-30 minutes. Serve fresh.
Back In Action with Spring Rolls
I know I've been MIA for the last few months -- moving sure can be hectic! But I've mastered my new kitchen and learned to make LOTS of yummy things that I'll be posting (along with photos!) It's amazing what one can learn in 2 months, eh?
I'll start the spring/summer food season with a fresh classic: spring rolls. In my egg roll adventure, which I'll elaborate on soon, I had a crisis in the grocery store. There were no egg roll wraps to be found. I wasn't going to let that defeat me, so in scouring the Asian foods section, I found "spring roll skins". Needless to say, I couldn't wait to get home and try them out!
Spring roll skins are interesting things. They come in a plastic round container and reminded me a bit of those big lenses we would play with in science class. In my initial attempt, I tried to fry the spring rolls. It wasn't a complete disaster but came close -- because the skins are so fragile and damp, they tend to bubble and pop in oil. I wound up double wrapping my rolls, which tasted fine but had a rather sticky texture.
Speaking of which, these skins can be super adhesive, so work with them with wet hands. The best way to prepare them is to get a cake pan or large skillet with hot (not boiling) water, and immerse the skins individually for about 15 seconds. Take them out, and you're ready to roll!
BASIC VEGGIE SPRING ROLLS:
Filling:
1/2 small head cabbage, chopped
~ 1/2 lb of tofu, cubed
1 grated carrot
1 nest mung bean threads (also known as sai fun, check Asian markets or the Asian foods section of your grocery store)
1c cooked sushi rice (optional)
1-2 tbsp salt to taste
*note - I like to keep some filling in a tupperware container ready-made, so chances are good you'll have some leftovers here. They can be frozen if you don't plan to use it up within a few days.
Take the veggies and bean noodles and lightly steam for a few minutes to soften. Combine your filling ingredients in a large bowl with a fork, you may want to chop the noodles into 3-4 sections to make this easier. With your prepared spring roll skin on a flat surface, put a few tablespoons of filling in the center of the skin. Take the left edge of the skin and fold over to the right -- imagine the filling is a "baby" and you're tucking it in. Fold the top and bottom ends toward the center, and roll the rest of the skin to the right.

photo courtesy of Jolinda Hackett
I recommend serving these fresh with tamari on the side, but any kind of sauce will do. Photos and nutritional info coming soon!
I'll start the spring/summer food season with a fresh classic: spring rolls. In my egg roll adventure, which I'll elaborate on soon, I had a crisis in the grocery store. There were no egg roll wraps to be found. I wasn't going to let that defeat me, so in scouring the Asian foods section, I found "spring roll skins". Needless to say, I couldn't wait to get home and try them out!
Spring roll skins are interesting things. They come in a plastic round container and reminded me a bit of those big lenses we would play with in science class. In my initial attempt, I tried to fry the spring rolls. It wasn't a complete disaster but came close -- because the skins are so fragile and damp, they tend to bubble and pop in oil. I wound up double wrapping my rolls, which tasted fine but had a rather sticky texture.
Speaking of which, these skins can be super adhesive, so work with them with wet hands. The best way to prepare them is to get a cake pan or large skillet with hot (not boiling) water, and immerse the skins individually for about 15 seconds. Take them out, and you're ready to roll!
BASIC VEGGIE SPRING ROLLS:
Filling:
1/2 small head cabbage, chopped
~ 1/2 lb of tofu, cubed
1 grated carrot
1 nest mung bean threads (also known as sai fun, check Asian markets or the Asian foods section of your grocery store)
1c cooked sushi rice (optional)
1-2 tbsp salt to taste
*note - I like to keep some filling in a tupperware container ready-made, so chances are good you'll have some leftovers here. They can be frozen if you don't plan to use it up within a few days.
Take the veggies and bean noodles and lightly steam for a few minutes to soften. Combine your filling ingredients in a large bowl with a fork, you may want to chop the noodles into 3-4 sections to make this easier. With your prepared spring roll skin on a flat surface, put a few tablespoons of filling in the center of the skin. Take the left edge of the skin and fold over to the right -- imagine the filling is a "baby" and you're tucking it in. Fold the top and bottom ends toward the center, and roll the rest of the skin to the right.

photo courtesy of Jolinda Hackett
I recommend serving these fresh with tamari on the side, but any kind of sauce will do. Photos and nutritional info coming soon!
Subscribe to:
Posts (Atom)